
How to Use GitHub Actions: A Step-by-Step Tutorial
How to Use GitHub Actions: A Step-by-Step Tutorial
What are GitHub Actions?
GitHubActions is a robust automation tool integrated into GitHub, allowing developers to automate, tailor, and run development workflows directly within their repositories. They facilitateCI/CD (continuous integration and continuous delivery/deployment)on GitHub, empowering teams to build, test, and deploy their code automatically whenever a code change is made.
GitHub Actions streamlines development processes by allowing us to define our workflow, which makes automation highly flexible and readable. They tightly integrate with the rest of the GitHub ecosystem, making them a natural choice for teams already using GitHub for version control.
Key features
The several key features of GitHub Actions include:
- Native GitHub integration: Seamlessly trigger workflows on events like push, pull requests, and issue creation.
- Matrix builds: Run parallel jobs for different OS orNode.jsversions.
- Marketplace: Access thousands of pre-built actions.
- Self-hosted runners: Run workflows on our own infrastructure.
- Secrets management: Store API tokens or sensitive data securely.
Next, we’ll go through the step-by-step process of creating a GitHub Action locally.
How to create a GitHub Action
There are two methods to create a GitHub Action:
- Using GitHub UI
- Using a local development environment
Let’s dive into these methods one by one.
Create a GitHub Action using GitHub UI
Follow the step-by-step process to create a GitHub Action using GitHub UI:
Step 1: Navigate to the target repository and click onActionslocated at the top navbar.
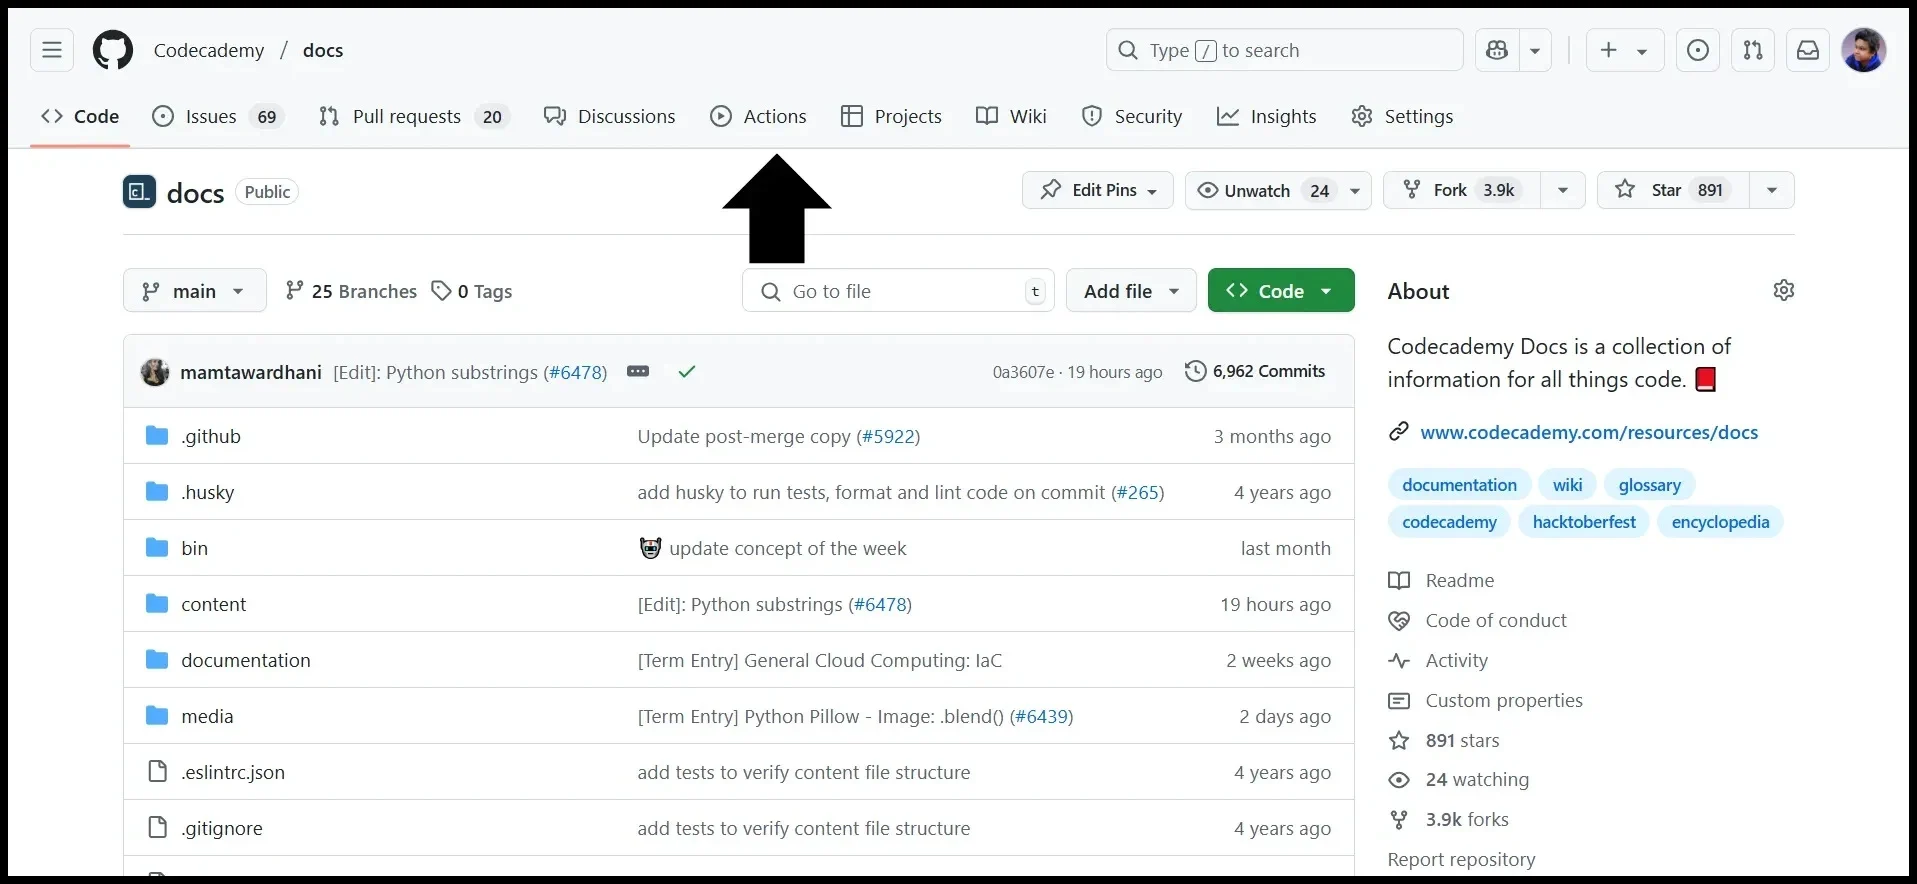
Step 1: Click on 'Actions' to go to the 'Actions' tab
Step 2: Click onNew workflowto create a new GitHub Actions workflow.
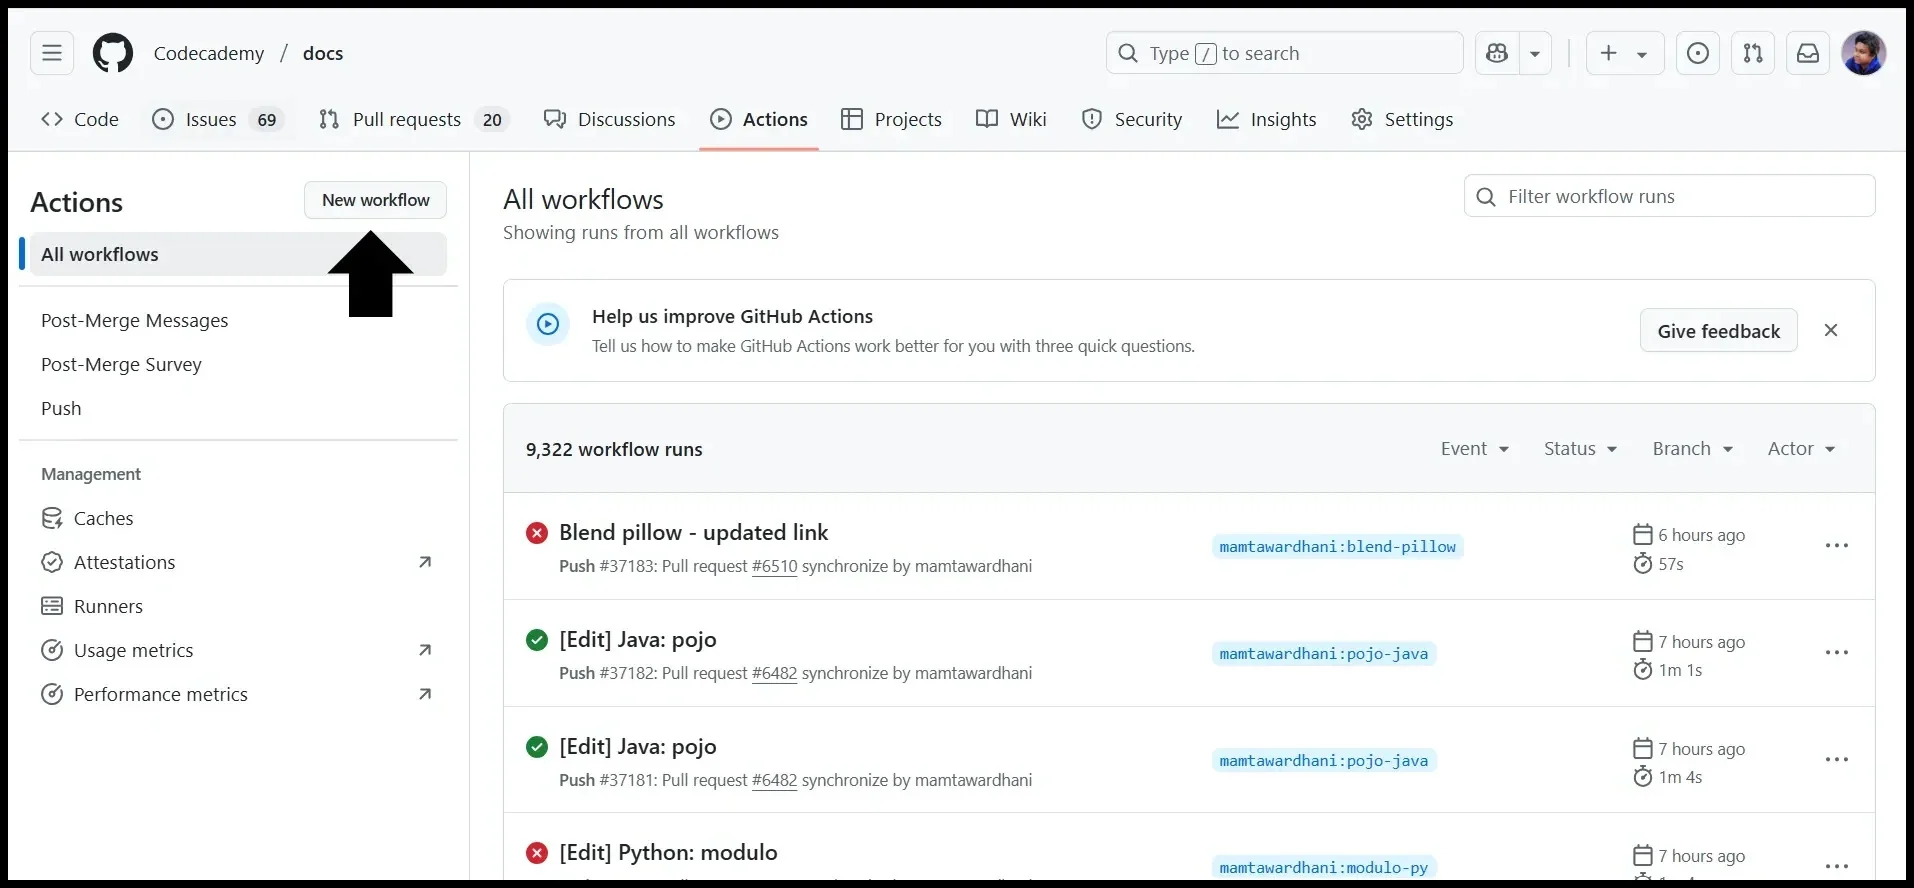
Step 2: Click on 'New workflow' to create a new GitHub Actions workflow
Step 3: On the page that appears, we will find a list of workflows suggested by GitHub for our repository. In this case, typeSimple workflowin the search bar and hitEnter.
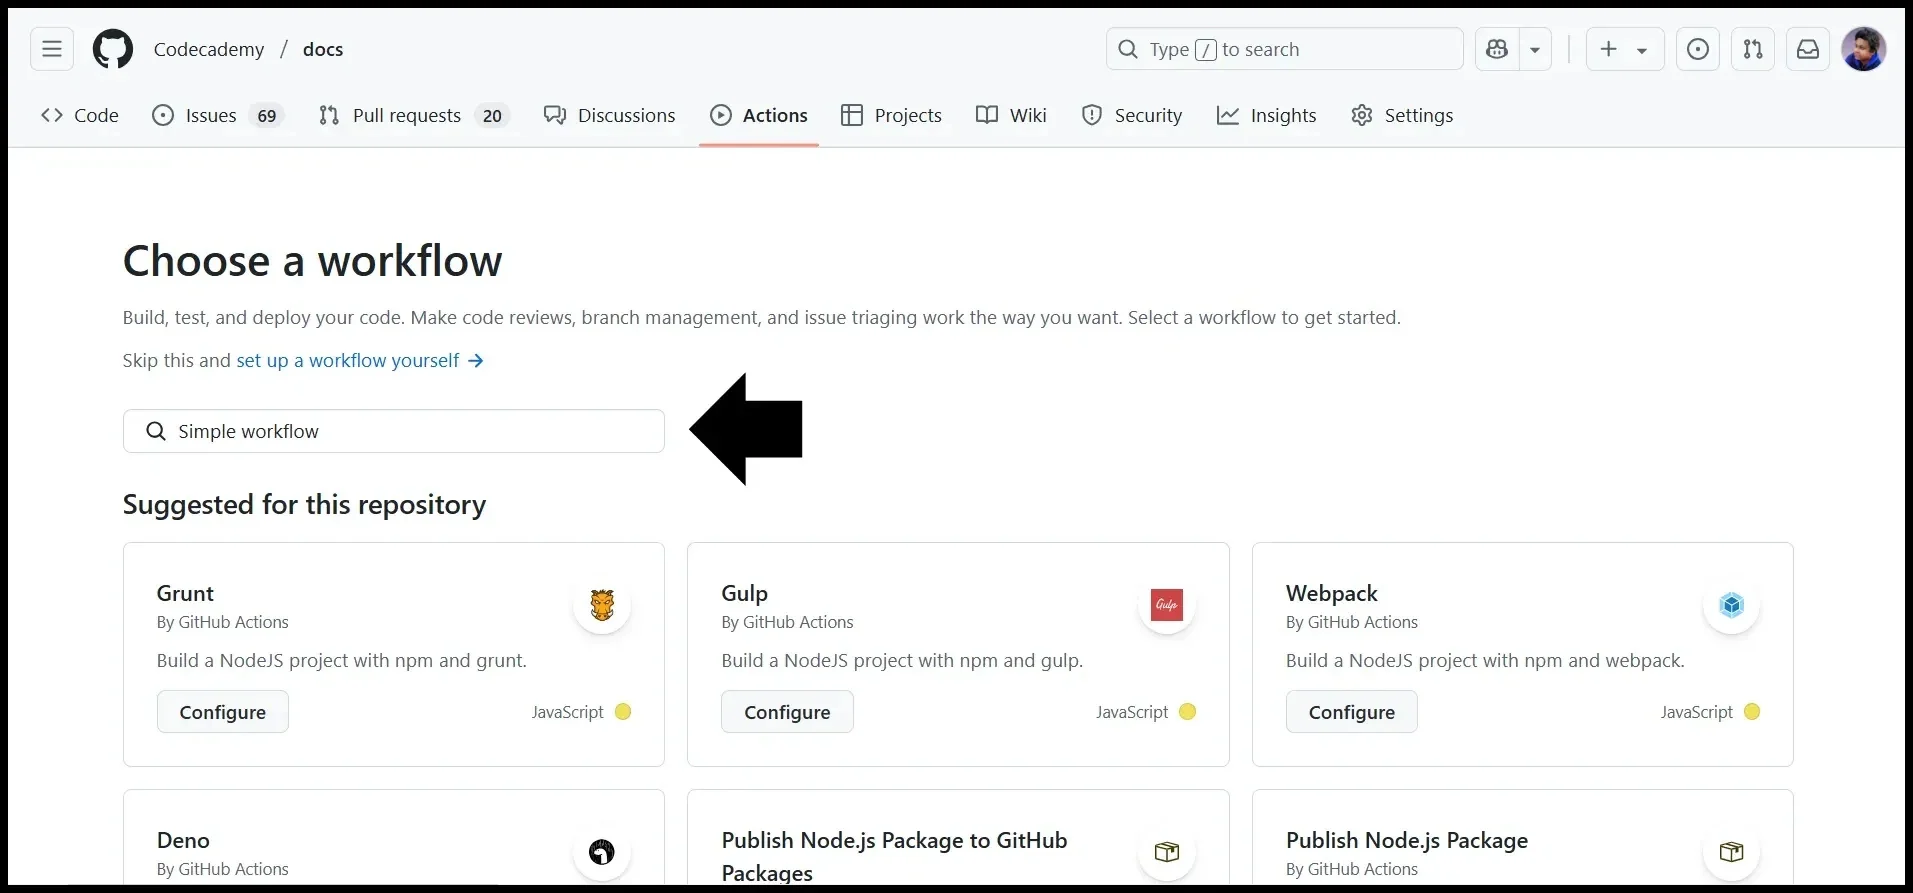
Step 3: Type 'Simple workflow' in the search bar
Step 4: The workflow namedSimple workflowappears. This workflow creates a.github/workflowsfolder and adds a .yml file to it containing the minimum necessary workflow structure. Click onConfigureto proceed to the configuration page.
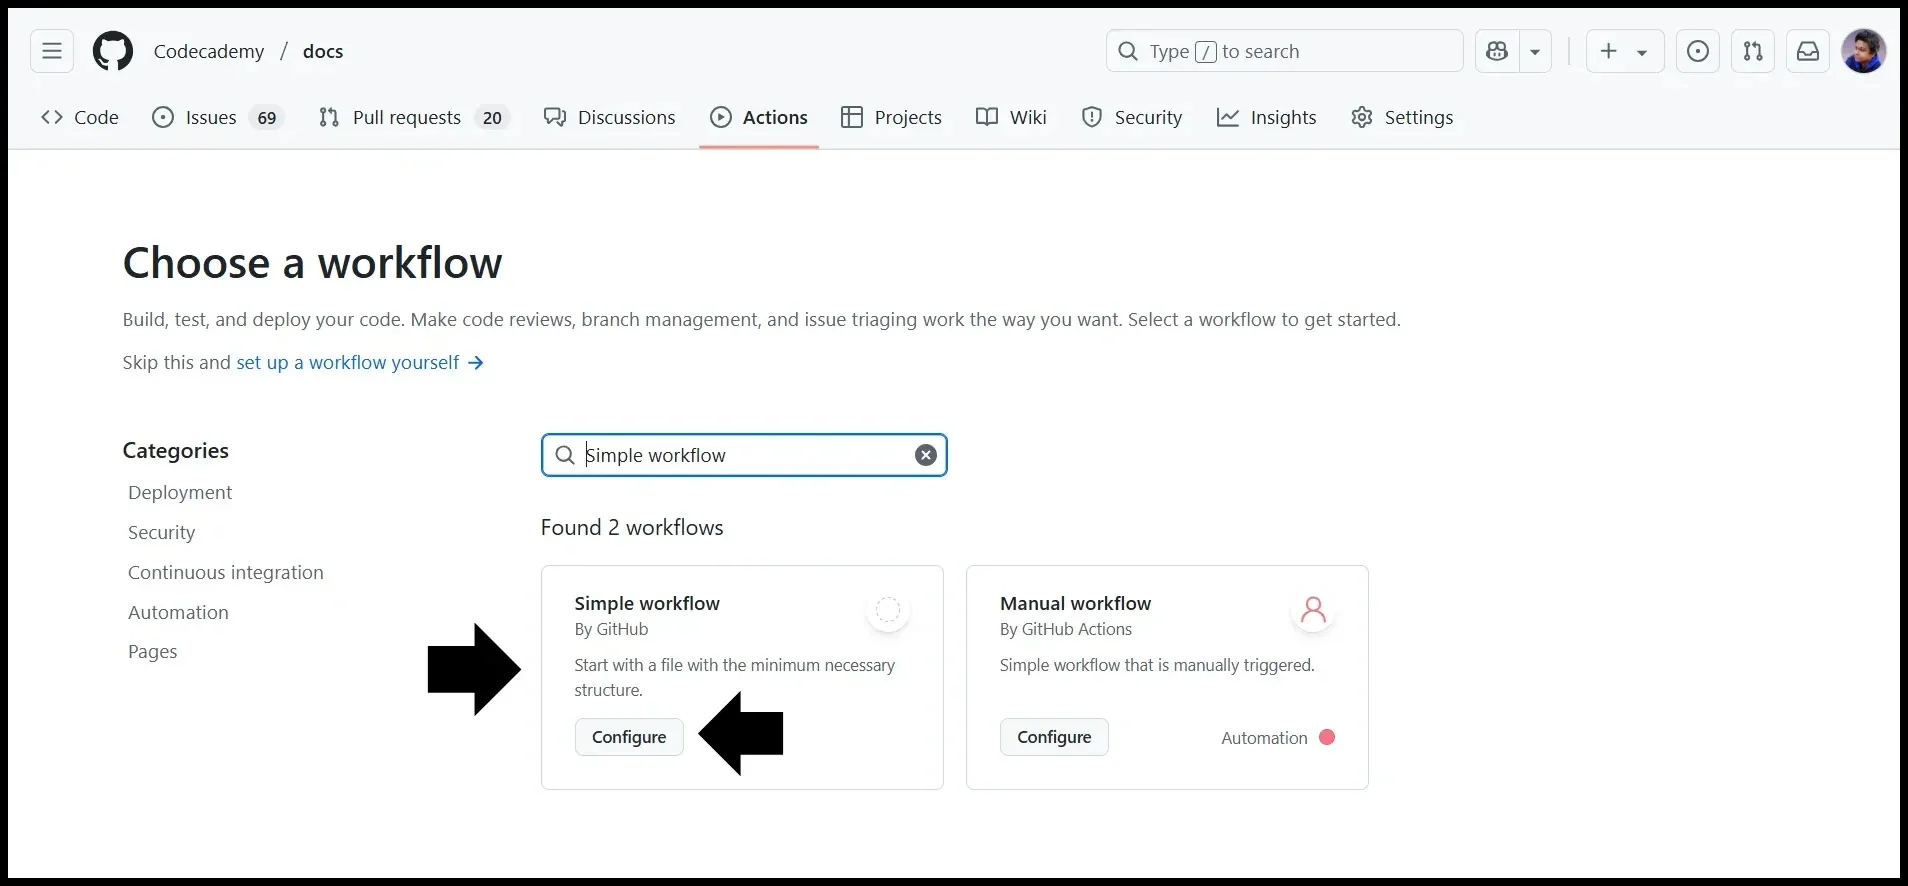
Step 4: Click on 'Configure' in the 'Simple workflow' card to go to the configuration page
Step 5: The configuration page allows us to modify the workflow structure, change the file name, and commit the changes. In this case:
- Change the given workflow to the one provided after the image
- Change the file name tohello-world.yml
- Click onCommit changesto commit the changes
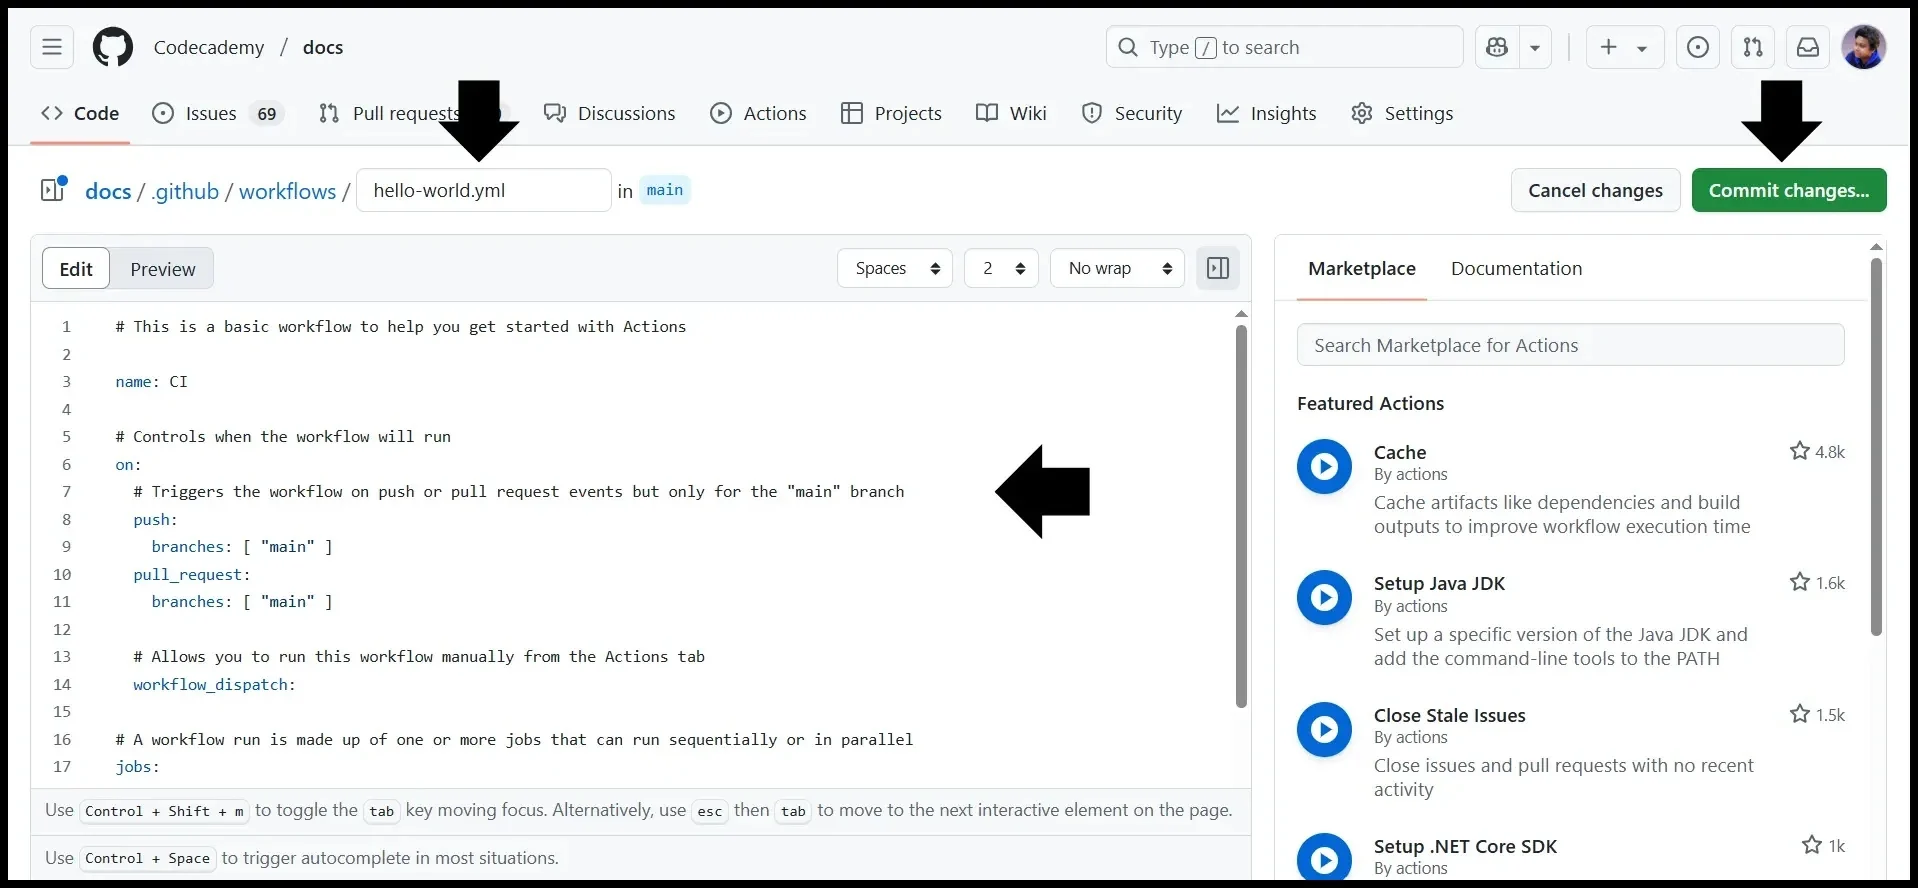
Step 5: Change the structure and file name in the configuration page, and click on 'Commit changes'
Here is the workflow:
name: Hello Worldon:  - pushjobs:  say-hello:    runs-on: ubuntu-latest    steps:      - name: Checkout code        uses: actions/checkout@v4      - name: Say Hello        run: echo "Hello, World!"
Copy to clipboard
name: Hello Worldon: - pushjobs: say-hello: runs-on: ubuntu-latest steps: - name: Checkout code uses: actions/checkout@v4 - name: Say Hello run: echo "Hello, World!"This workflow prints “Hello, World!” to the job logs whenever code is pushed to the repository.
We’re now done creating the GitHub Action workflow using GitHub UI. However, we can create the same workflow locally as well.
In the next section, we’ll go through the step-by-step process of creating a GitHub Action locally.
Create a GitHub Action locally
The first step is to navigate to the target local repository:
cd docs
Copy to clipboard
cd docsAfter that, open theterminaland run these commands to create and navigate to the folder.github/workflows:
mkdir .github/workflowscd .github/workflows
Copy to clipboard
mkdir .github/workflowscd .github/workflowsThen, create a new file namedhello-world.yml:
touch hello-world.yml
Copy to clipboard
touch hello-world.ymlNext, open the file in Nano, a useful command-line editor:
nano hello-world.yml
Copy to clipboard
nano hello-world.ymlAfter opening the file, insert this content into it:
name: Hello Worldon:  - pushjobs:  say-hello:    runs-on: ubuntu-latest    steps:      - name: Checkout code        uses: actions/checkout@v4      - name: Say Hello        run: echo "Hello, World!"
Copy to clipboard
Once done, hitCtrl+Xto exit,Yto save the changes, andEnterto keep the file name as it is and return to the regular terminal mode.
Finally,addandcommitthe changes:
git add .github/workflows/hello-world.ymlgit commit -m “Add a GitHub Actions workflow”
Copy to clipboard
git add .github/workflows/hello-world.ymlgit commit -m “Add a GitHub Actions workflow”The-mflag enables us to write an inline commit message, avoiding the hassle of launching the default text editor and writing the message in it.
We now know how to create a GitHub Action locally and using GitHub UI. Next, let’s have a look at some GitHub Action workflow examples.
GitHub Actions workflow examples
GitHub Actions allow us to create a wide range of workflows. In this section, we’ll check out these example workflows:
- Basic CI/CD pipeline for a Node.js project
- Deploy toGitHub Pages
- Lint and format code using Prettier
Let’s go through them one by one.
Basic CI/CD pipeline for a Node.js project
This workflow sets up a basic CI/CD pipeline for a Node.js project:
name: Node.js CIon:  - pushjobs:  build:    runs-on: ubuntu-latest    strategy:      matrix:        node-version:          - 14          - 16          - 18    steps:      - uses: actions/checkout@v3      - name: Use Node.js ${{ matrix.node-version }}        uses: actions/setup-node@v3        with:          node-version: ${{ matrix.node-version }}      - run: npm install      - run: npm test
Copy to clipboard
name: Node.js CIon: - pushjobs: build: runs-on: ubuntu-latest strategy: matrix: node-version: - 14 - 16 - 18 steps: - uses: actions/checkout@v3 - name: Use Node.js ${{ matrix.node-version }} uses: actions/setup-node@v3 with: node-version: ${{ matrix.node-version }} - run: npm install - run: npm testThis workflow automates the process of testing and building a Node.js project whenever code is pushed, or a pull request is opened in the repository. It installs dependencies usingnpm, runs unit tests, and builds the project to ensure that all code changes are functional and production-ready. This helps catch issues early and maintain code quality throughout the development lifecycle.
Deploy to GitHub Pages
Take a look at this workflow:
name: Deploy to GitHub Pageson:  push:    branches:      - mainjobs:  deploy:    runs-on: ubuntu-latest    steps:      - uses: actions/checkout@v3      - name: Build site        run: npm run build      - name: Deploy        uses: peaceiris/actions-gh-pages@v3        with:          github_token: ${{ secrets.GITHUB_TOKEN }}          publish_dir: ./dist
Copy to clipboard
name: Deploy to GitHub Pageson: push: branches: - mainjobs: deploy: runs-on: ubuntu-latest steps: - uses: actions/checkout@v3 - name: Build site run: npm run build - name: Deploy uses: peaceiris/actions-gh-pages@v3 with: github_token: ${{ secrets.GITHUB_TOKEN }} publish_dir: ./distThis workflow enables us to publish our website or front-end project automatically to GitHub Pages when the code is pushed to themainbranch. After building the site, it pushes the generated files to a specific branch (commonlygh-pages). This enables continuous deployment, so every time we push changes to themainbranch, our website is updated automatically.
Lint and format code using Prettier
The workflow looks like this:
name: Lint with Prettieron:  - push  - pull_requestjobs:  lint:    runs-on: ubuntu-latest    steps:      - uses: actions/checkout@v3      - name: Install Dependencies        run: npm install      - name: Run Prettier        run: npx prettier . --check
Copy to clipboard
name: Lint with Prettieron: - push - pull_requestjobs: lint: runs-on: ubuntu-latest steps: - uses: actions/checkout@v3 - name: Install Dependencies run: npm install - name: Run Prettier run: npx prettier . --checkThis workflow runs the Prettier code formatter on our codebase to automatically enforce consistent formatting. It can be triggered on every push or pull request to ensure the code adheres to our project’s styling rules. By integrating Prettier into our CI pipeline, we can reduce manual formatting effort and help keep the codebase clean and standardized.
Next, let’s go through the advantages of using GitHub Actions.
Advantages of using GitHub Actions
There are multiple advantages of using GitHub Actions, including:
- No third-party CI tooling required: Directly integrated with GitHub repositories.
- Scalable workflows: Easily build complex workflows using events, jobs, steps, and more.
- Community support: Huge ecosystem with reusable actions.
- Free tiers: Generous usage quotas for individuals and teams.
- Automation beyond CI/CD: Automate issue management, labeling, commenting, and more.
With the advantages covered, let’s discuss the key components of GitHub Actions in the next section.
Key components of GitHub Actions
Understanding the building blocks of GitHub Actions will help us design robust and maintainable workflows. Here’s a deeper look into each core component:
Workflows
A workflow is an automated, configurable process comprising one or more jobs. In a Git repository, it lives inside the.github/workflows/directory and is defined in a YAML (.yml) file. The purpose of a workflow is to determine what automation should occur and under what conditions.
Here is an example of a workflow:
name: Example Workflowon: pushjobs:  say-hello:    runs-on: ubuntu-latest    steps:      - run: echo "Hello from the workflow!"
Copy to clipboard
name: Example Workflowon: pushjobs: say-hello: runs-on: ubuntu-latest steps: - run: echo "Hello from the workflow!"This workflow runs every time someone pushes code to the repository, defined by theon: pushevent.
Events
An event is a particular activity that triggers a workflow. GitHub supports many types of events, such aspush,pull_request,issues,release, and more. The purpose of an event is to define when a workflow should be triggered.
Here are the definitions of the events mentioned:
- push: Triggered when someone pushes code to the repository or a specific branch.
- pull_request: Triggered when a pull request is opened, updated, or closed.
- issues: Triggered when an issue is opened, edited, labeled, or closed.
- release: Triggered when a release is created, published, edited, or deleted.
Here is an example of an event:
on:  push:    branches:      - main
Copy to clipboard
on: push: branches: - mainThis configuration will trigger the workflow only when changes are pushed to themainbranch.
Jobs
A job is a set of steps that run in the same virtual environment, known as a runner. Jobs can run independently or depend on other jobs. The purpose of a job is to break down workflows into logical units of work that can be run sequentially or in parallel.
Here is an example of a job that is often used to indicate the start of a build process:
jobs:  build:    runs-on: ubuntu-latest    steps:      - run: echo "Building..."
Copy to clipboard
jobs: build: runs-on: ubuntu-latest steps: - run: echo "Building..."This job executes a single operation, which is printing “Building…” in the job logs.
Steps
A step is an individual task within a job. Steps can either run shell commands or use actions. All steps in a job run on the same runner, and the data (like files or environment variables) can be shared between them. The purpose of a step is to define the individual operations that make up a job.
Here is an example of a step:
steps:  - name: Print message    run: echo "This is a step"  - name: Checkout repository code    uses: actions/checkout@v3
Copy to clipboard
steps: - name: Print message run: echo "This is a step" - name: Checkout repository code uses: actions/checkout@v3There are two steps in this example:
- The first step prints the given message in the job logs.
- The second step uses theactions/checkout@v3action to clone the repository’s code into the runner. Here,@v3indicates we’re using version 3 of theactions/checkoutaction.
Actions
An action is a reusable piece of code that performs a specific task. GitHub provides many official actions, and we can also create or use actions from the GitHub Marketplace or define our own. The purpose of an action is to encapsulate logic and make it reusable across workflows and projects.
Here is an example of an action:
- name: Set up Node.js  uses: actions/setup-node@v3  with:    node-version: "18"
Copy to clipboard
- name: Set up Node.js uses: actions/setup-node@v3 with: node-version: "18"Here, we’re setting up Node.js version 18 in the workflow using theactions/setup-node@v3action.
Runners
A runner is the server (virtual machine) that executes the jobs in a workflow. GitHub provides hosted runners for Ubuntu, Windows, and macOS, or we can use self-hosted runners on our own infrastructure. The purpose of a runner is to provide the execution environment for workflows.
Here is an example of a runner:
jobs:  build:    runs-on: ubuntu-latest
Copy to clipboard
jobs: build: runs-on: ubuntu-latestIn this example, we’re using theubuntu-latestrunner to run the build job on the latest Ubuntu-based virtual machine.
Conclusion
In this tutorial, we explored what GitHub Actions are and why they play a crucial role in modern development workflows. We looked at their key features and the advantages they offer. We also learned how to create them locally and using GitHub UI and use them to build different workflows.
GitHub Actions represent a major step forward in developer productivity. Their tight GitHub integration, combined with a thriving marketplace and customizable workflows, make them a go-to tool for modern software teams. By mastering GitHub Actions, we gain a valuable tool for increasing productivity, improving code quality, and automating repetitive tasks directly within our GitHub repositories.
If you want to learn more about GitHub Actions, check out theLearn GitHub: Actions and Codespacescourse on Codecademy.
Frequently Asked Questions
1. What are the three types of GitHub Actions?
The three types of GitHub Actions are:
- Docker container actions: Run actions in aDocker container
- JavaScript actions: Run actions directly using Node.js
- Composite actions: Combine multiple steps into one action
2. What is the difference between GitHub Actions and GitLab CI/CD?
GitHub Actions are tightly integrated with GitHub and use YAML workflows to automate tasks like testing and deployment within the GitHub ecosystem. GitLab CI/CD, on the other hand, is part of the GitLab platform and uses a.gitlab-ci.ymlfile to define more complex, customizable pipelines. While both are powerful CI/CD tools, the best choice depends on which platform we primarily use.
3. Are GitHub Actions better than Jenkins?
GitHub Actions are easier to set up and integrate tightly with GitHub, making them ideal for GitHub-based projects. Jenkins, on the other hand, offers more flexibility and plugin support but requires more manual setup and maintenance. The right tool depends on our infrastructure and needs.
'The Codecademy Team, composed of experienced educators and tech experts, is dedicated to making tech skills accessible to all. We empower learners worldwide with expert-reviewed content that develops and enhances the technical skills needed to advance and succeed in their careers.'
Complete Payment to Unlock Full Guide & Source Code
You are viewing the 30% preview. Join TopCourseAI Pro to unlock the remaining 70% of this article, unblur all code snippets, and gain full access to all 412 technical projects and guides.
Ready to access the complete step-by-step tutorial?
Gain full unhindered access to all 412 technical projects and guides, unblur all source code snippets, and download runnable scripts.
How to Use Git Rebase: A Complete Guide
Next BlueprintHow to Use Hugging Face: Beginner's Guide to AI Models
Related Blueprints & Guides
View all 166 →Android Studio Quick-Start Guide
Android Studio often intimidates beginners, but by learning a few handy shortcuts and getting the lay of the land, we can navigate this powerful development environment with ease.
Developer toolsApache Kafka Tutorial: A Complete Guide for Beginners
Apache Kafkais a well-known distributed event streaming platform designed to efficiently manage real-time data feeds. It was originally developed by LinkedIn in 2011 and later open-sourced. Apache Kafka has gained immens...
Developer toolsBuilding Websites with Wix
Creating a website has never been easier. Previously, making a presentable website meant learning HTML, CSS, andJavaScript. The whole process could take weeks, months, or even years before creating a website that you’re...
Ready to build production-grade AI systems?
Enjoyed this guide? Continue exploring our library of 166+ production blueprints, multi-agent swarms, and autonomous agent systems with 100% unblurred, executable source code.