
How to Use Git Rebase: A Complete Guide
How to Use Git Rebase: A Complete Guide
What is Git rebase?
At a high level, rebasing can be understood as “moving the base of a branch onto a different position”. Think of it like a redo — “I meant to start here.”
Consider that a team has just completed a production release. While working on a completely new feature branch callednew_feature, a co-worker finds a bug in the production release (mainbranch). In order to fix this, a team member creates aquick_fixbranch, squashes the bug, and merges their code into themainbranch. At this point, themainbranch and thenew_featurebranch have diverged, and they each have a different commit history. We can visualize this in the image below:
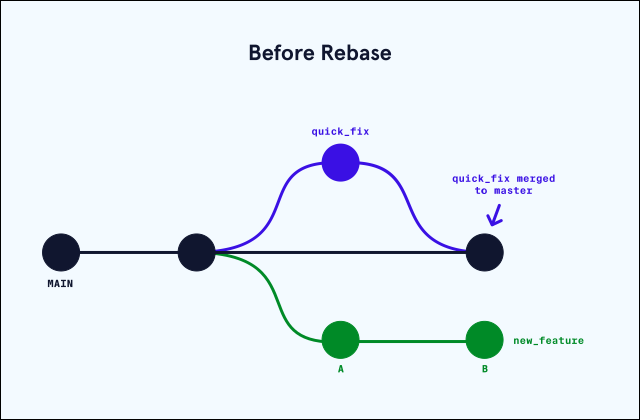
A diagram showing that before rebase, branch commits stick out from the main line of development.
If we want to bring the updated changes frommainintonew_feature, one could use themergecommand, but withrebasewe can keep the Git commit history clean and easy to follow. By “rebasing” thenew_featurebranch onto themainone, we move all the changes made fromnew_featureto the front ofmainand incorporate the new commits by rewriting its history. We can see how this is done below:
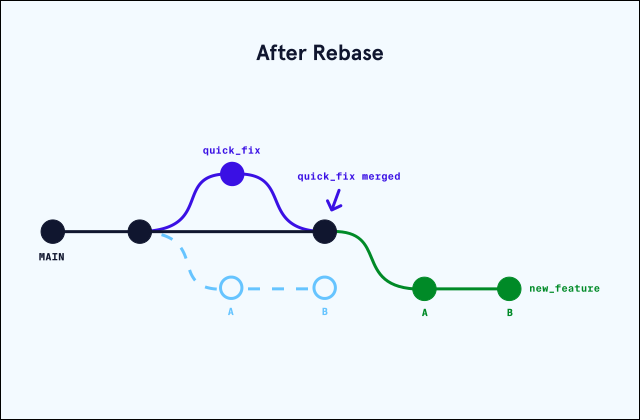
A diagram showing that after rebase, commits over multiple branches get flattened into a single line.
We can see above that the new “base” of ournew_featurebranch is the updatedmainbranch with the previous changes from the bug fix implemented.
One of the major benefits of usinggit rebaseis that it eliminates unnecessary merge commits required bygit merge. Most importantly, the history of the changes made in the main repository remains linear and follows a clear path of changes. This allows us to navigate the changes easier when viewing the changes in alogorgraph.
Next, let’s discuss the advantages and disadvantages of usinggit rebase.
Advantages and disadvantages of using Git rebase
Here are the advantages of usinggit rebase:
- Clean commit history: Keeps the project history linear and easier to follow.
- Improved readability: Makesgit logandgit bisectoutputs more straightforward.
- Easier patch application: Rebasing simplifies applying changes from one branch to another.
However,git rebasehas some disadvantages as well:
- History rewriting: It changes commit hashes, which can cause issues in shared branches.
- Conflicts can be harder to resolve: Especially during interactive or long rebase sequences.
- Not ideal for public/shared branches: Rebasing public history can confuse collaborators.
When to use Git rebase
Use git rebase when you want to:
- Clean up your local commit history before sharing
- Integrate the latest changes from main into your feature branch
- Prepare your branch for a clean merge into the main branch
Avoid rebasing when:
- Working on shared branches that others are actively using
- The commits have already been pushed to a public repository
- You’re unsure about the current state of your repository
With the advantages and disadvantages covered, let’s comparegit rebaseandgit mergeto see how their functionalities differ.
Git rebase vs Git merge
Althoughgit rebaseis an extremely useful tool to keep a Git repository clean and easy to follow, it doesn’t mean that one should always stick to that command when integrating code changes. Let’s go over the definitions ofrebaseandmergeone more time:
- git rebase: Reapplies commits on top of another base branch.
- git merge: joins two or more development histories together (creating a new merge commit).
In other words,git mergepreserves history as it happened, whereas rebase rewrites it.
Use git merge when:
- Working on shared/public branches
- You want to preserve the exact history of how development happened
- Multiple developers are collaborating on the same feature branch
Use git rebase when:
- Cleaning up local branches before merging
- You want a linear, easy-to-follow project history
- Working on feature branches that only you are modifying

In the diagram, the history from only using `git merge` shows lots of different paths representing different branches. Next to it, the path from using `git rebase` is one straight line, with commits from a feature branch getting represented as a commit on the main branch.
Now that we’re done comparinggit rebaseandgit merge, let’s learn how to rebase Git branches.
How to rebase Git branches
Rebasing can be simple or powerful depending on how we use it. Let’s check out the different ways to usegit rebase.
Basic Rebase
Often, we’ll want to rebase our feature branch onto the latest version of themain(ormaster) branch before merging. This makes our changes appear as if they were made on top of the most recent project history.
To do so, first use this command in the terminal to switch to the feature branch:
git checkout feature-branch
Copy to clipboard
git checkout feature-branchThen, rebase the feature branch ontomain:
git rebase main
Copy to clipboard
git rebase mainThis reapplies the commits from the feature branch on top of the main branch. Git will automatically fast-forward your branch unless there are conflicts.
Interactive Rebase
We need to use an interactive rebase when we want to:
- Edit commit messages
- Combine multiple commits into one (squash)
- Delete unnecessary commits
- Reorder commits
Suppose we want to combine multiple commits into one. In that case, first run this command in the terminal:
git rebase -i HEAD~3
Copy to clipboard
git rebase -i HEAD~3In the example:
- git rebase -i: Enables us to perform an interactive rebase.
- HEAD~3: Specifies the 3 most recent commits to be edited interactively (The number of commits can be different in your case).
Upon running the command, the 3 most recent commits are shown in the default text editor:
pick 8f3e4f2 Add login feature pick 1f0a3e6 Fix login bug pick 2a7e9d4 Update UI styles
Copy to clipboard
pick 8f3e4f2 Add login feature pick 1f0a3e6 Fix login bug pick 2a7e9d4 Update UI stylesHere,pickis an action that we can perform on a particular commit. Let’s check out what this action does, along with some other ones:
- pick: Use commit as is
- reword: Change the commit message
- edit: Amend the commit
- squash: Combine with previous commit
- drop: Remove the commit
In this case, we want to squash the second commit into the first commit. To do so, we need to changepicktosquashfor the second commit:
pick 8f3e4f2 Add login feature squash 1f0a3e6 Fix login bugpick 2a7e9d4 Update UI styles
Copy to clipboard
pick 8f3e4f2 Add login feature squash 1f0a3e6 Fix login bugpick 2a7e9d4 Update UI stylesSince we’re done learning the different ways to usegit rebase, let’s check out some best practices that we can follow to get the most out of this command.
Best practices for using Git rebase
Apply these best practices to usegit rebaseefficiently:
- Use rebase for local cleanup: Tidy up your branch before pushing to shared repositories.
- Avoid rebasing shared branches: Never rebase commits others are working on.
- Rebase before merging tomain: Keeps themainbranch history clean.
- Always review: Usegit logorgit statusto review the repository before and after rebasing.
- Communicate with your team: Ensure everyone understands how rebase is used in your workflow.
Conclusion
git rebasecan be a very powerful tool when working with numerous people and branches, if used correctly it allows everyone to view a very clean commit history and track what commits fixed given defects or whether or not a commit was included in a release.
However, it’s critical to understand how it works and the risks that come with it since it’s a destructive operation. If done correctly, it can result in a very fluid and effective workflow.
If you want to expand your knowledge of Git, check out theLearn Git & GitHubcourse on Codecademy.
Frequently asked questions
1. When should I use Git rebase?
Usegit rebasewhen:
- You want a clean, linear history.
- You’re working locally and want to tidy your commits.
- You’re preparing your branch before merging intomain.
Avoid it on branches shared with others.
2. Do I need to push after rebase?
Yes, especially if you’ve already pushed before. Since rebase rewrites history (commit hashes change), you must force push the updated branch:
git push --force
Copy to clipboard
git push --force3. Can I undo a rebase?
Yes, if something goes wrong, you can undo a rebase using:
git reflog git reset --hard <commit-hash>
Copy to clipboard
git reflog git reset --hard <commit-hash>Usegit reflogto retrieve the previous commit hash and reset your branch to it.
4. What is the difference between Git revert and rebase?
- git revertcreates a new commit undoing the changes of a previous commit. It is safe for shared branches because it doesn’t change the commit history.
- git rebasemoves or replays commits from one branch onto another, rewriting history in the process. It’s useful for cleaning up a feature branch before merging, but should be used with caution, especially on public branches, because it rewrites commit hashes.
5. What’s the difference between Git rebase and squash?
- git rebasere-applies a series of commits onto another base branch, preserving each commit (unless told to modify them).
- Squashing during a rebase (e.g., withgit rebase -i) means combining multiple commits into one, reducing commit clutter.
'The Codecademy Team, composed of experienced educators and tech experts, is dedicated to making tech skills accessible to all. We empower learners worldwide with expert-reviewed content that develops and enhances the technical skills needed to advance and succeed in their careers.'
Complete Payment to Unlock Full Guide & Source Code
You are viewing the 30% preview. Join TopCourseAI Pro to unlock the remaining 70% of this article, unblur all code snippets, and gain full access to all 412 technical projects and guides.
Ready to access the complete step-by-step tutorial?
Gain full unhindered access to all 412 technical projects and guides, unblur all source code snippets, and download runnable scripts.
How to Use Git Prune to Remove Outdated References in Git
Next BlueprintHow to Use GitHub Actions: A Step-by-Step Tutorial
Related Blueprints & Guides
View all 166 →Android Studio Quick-Start Guide
Android Studio often intimidates beginners, but by learning a few handy shortcuts and getting the lay of the land, we can navigate this powerful development environment with ease.
Developer toolsApache Kafka Tutorial: A Complete Guide for Beginners
Apache Kafkais a well-known distributed event streaming platform designed to efficiently manage real-time data feeds. It was originally developed by LinkedIn in 2011 and later open-sourced. Apache Kafka has gained immens...
Developer toolsBuilding Websites with Wix
Creating a website has never been easier. Previously, making a presentable website meant learning HTML, CSS, andJavaScript. The whole process could take weeks, months, or even years before creating a website that you’re...
Ready to build production-grade AI systems?
Enjoyed this guide? Continue exploring our library of 166+ production blueprints, multi-agent swarms, and autonomous agent systems with 100% unblurred, executable source code.