
Android Studio Quick-Start Guide
Android Studio Quick-Start Guide
Android Studio often intimidates beginners, but by learning a few handy shortcuts and getting the lay of the land, we can navigate this powerful development environment with ease.
Interface Basics
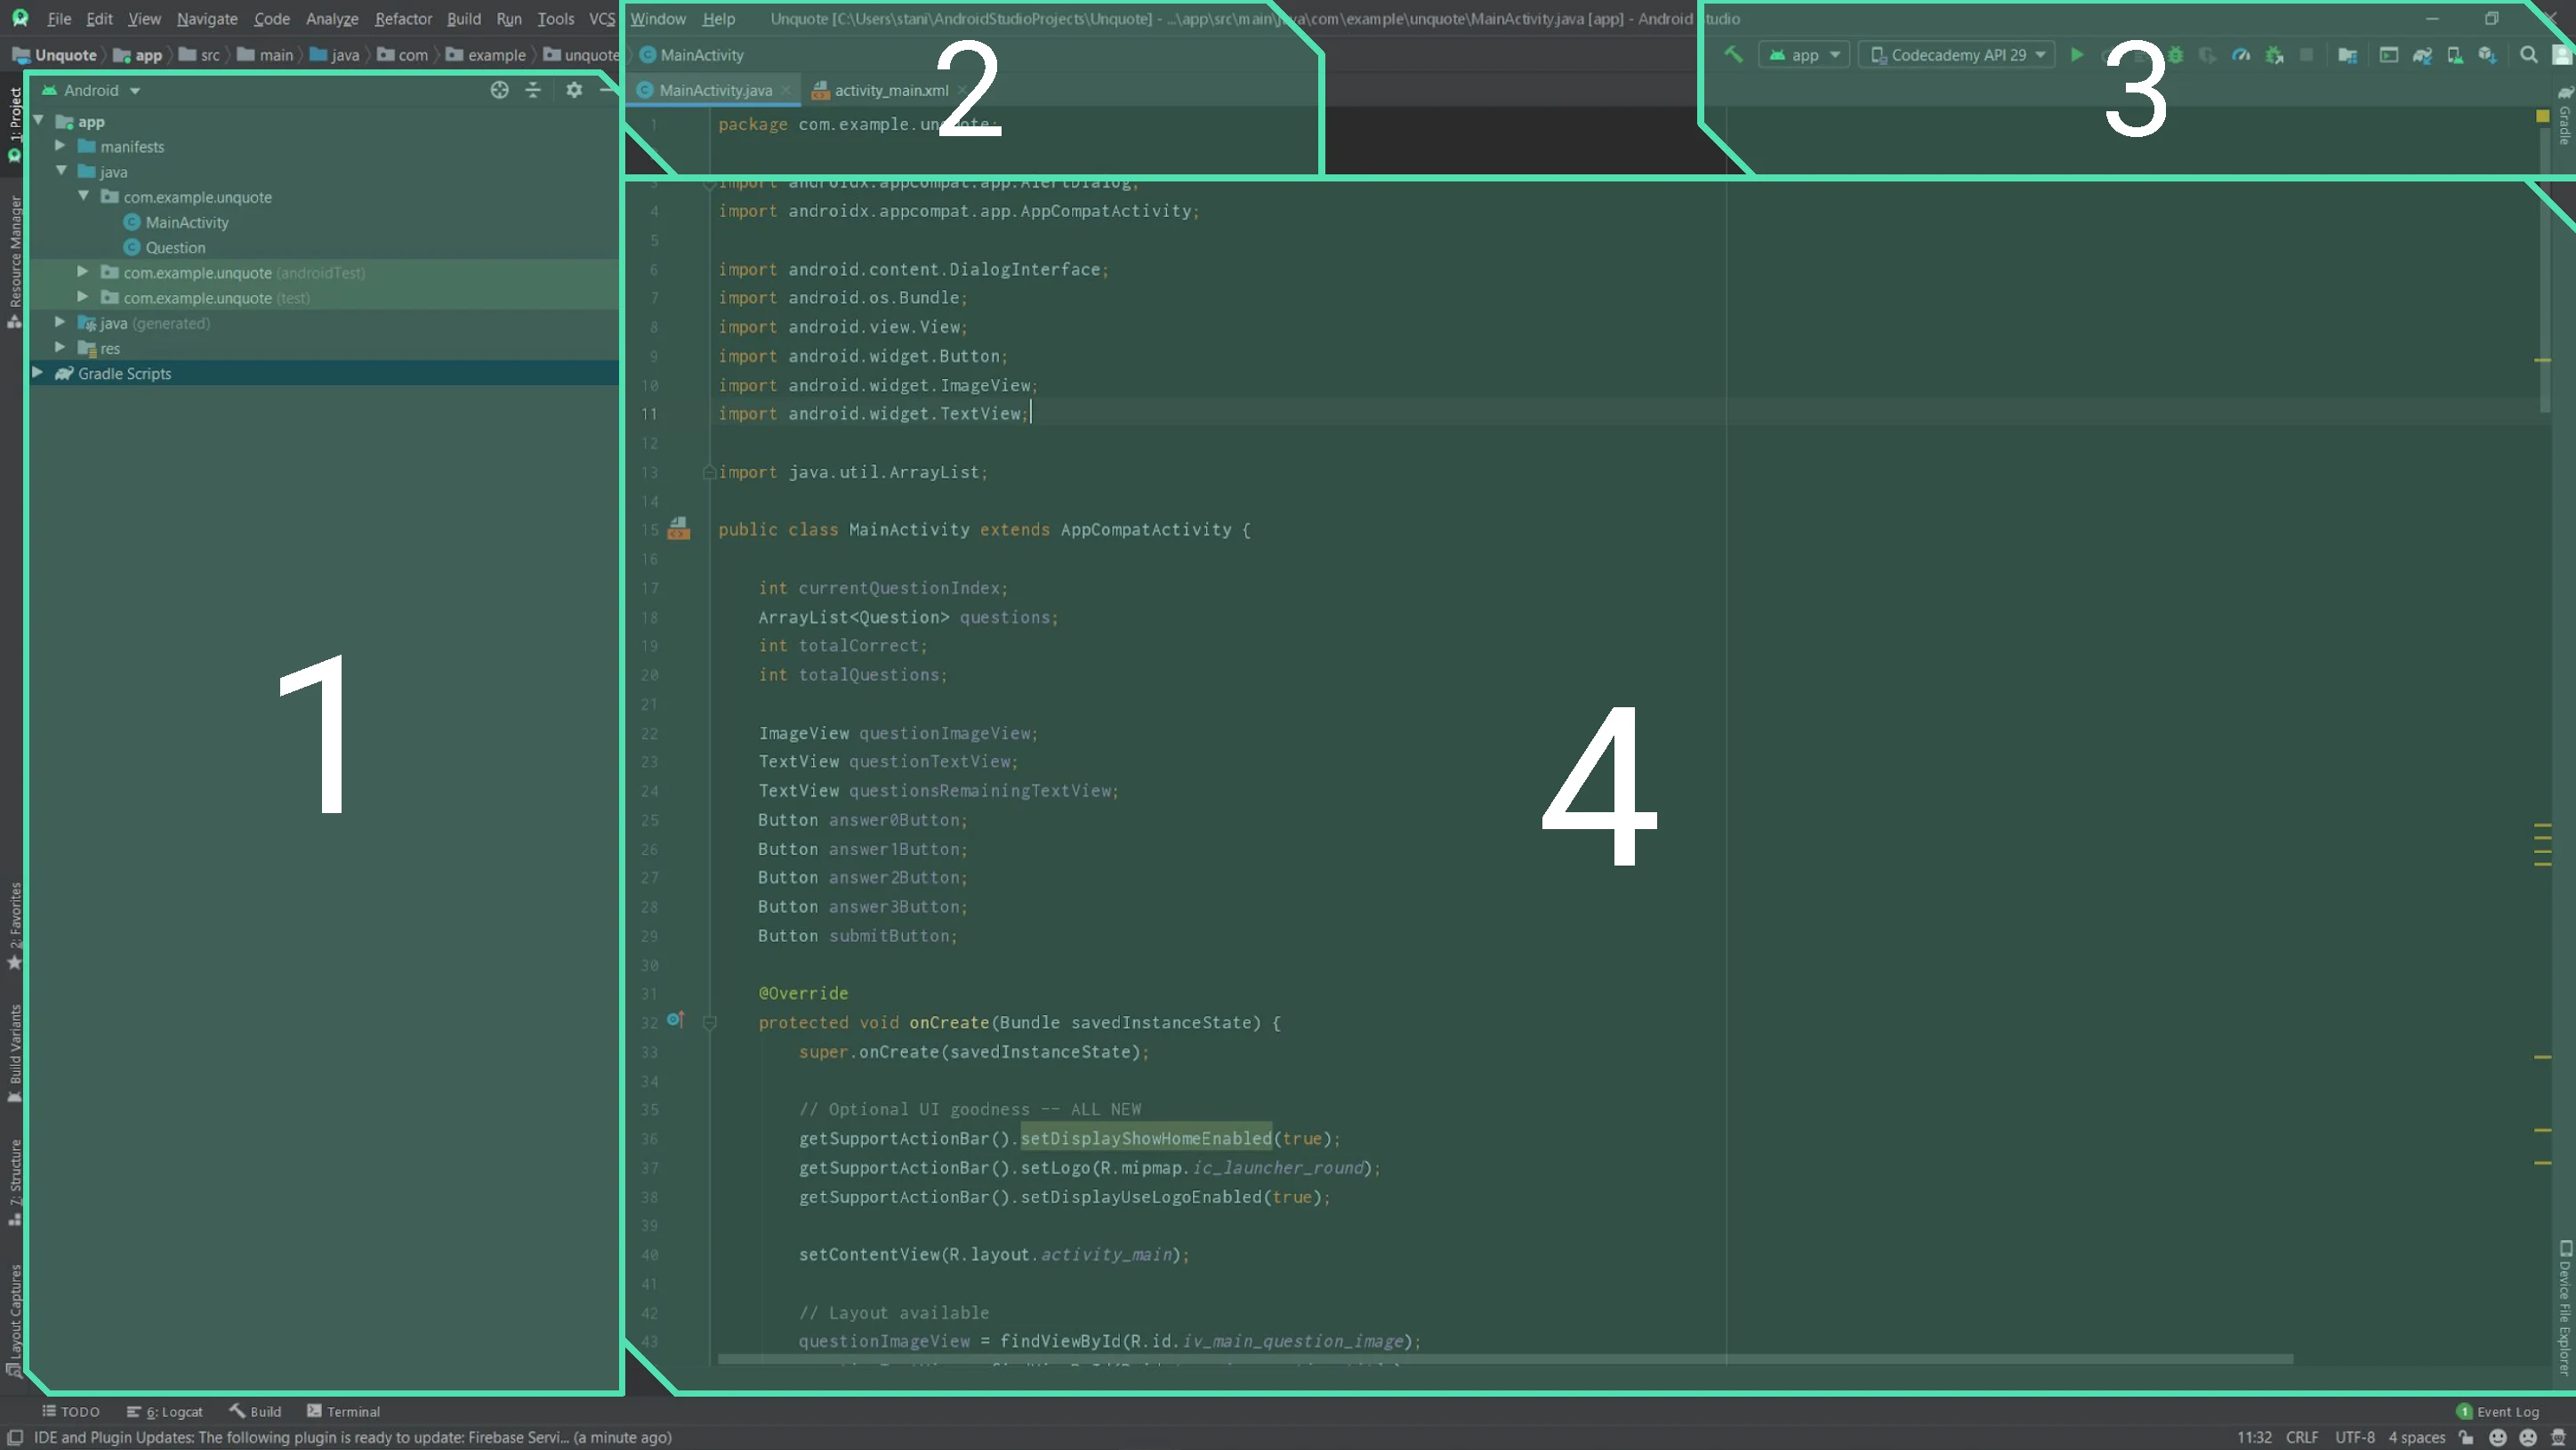
When you open a project in Android Studio, you’ll see a screen resembling the following:
Android Studio Quick-Start Guide
Figure A. Main Window
Here’s what each highlighted area corresponds to.
- A-1.TheProject Panellists every file included in your Android Project.
However, you will focus primarily on code located under theapp>java>{com}.{example}.{appname}directory. In general, you can ignore the remaining folders and files, used primarily for testing and application configuration (a more advanced topic).
Double-click any folder or file to reveal its contents.
- A-2.File tabsindicate every ‘open’ file.
Android Studio permits you to edit one file at a time, and each tab represents an open file. Click on a tab to switch to the file and continue editing.
Tip:Android Studio automatically saves your changes as you edit each file, no need to save after making changes.
- A-3.Launch controlshelp you ‘run’ an application, choose a target device / emulator, and more.
Tip:to learn more about what each icon does, hover your mouse cursor over the button until a tooltip appears.
- A-4.TheEditing areais where the bulk of your work takes place. Your current open file consumes this area.
Resource Manager
In Android applications, Resources represent files and data you bundle with your application.
These files may include interface blueprints (XML layouts), images, fonts, and more.
And your data may include text Strings (such as the name of the app), XML styles, dimensions (such as those used for width, height, text size), and beyond.
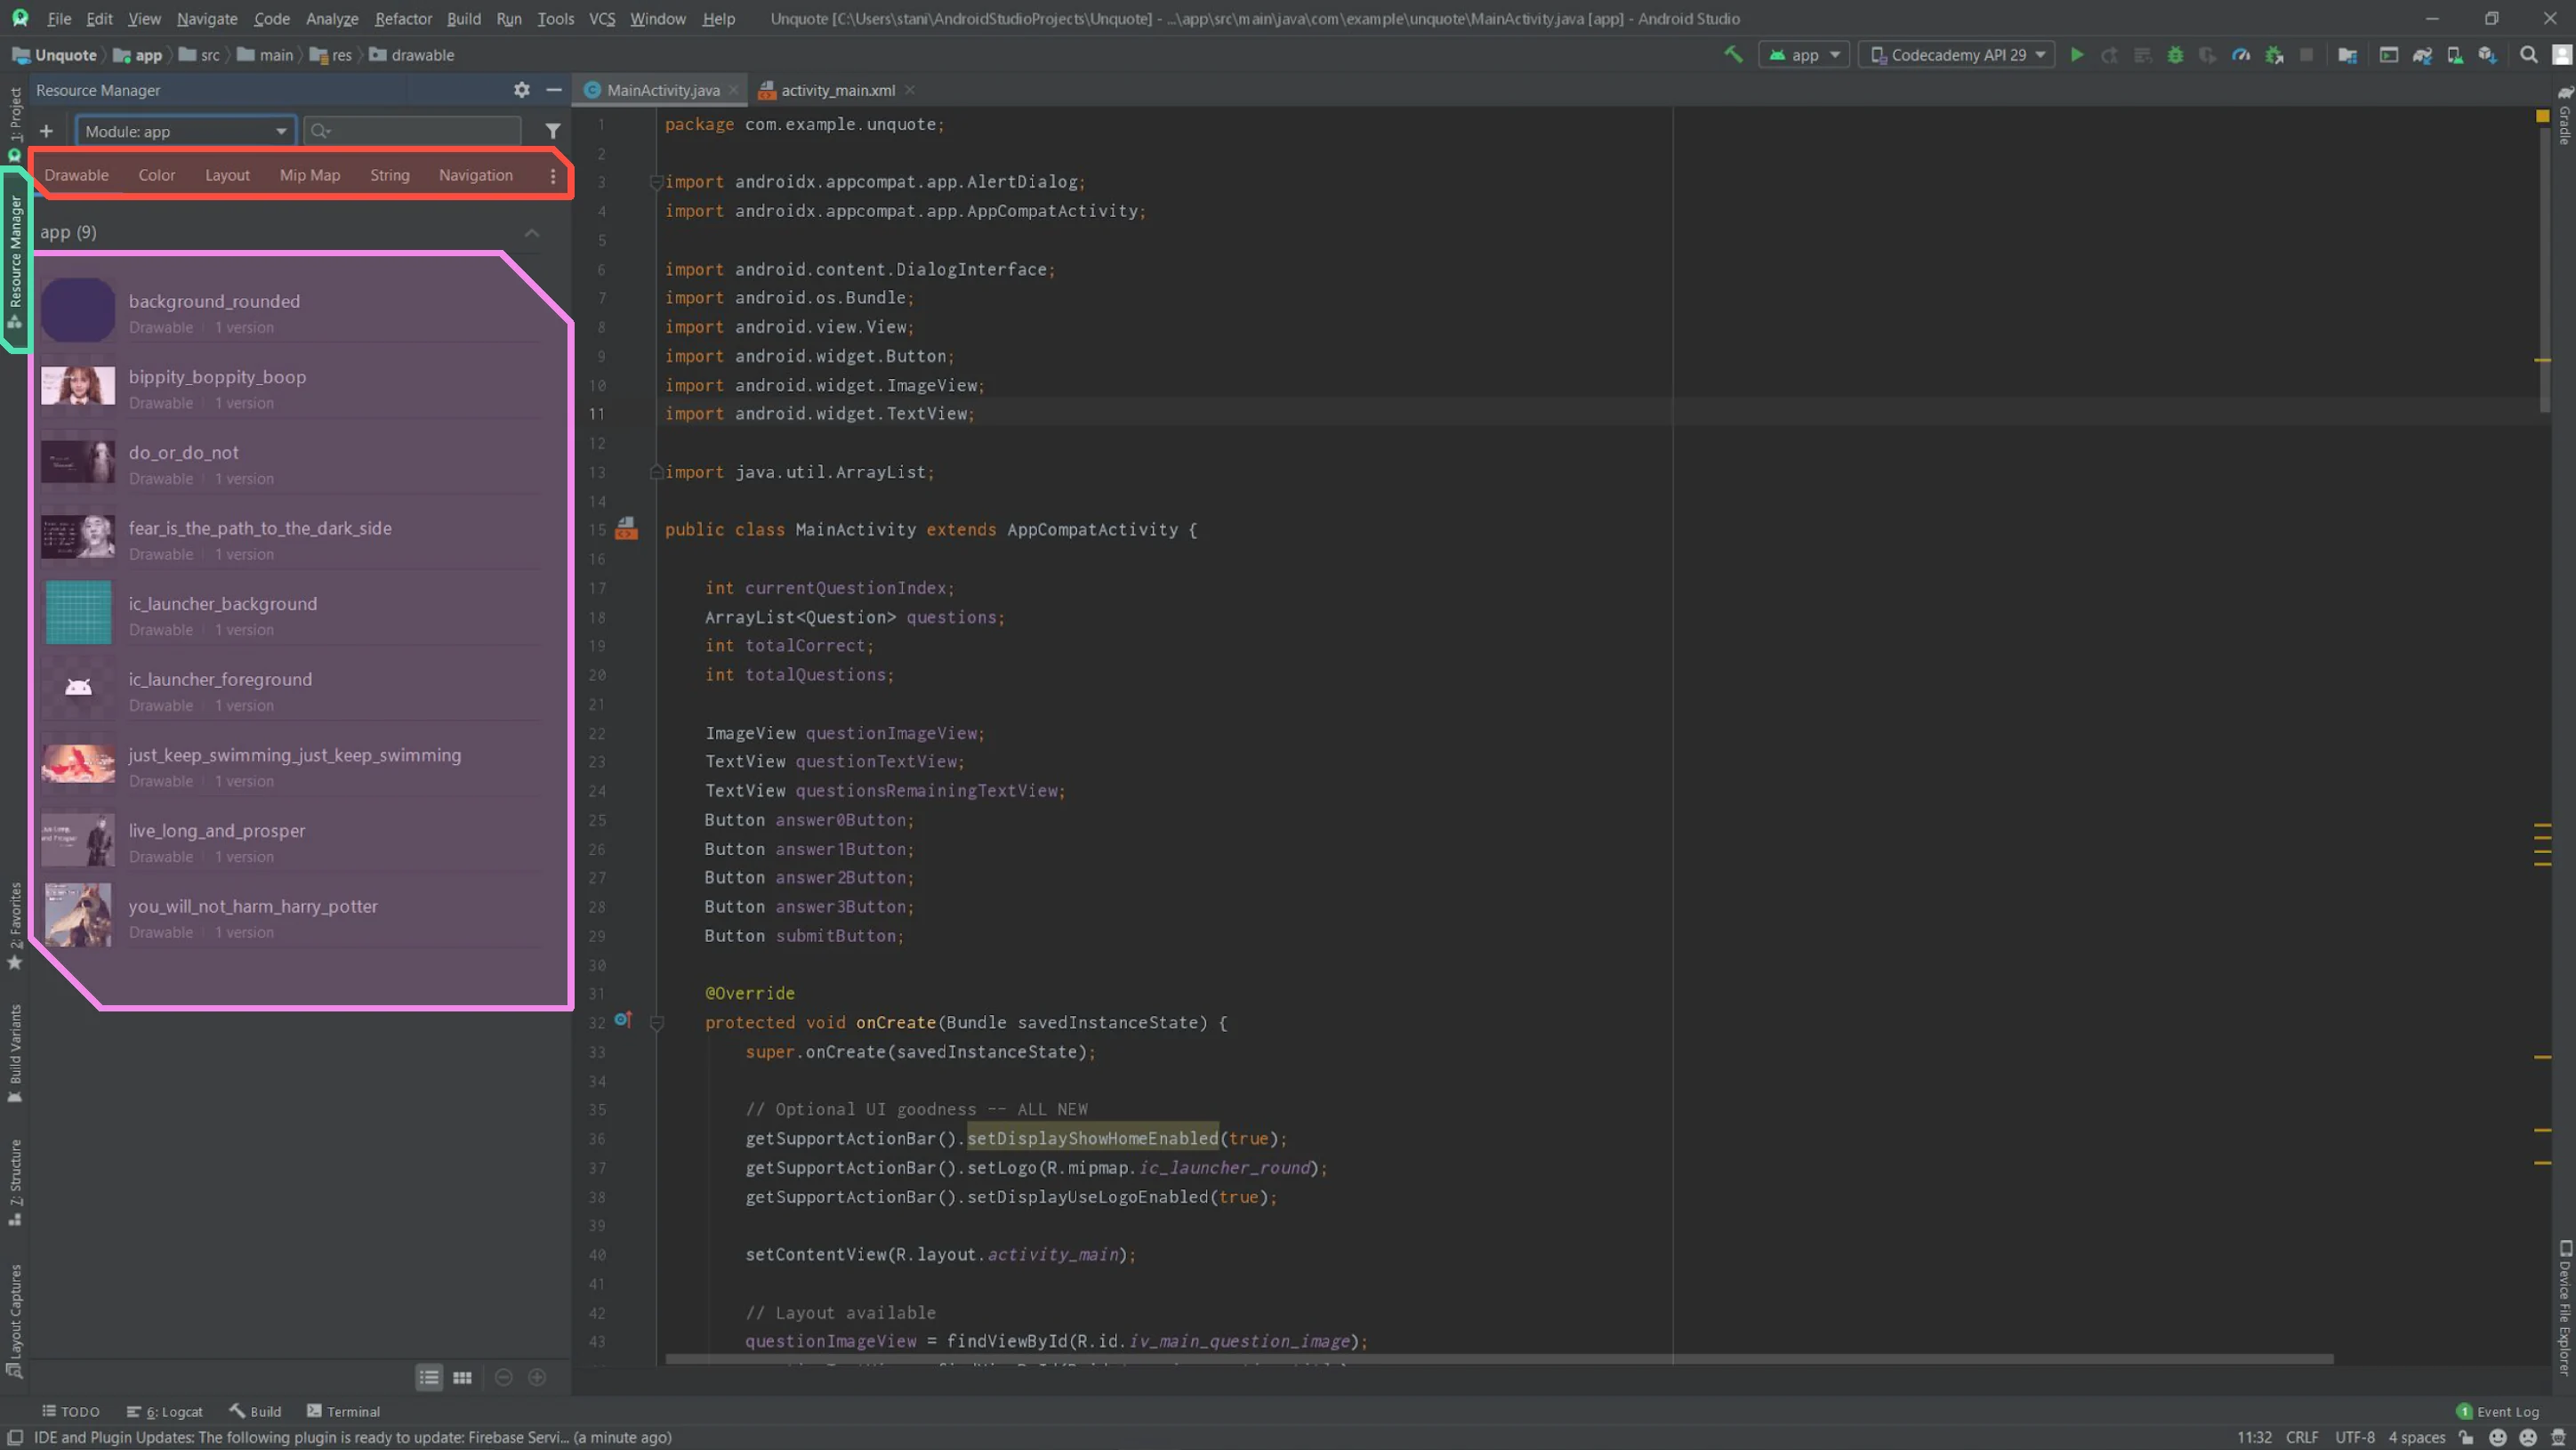
You may access and modify these through theResource Managerpictured below:
Android Studio Quick-Start Guide
Figure B. Resource Manager
Clicking the tab highlighted ingreenreveals & collapses theResource Manager.
Theredarea indicates the various categories of resources you may access through the manager (Drawables, Colors, Strings, etc.).
Finally, thepurplearea lists every resource of a given type available to your application.
Tip:Double-clicking any resource listed in the manager will reveal its corresponding file in the editing area.
Tip:Right-clicking a resource can help youdeletea resource, reveal its location on your computer, and more.
Layout Editor
Android Studio reveals theLayout Editorwhenever you begin to edit a layout file. For example, you can begin editing a layout file by double-clicking a layout’s name within theResource Manager. The editor comes in three possible modes:
- Visual
- Text
- Text + Preview
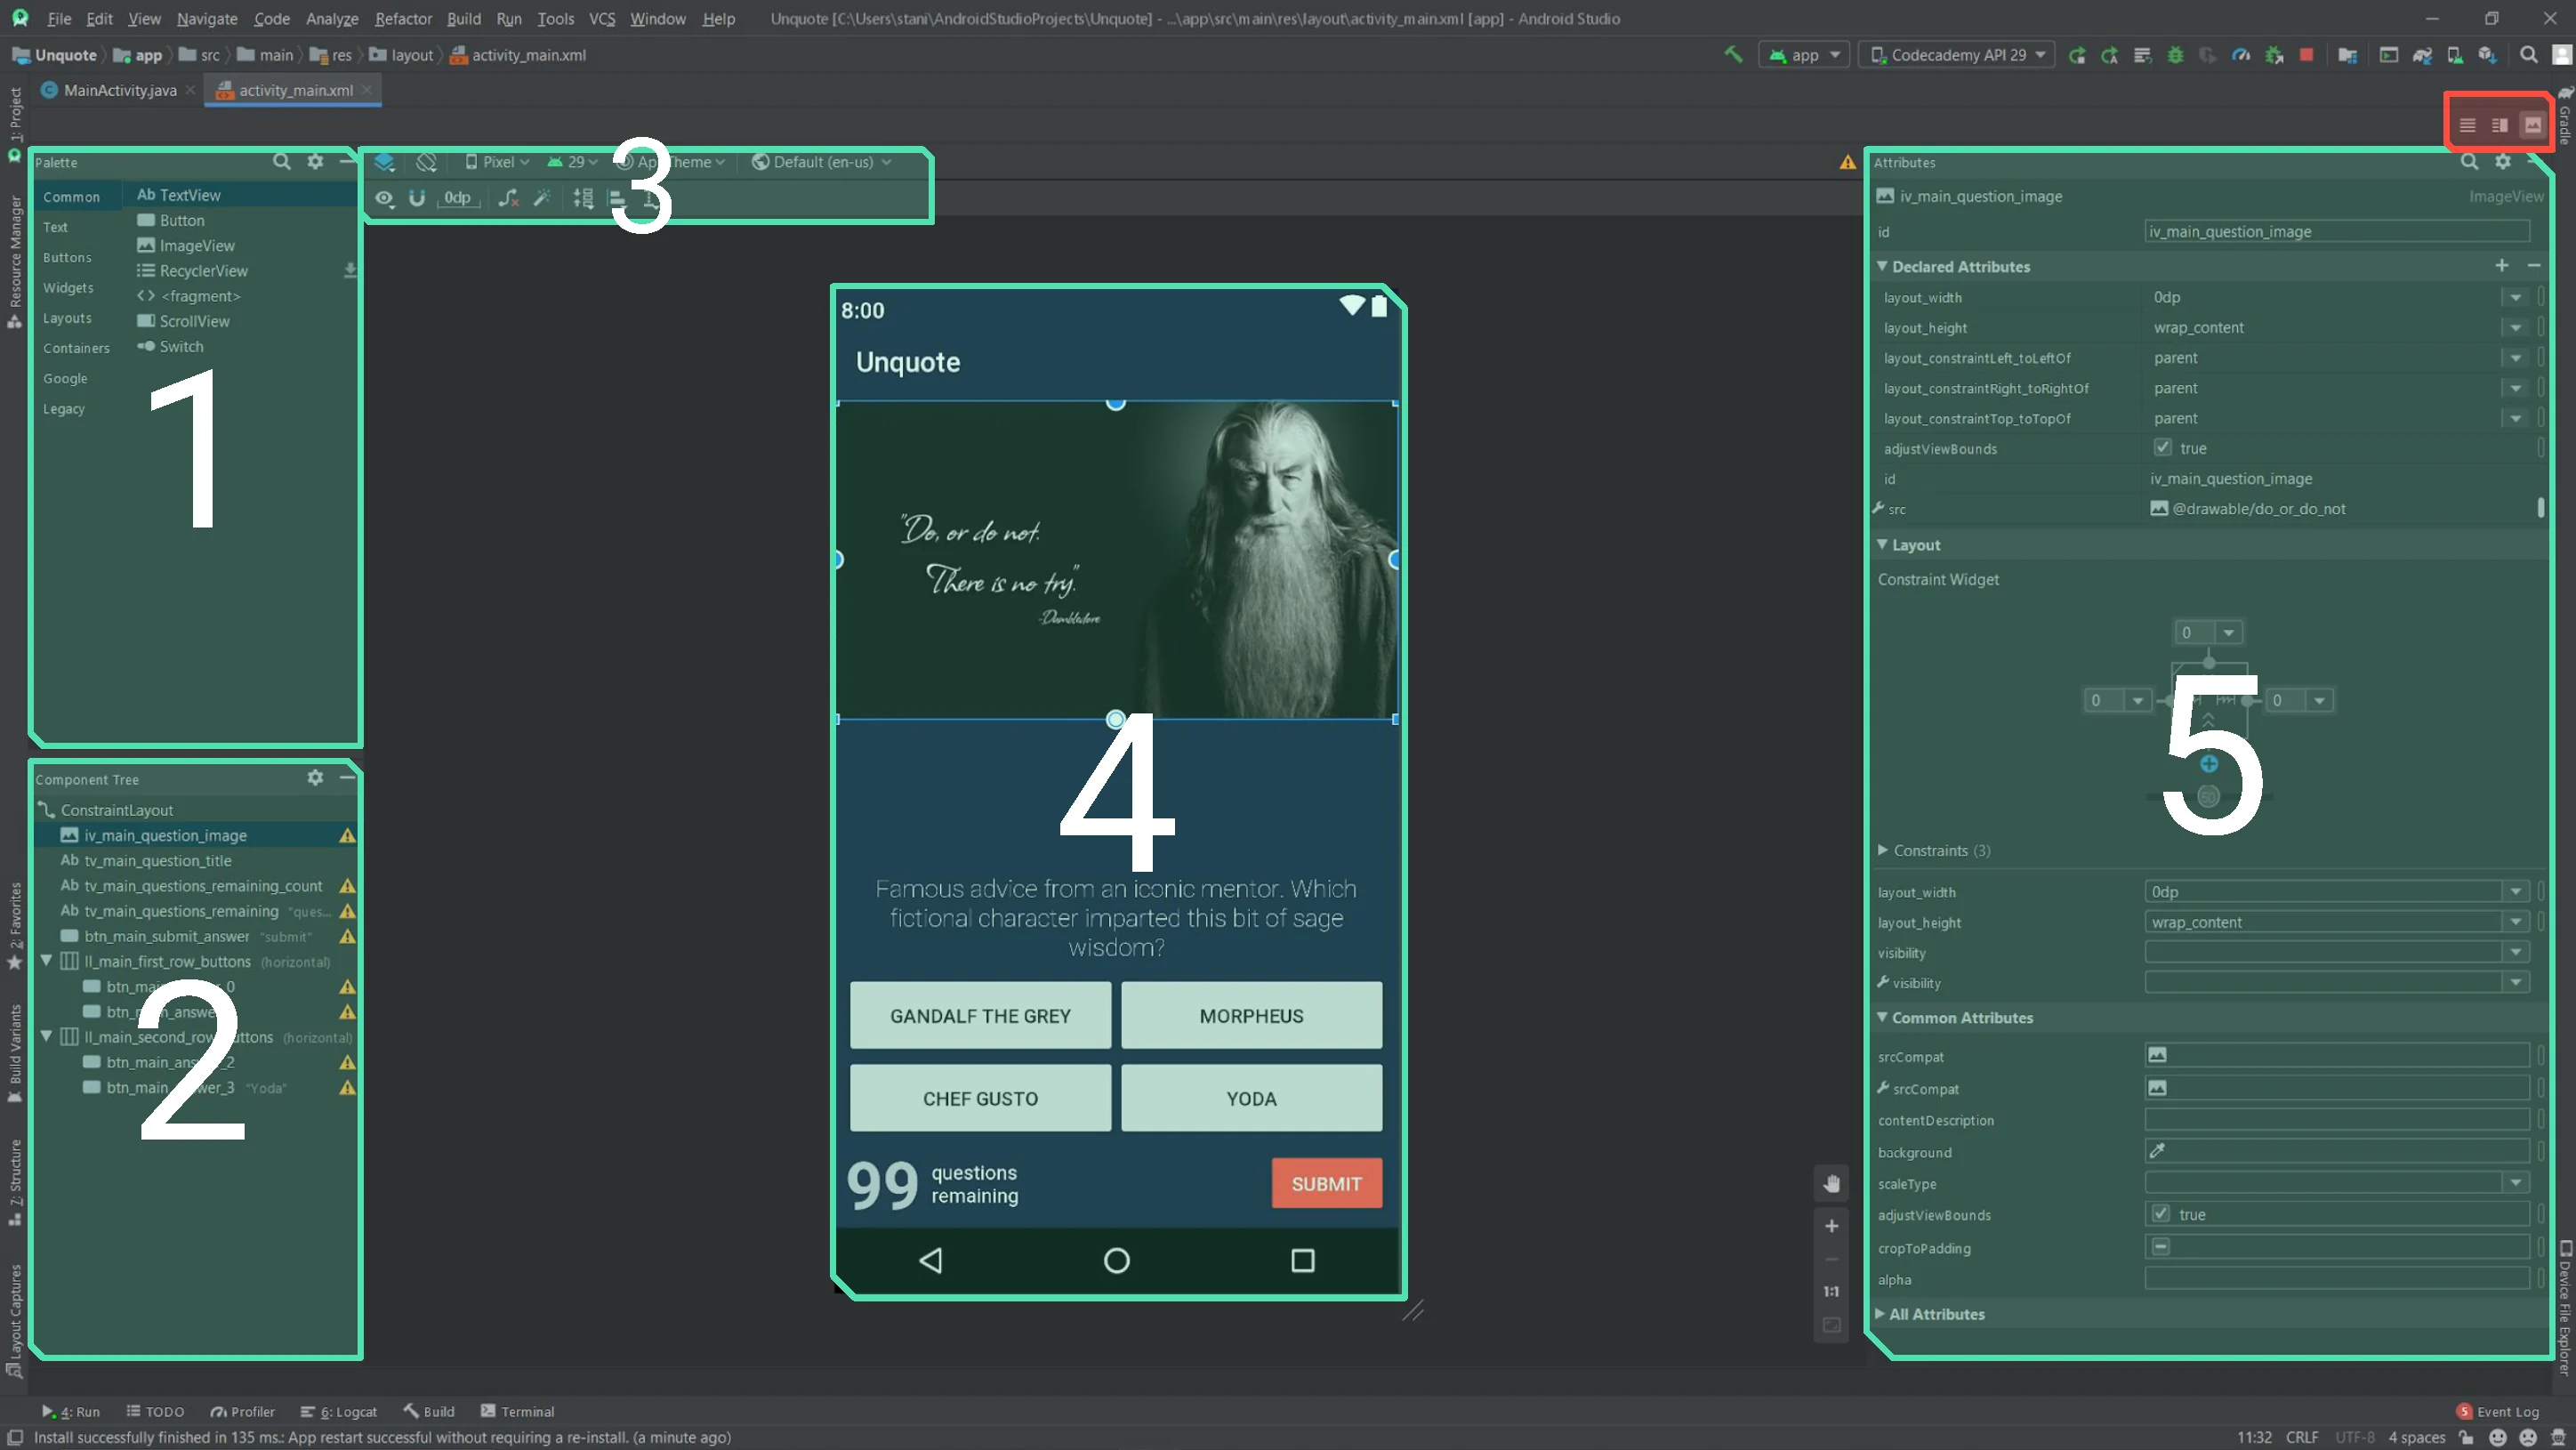
By default, Android Studio opens the Layout Editor inVisualmode, shown below (to view the layout editor as you see it here, collapse the Project and/or Resource Manager panels to give it more space):
Android Studio Quick-Start Guide
Figure C. Visual Layout Editor
You may switch betweenVisual,Text, andText + Previewby clicking the iconshighlighted in red.
- C-1.TheComponent Palettehelps you discover and choose Android layout components (Views and ViewGroups) to use in your designs.
Tip:Click and drag a component onto the layout preview (C-4) to add it to your design.
- C-2.TheComponent Treerepresents the parent-child relationships of components within your layout and helps you quickly focus on a specific component when your layout grows complex.
Tip:Click any component in the tree to highlight it within your layout preview (C-4).
- C-3.This panel of controls help you change the preview parameters such as ‘portrait’ vs ‘landscape’, screen size, and much more.
Tip:Hover any icon to reveal a tooltip. Android Studio will explain the purpose of each button and drop-down menu.
- C-4.TheLayout Previewattempts to draw your layout as it would appear on a real device. Clicking within the Layout Preview permits you to manipulate components and reveal their attributes.
- C-5.TheAttributes Panelpresents each component’s editable attributes. By modifying attributes, you are able to change the appearance and behavior of any component.
After youselecta component in the Layout Preview, you reveal the Attributes Panel. The panel breaks into four distinct sections, listed below.
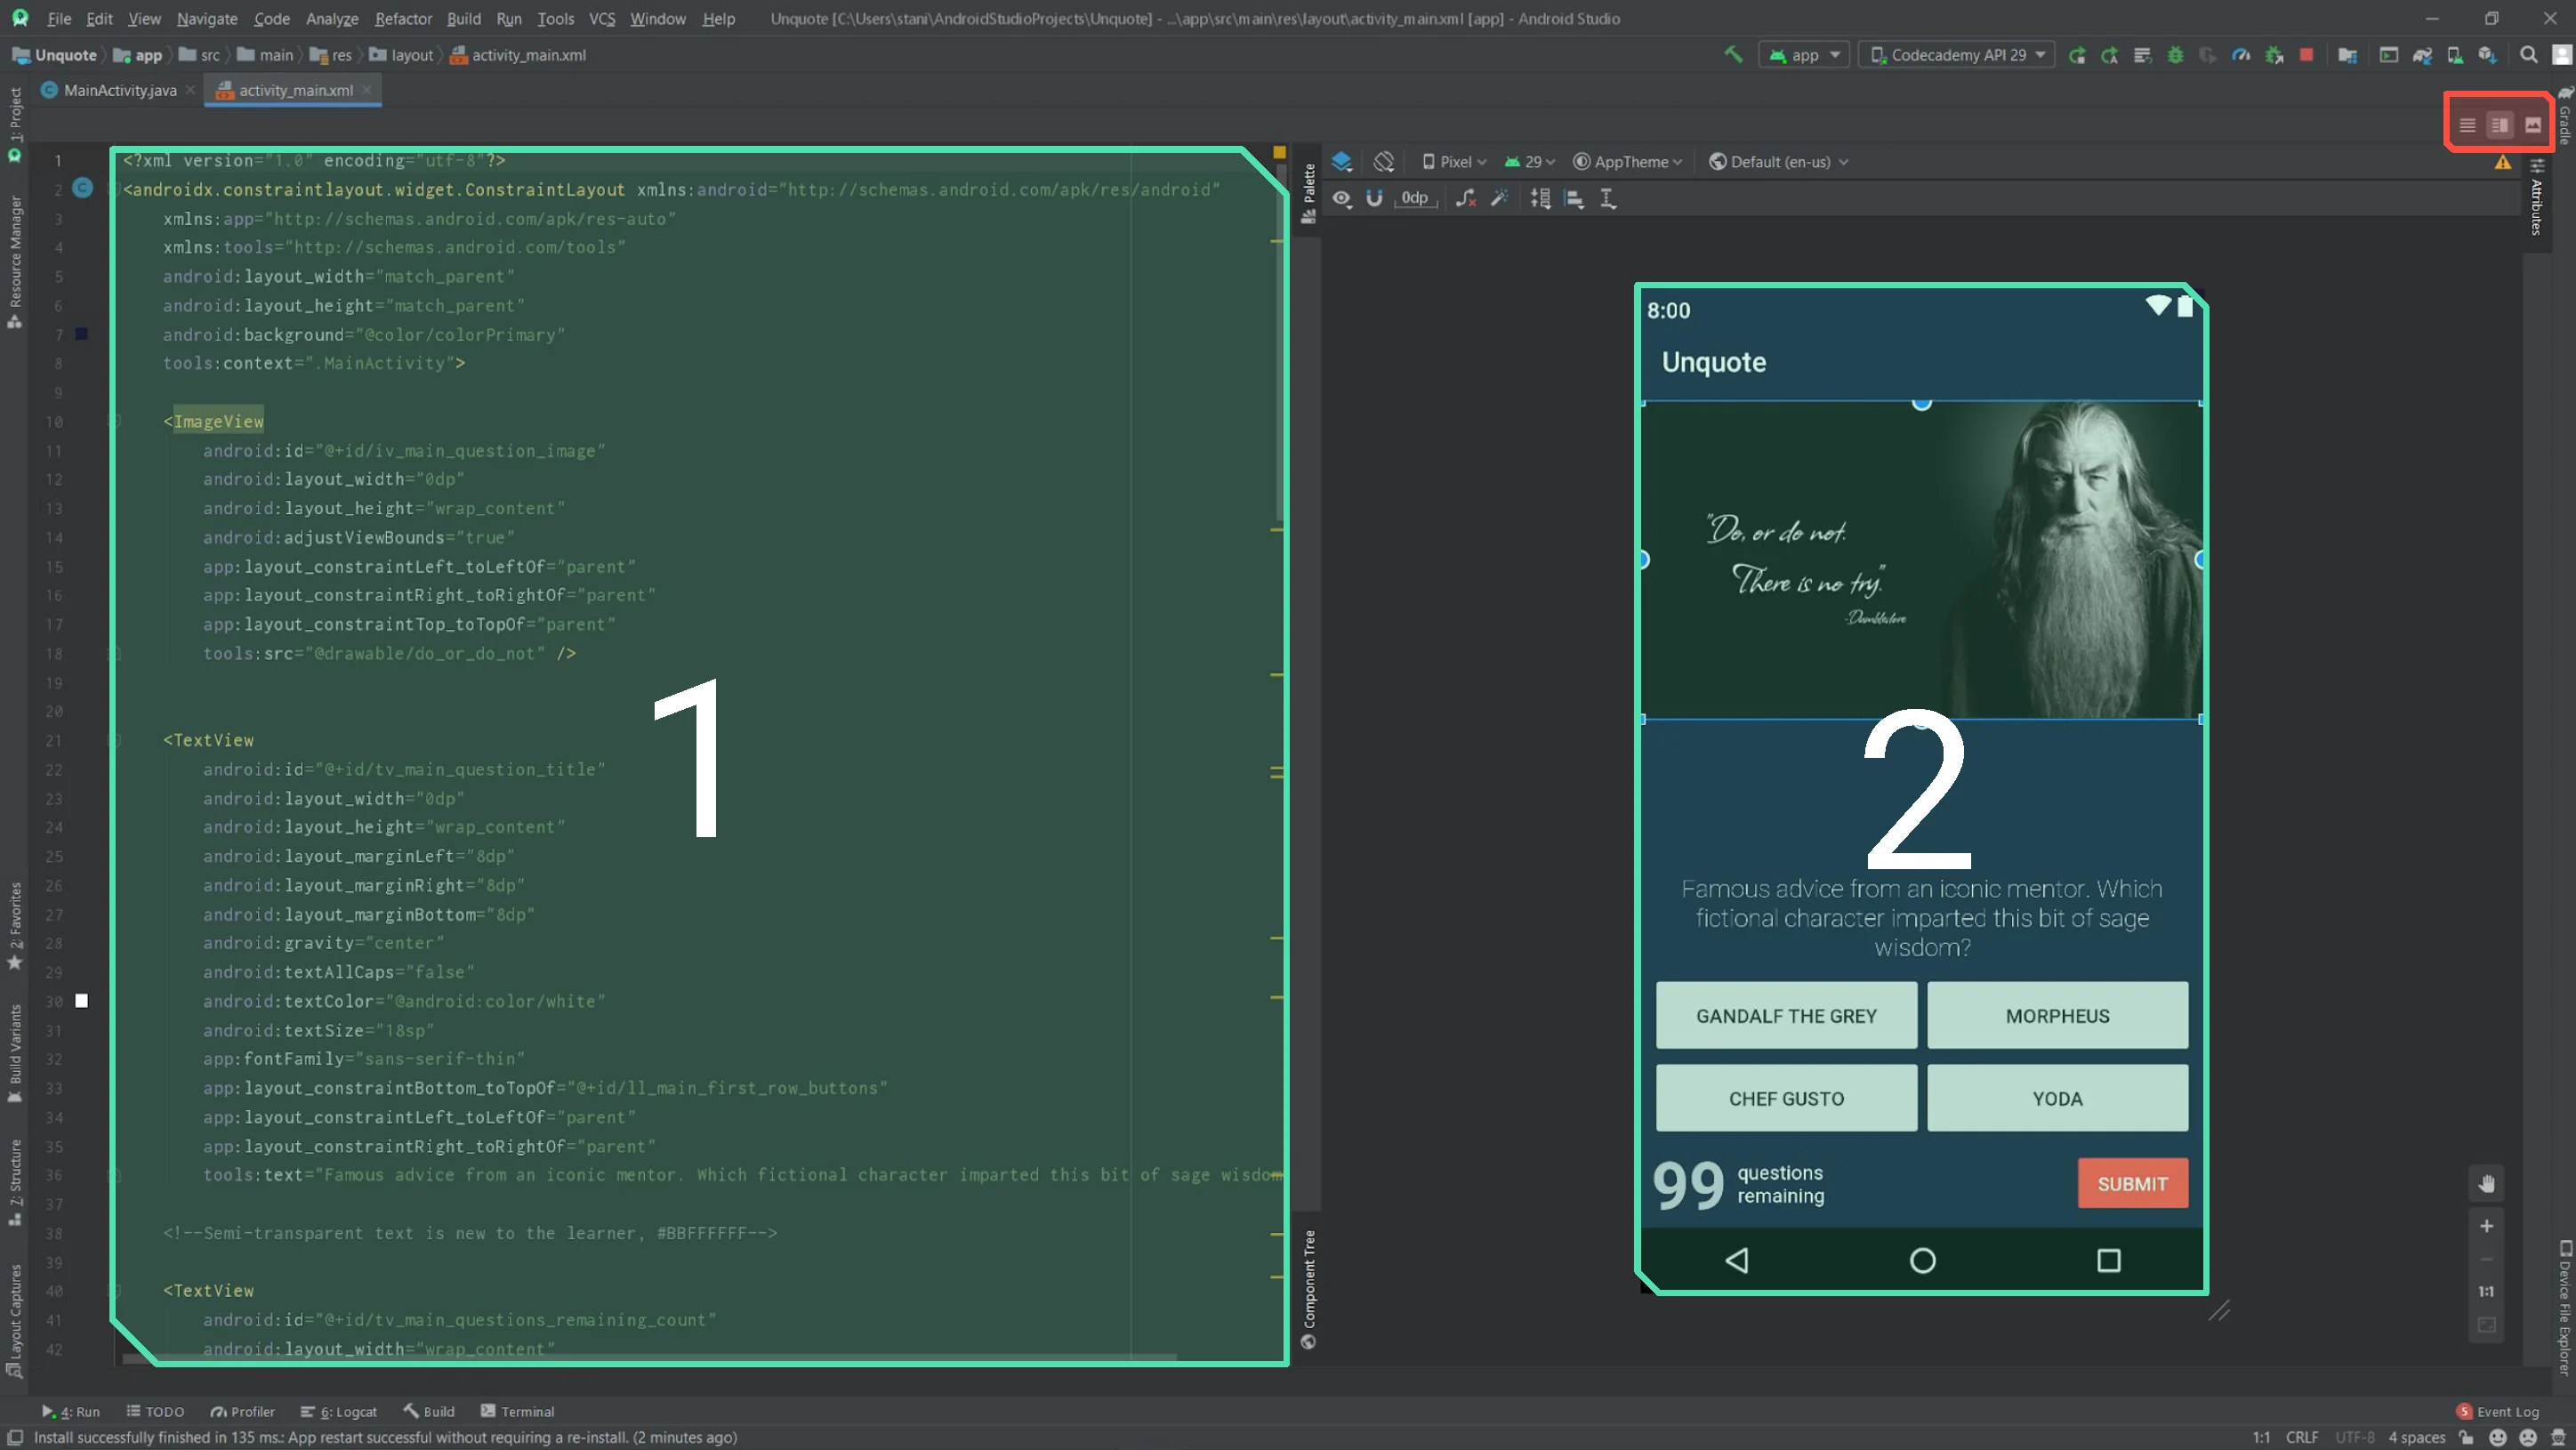
If you wish to edit the underlying XML content directly, use the toggles (highlighted in red to switch toTextorText + Previewmode:
Android Studio Quick-Start Guide
Figure D. Text + Preview Layout Editor
Once you’ve switched to (e.g.)Text + Previewmode, atD-1, you may edit directly the XML layout file. Changes made atD-1will reflect inD-2, which is also an active Layout Preview.
Logcat
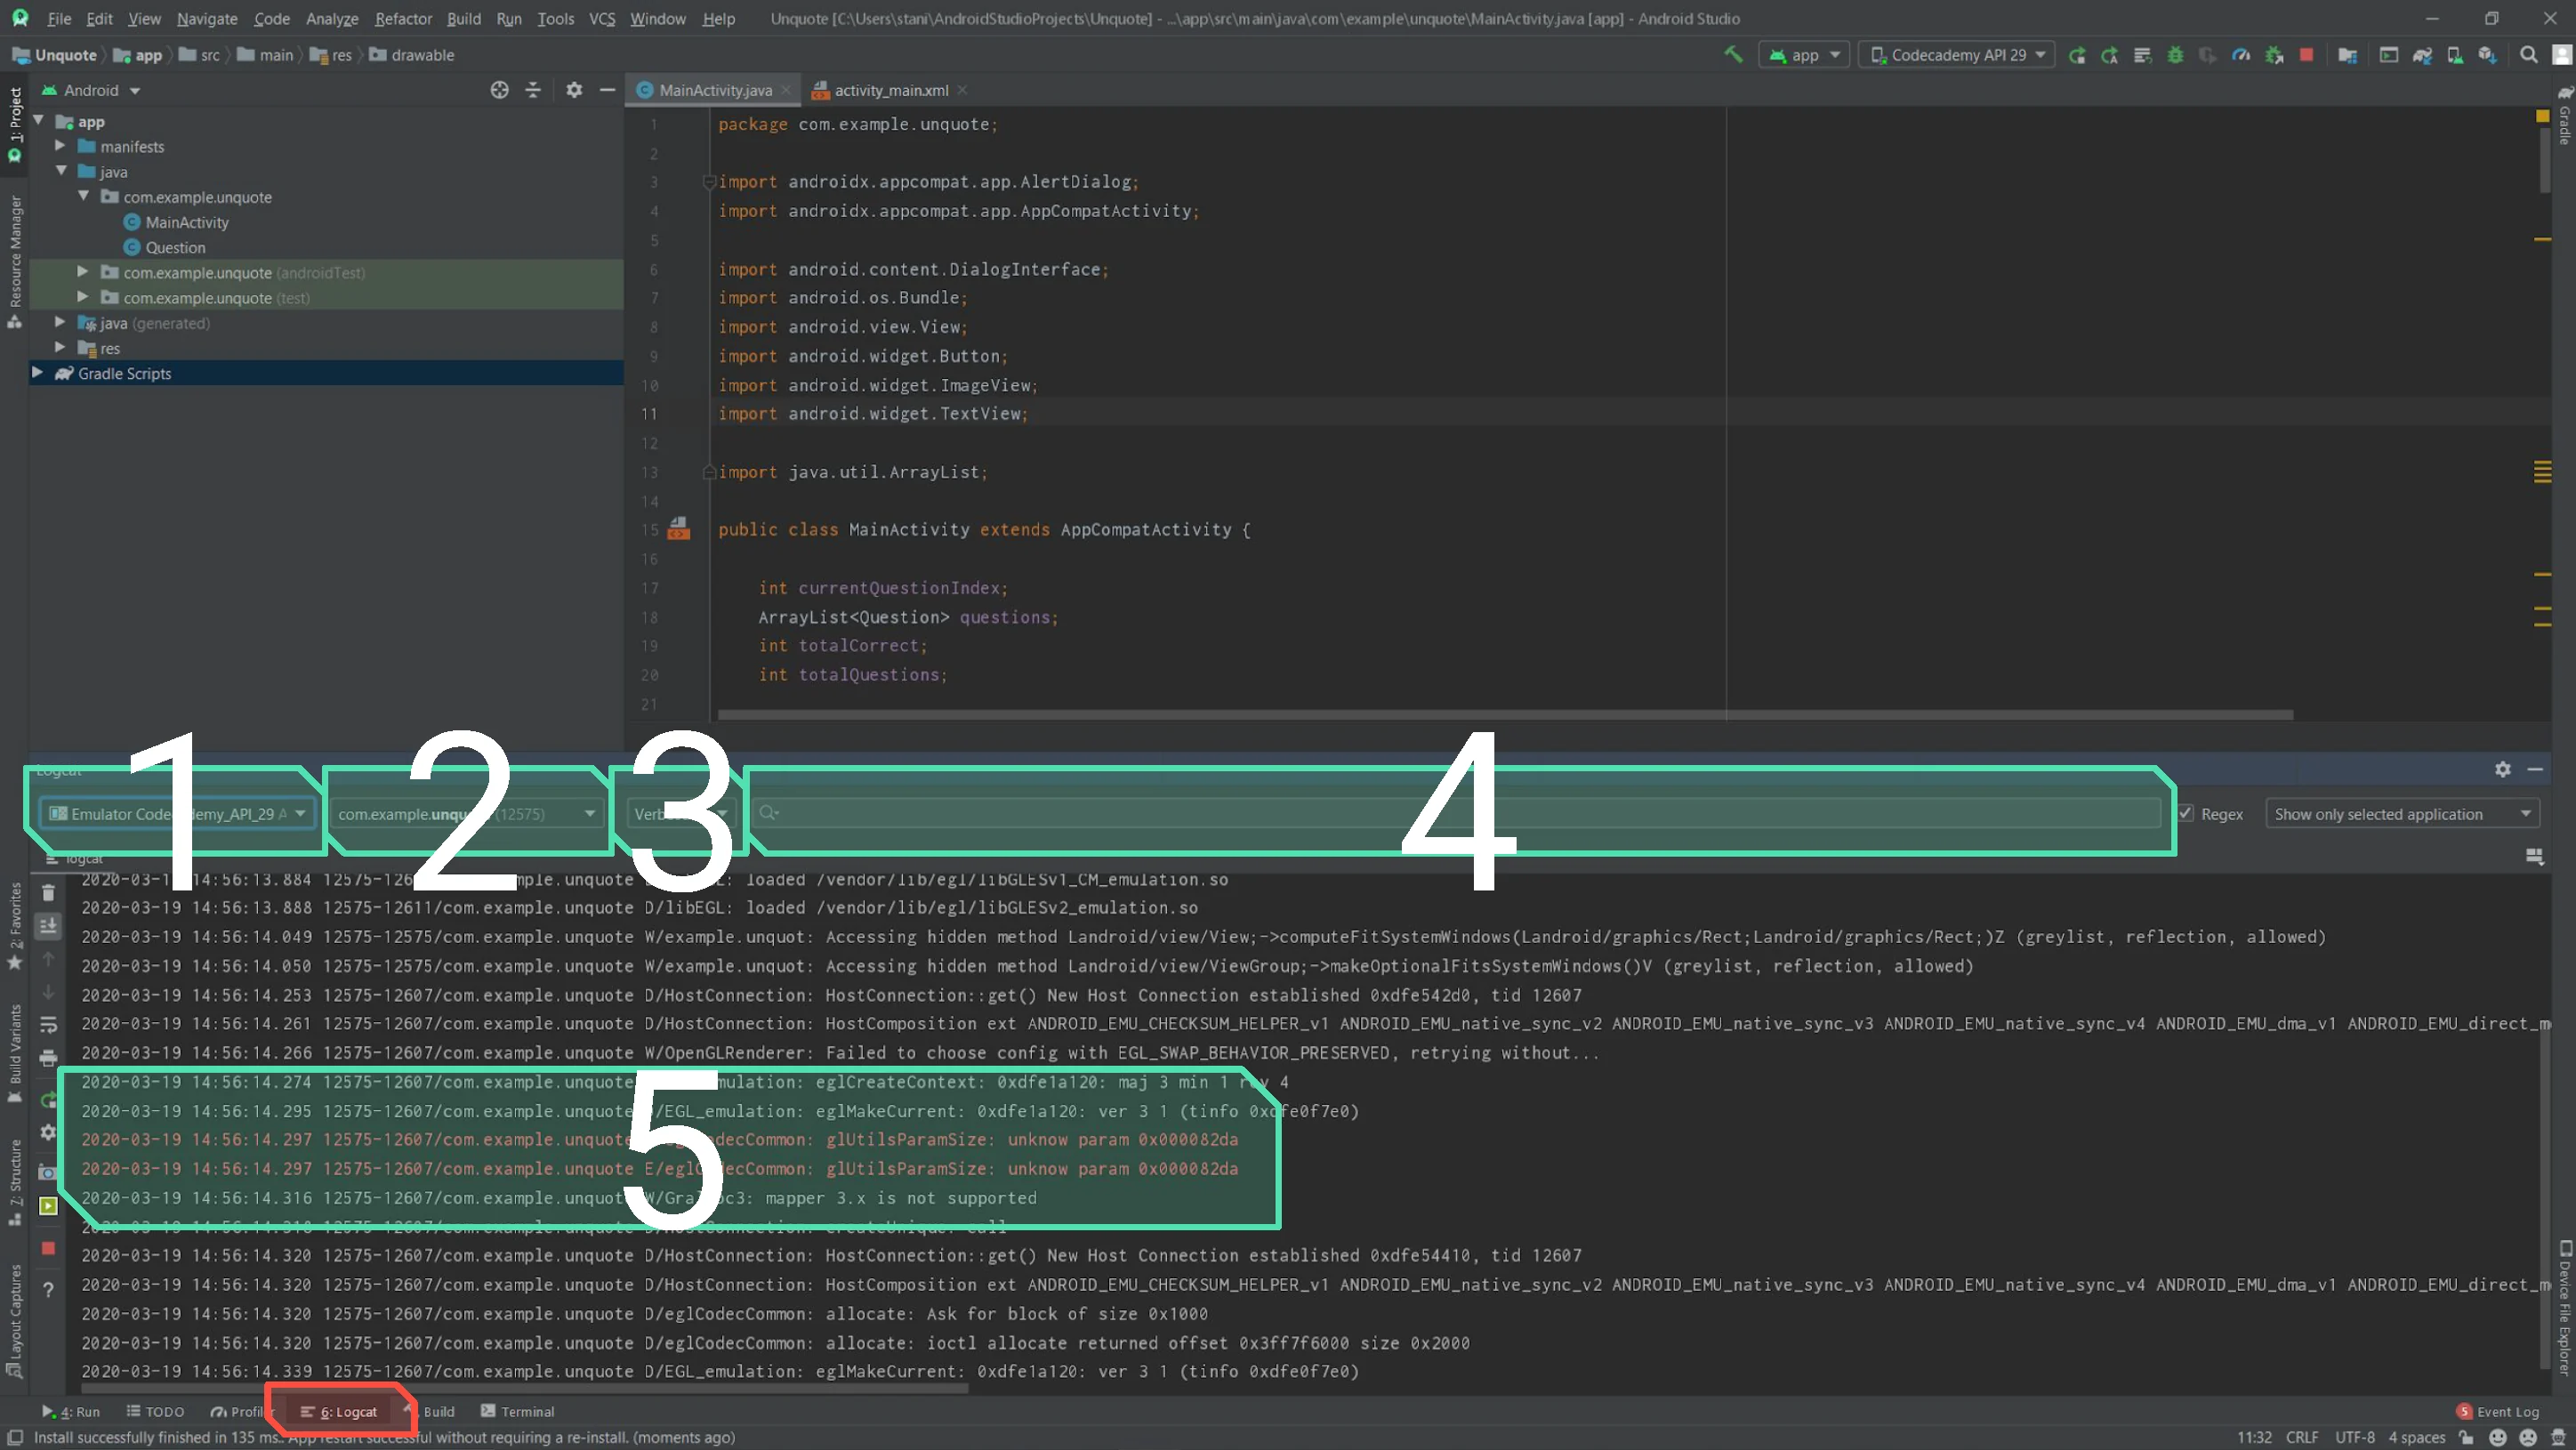
TheLogcat Panelprovides access to system messages printed by your running application and every internal component it relies upon:
Android Studio Quick-Start Guide
Figure E. Logcat Panel Revealed
By default, the Logcat Panel reveals itself after you run your application for the first time, but you may collapse and reveal the panel at any time by clicking its title tab (highlighted in red).
- E-1.This dropdown identifies the source of the log messages (emulator or device)
- E-2.The dropdown atE-2filters the log messages based on which application printed them (by default, the log is a public file which any application can write to and read from)
- E-3.Use the controls atE-3to change the urgency of log messages presented (Verbosepresentsallmessages,Errorpresents only error messages)
- E-4.If you know the message you’re looking for, type a keyword in this box to filter messages that contain that keyword
- E-5.Error messages show up in red, which helps you identify them as you read your logs
Navigation Shortcuts
A few nifty tips can help you avoid excessive mouse-clicking or getting lost in Android Studio when you’re just trying tofind that one thing.
Search All
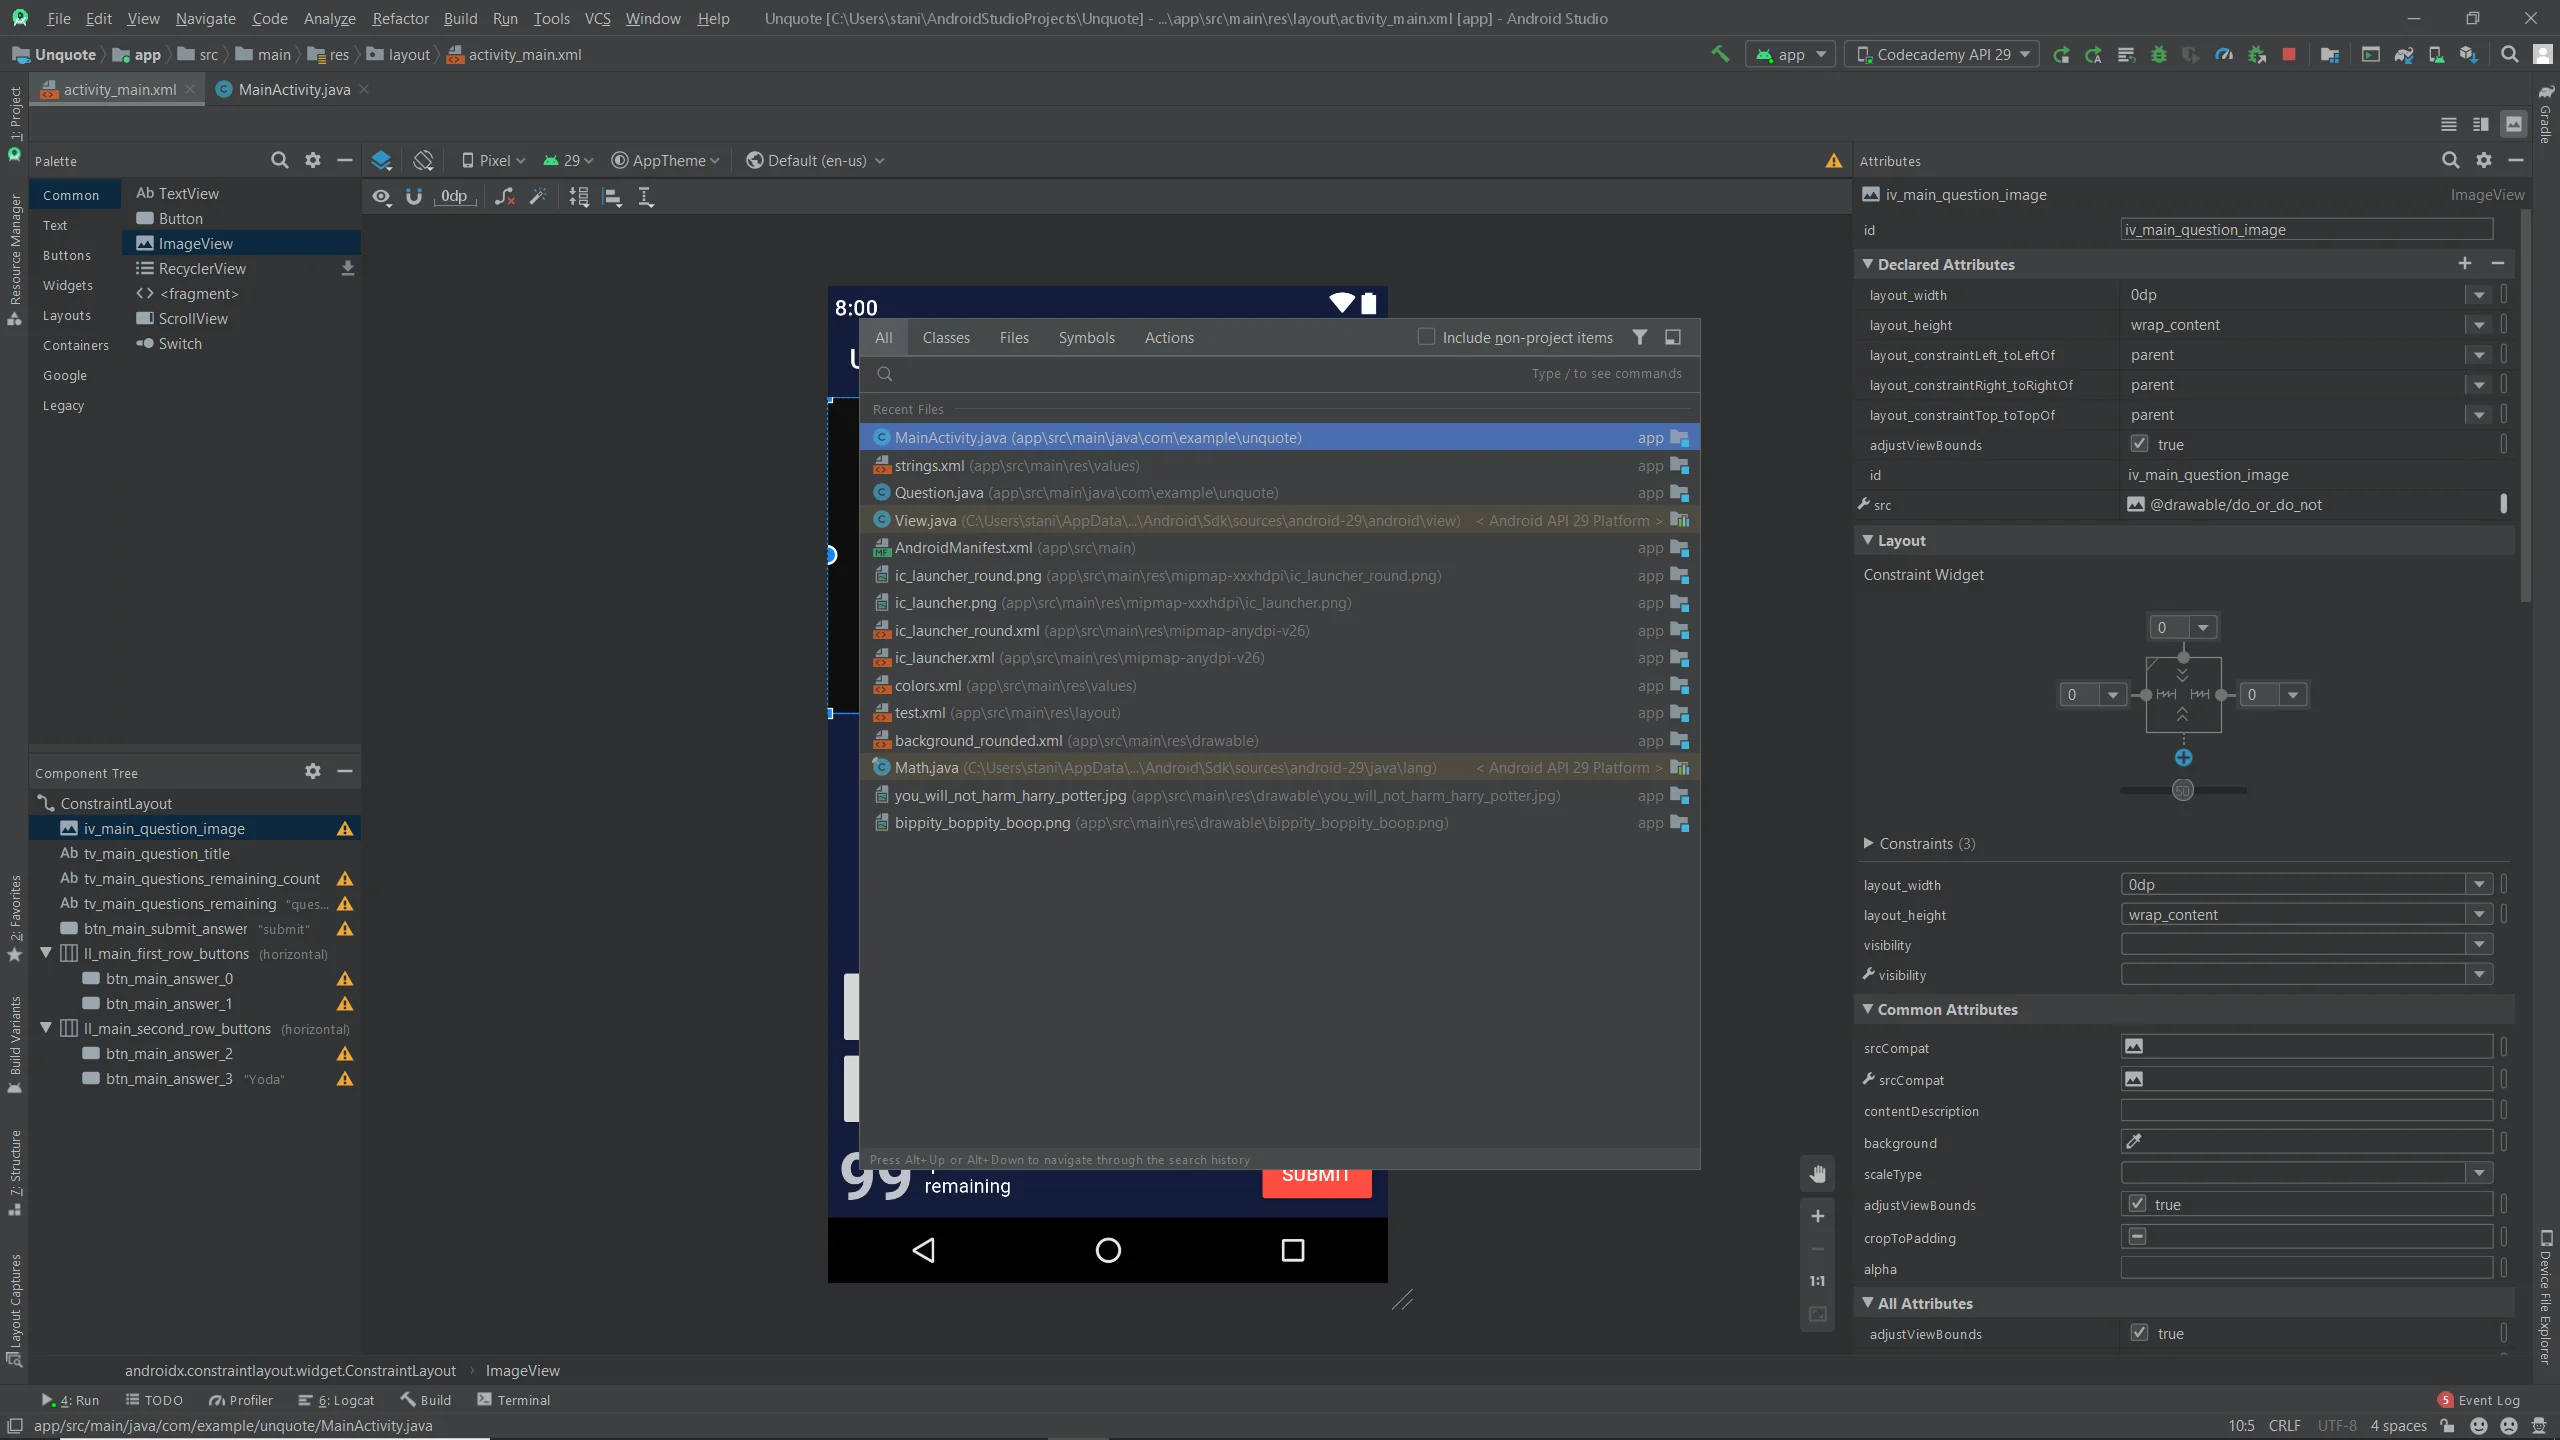
The most powerful way to find anything in Android Studio is within the Search All window:
Android Studio Quick-Start Guide
Figure F. Search All Window
To reveal this window, pressShifttwo times in quick succession. Once revealed, begin typing the name of any file in your project to narrow the results.
Use your arrows keys (↑,↓,←,→) and theenter(orreturn ↩) to select and open the desired file.
Go-To Source
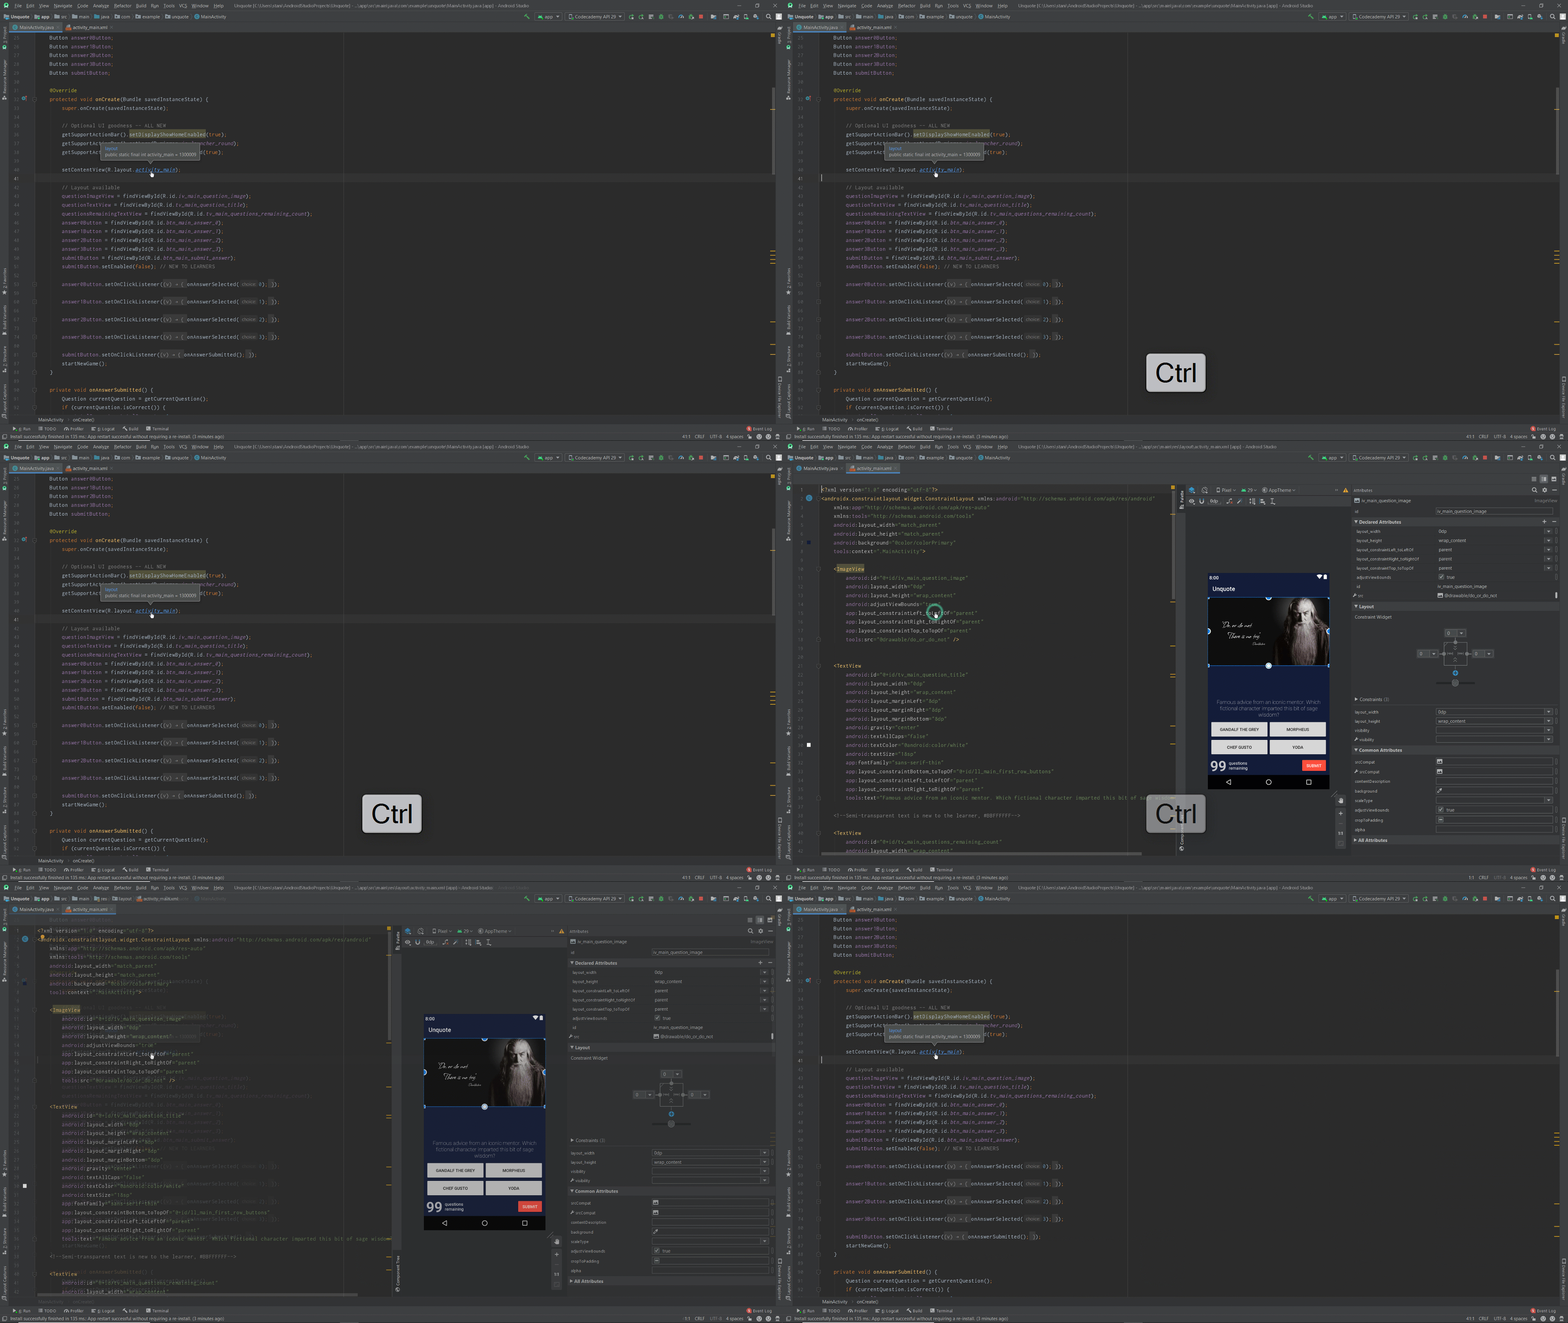
When editing a file (code or resource), we often want to ‘jump’ to the place where we initially defined a variable, class type, or resource identifier. By performing a ‘Go-To Source’ click, we can open the original declaring location of any element:
Android Studio Quick-Start Guide
Figure G. Go-To Source (Layout Identifier) Directs to the Original Layout File
Within the editing area (A-4), hold theCTRLkey on Windows / Linux (orCMDkey on OS X) and click any variable type or variable name to navigate to the place it was defined.
Here’s what this allows you to do:
- Jump straight to a layout file by clicking its resource identifier
- Navigate to a class definition by clicking the object type
- Present a drawable on-screen by clicking its resource identifier
- And more!
Coding Shortcuts
As you’re coding, Android Studio bends over backwards to reduce the number of times your poor fingers must hammer away at the keyboard. These tips will help you generate code and layout components faster.
Autocomplete
Many integrated development platforms offered autocomplete (Code Completion) before it was cool. When working with a strictly-typed language like Java, these platforms think one or two steps ahead of the programmer to offer shortcuts as they type away:

Android Studio Quick-Start Guide
Figure H. Code Autocompletion forView.OnClickListener
Autocomplete in Android Studio works just like on your smartphone, but better. As you type code into a Java class or attributes into a layout file in text mode, an autocomplete window may appear. If it does not, you can force it to appear by hitting the following shortcut:
- Windows + Linux:CTRL+Spacebar
- OS X:CMD+Spacebar
There’s also afancierversion that matches expected types 100%:
- Windows + Linux:CTRL+Shift+Spacebar
- OS X:CMD+Shift+Spacebar
After the autocomplete menu pops up, use the arrow keys (↑,↓,←,→) in combination withTABto insert the autocompleted code snippet.
Generate Common Code
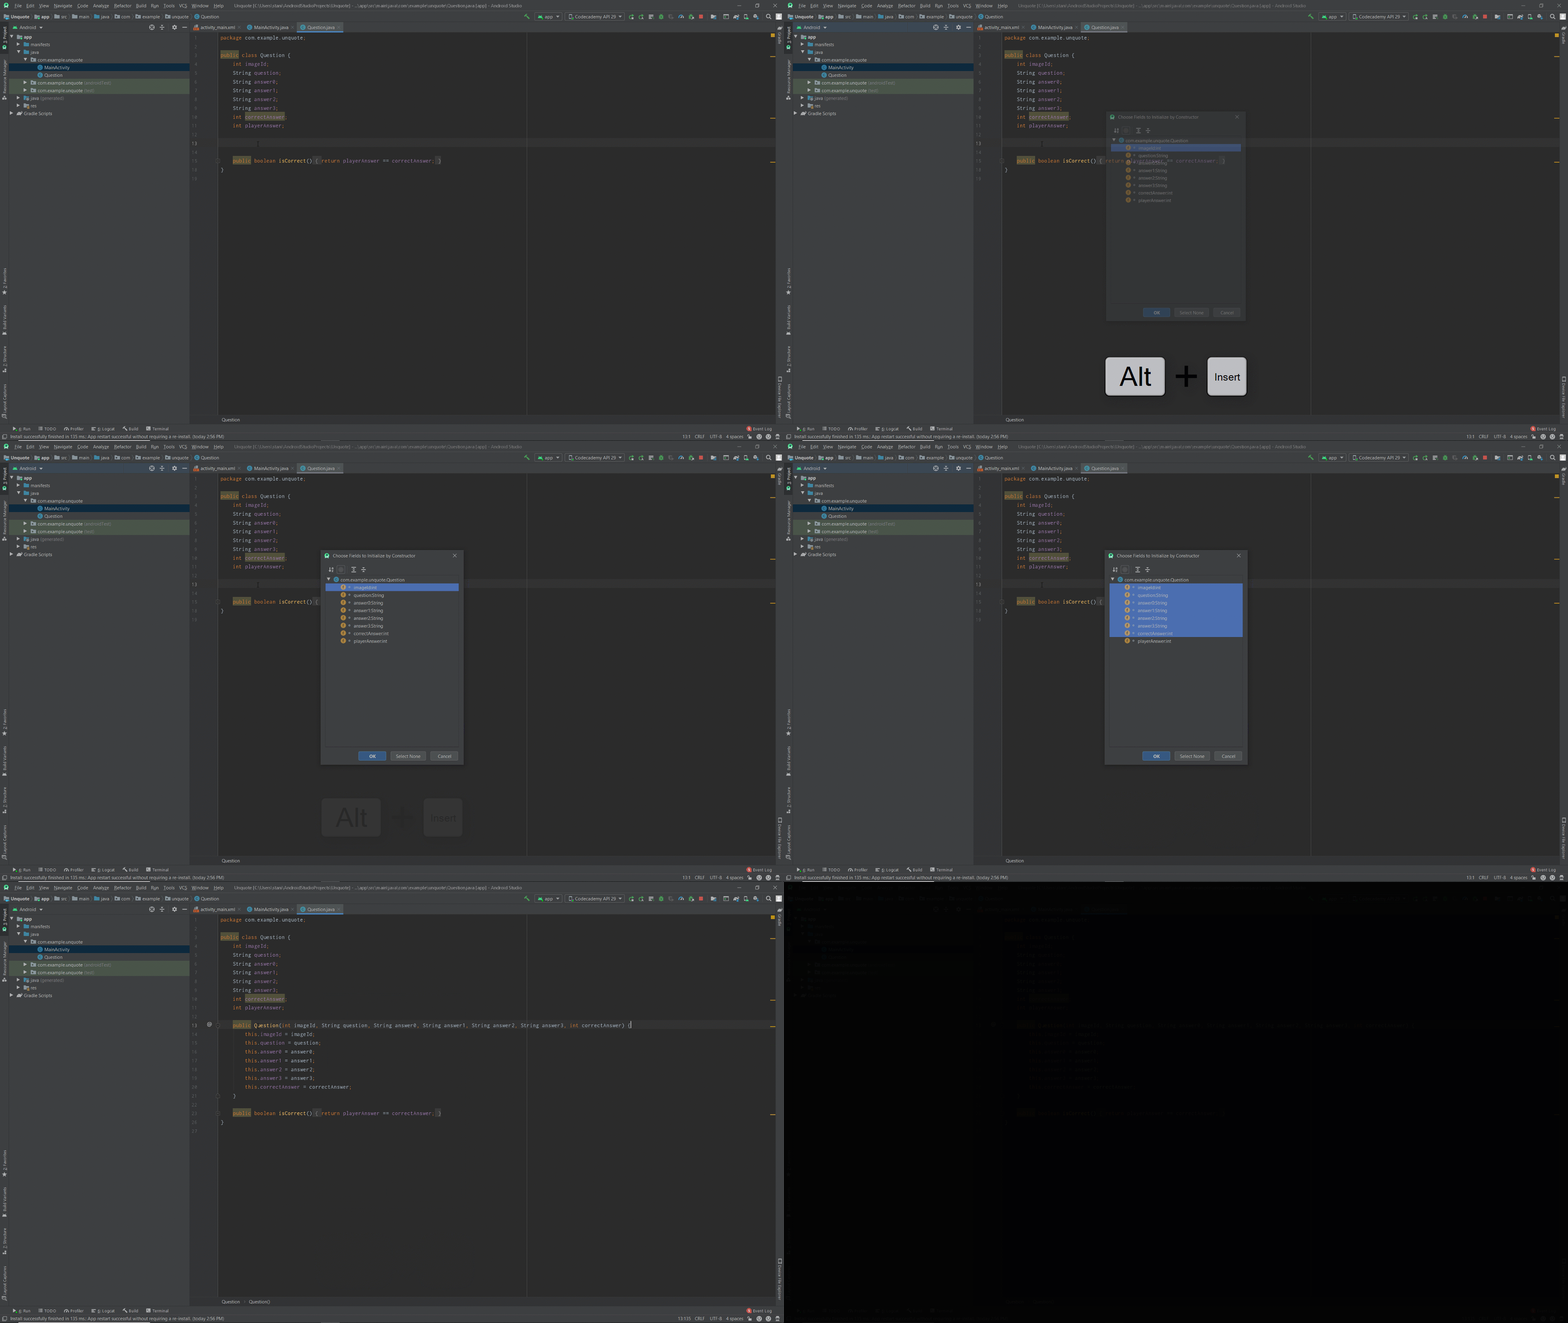
Android Studio can help you generate common code patterns (constructors, getters, setters, and more) through a point-and-click interface; they call this feature ‘code generation.’ Here’s an example of Android Studio generating a constructor for theQuestion.javaclass:
Android Studio Quick-Start Guide
Figure I. Generate a Constructor Using Code Generation
In this short gif, our class,Question, started off with a handful of member variables andno constructor. The code generator created a constructor for us that assigned the member variables we selected. And while you will probably only use this for constructors, it will become more useful over time as you learn more about Java.
To begin generating code, use the following keyboard shortcut while your editing area (A-4) is in focus:
- Windows + Linux:ALT+Insert
- OS X:CMD+N
This brings up a ‘Generate’ popup window that you may navigate with arrow keys (↑,↓,←,→). Hitreturn ↩to select the element you wish to generate (a constructor, for example), then follow the on-screen prompts.
Quickly Comment Your Code
Two types of comments exist:Line CommentsandBlock Comments.
// This is a line commentint myVariable = 5;
/* * This is a block comment! */
Copy to clipboard
// This is a line commentint myVariable = 5;
/* * This is a block comment! */To turn any line of code into aLine Comment, place your typing cursor on the designated line and use the following keyboard shortcut:
- Windows + Linux:CTRL+/
- OS X:CMD+/
This also works in reverse! Turn a Line Comment into a regular piece of code by repeating the keyboard shortcut on a commented line.
To create aBlock Comment, use the following keyboard shortcut:
- Windows + Linux:CTRL+Shift+/
- OS X:CMD+Shift+/
You can also highlight a section of your code, and turn the whole thing into a Block Comment by using this shortcut.
Other Nifty Shortcuts
For a complete list of shortcuts broken down by category, check out theAndroid documentation. Here are some particularly useful ones:
With this Android Studio guide under your belt, you’re ready to navigate and code within Android Studio two, three, or maybe 10 times faster!
'The Codecademy Team, composed of experienced educators and tech experts, is dedicated to making tech skills accessible to all. We empower learners worldwide with expert-reviewed content that develops and enhances the technical skills needed to advance and succeed in their careers.'
Complete Payment to Unlock Full Guide & Source Code
You are viewing the 30% preview. Join TopCourseAI Pro to unlock the remaining 70% of this article, unblur all code snippets, and gain full access to all 412 technical projects and guides.
Ready to access the complete step-by-step tutorial?
Gain full unhindered access to all 412 technical projects and guides, unblur all source code snippets, and download runnable scripts.
Agentic IDE Comparison: Cursor vs Windsurf vs Antigravity
Next BlueprintAnthropic Claude Opus 4.6: Is the Upgrade Worth It?
Related Blueprints & Guides
View all 166 →Apache Kafka Tutorial: A Complete Guide for Beginners
Apache Kafkais a well-known distributed event streaming platform designed to efficiently manage real-time data feeds. It was originally developed by LinkedIn in 2011 and later open-sourced. Apache Kafka has gained immens...
Developer toolsBuilding Websites with Wix
Creating a website has never been easier. Previously, making a presentable website meant learning HTML, CSS, andJavaScript. The whole process could take weeks, months, or even years before creating a website that you’re...
Developer toolsCSS Visual Rules in Chrome Inspector
Browser developer tools allow web developers to quickly collect important information on most websites. These tools are available within most major web browsers, like Chrome, Safari, and Firefox, to name a few. Because G...
Ready to build production-grade AI systems?
Enjoyed this guide? Continue exploring our library of 166+ production blueprints, multi-agent swarms, and autonomous agent systems with 100% unblurred, executable source code.