
How to Deploy Your Vibe Coding Projects for Free
How to Deploy Your Vibe Coding Projects for Free
What is vibe coding?
Vibe coding is a software development method that uses AI tools to generate complete applications from natural language descriptions. Instead of spending hours programming, describe what you want in plain English and let AI generate working applications in minutes.
Popular tools like Cursor, Replit, v0 by Vercel, Bolt, and Lovable make vibe coding possible by generating React components, full-stack applications, and complete websites from simple text descriptions.
Free deployment platforms work perfectly with vibe coding because they match the speed and experimental nature of AI-generated projects. When AI creates code instantly, deployment should be equally fast and cost-free for testing ideas and rapid iteration.
Now that you understand vibe coding, the next step is choosing the right deployment platform for our AI-generated projects.
Vibe coding platforms: Vercel vs Netlify
Vercel excels at React and Next.js applications with zero-configuration deployments, while Netlify takes a broader approach supporting any static site or JAMstack application. Here's a comparison:
Choose Vercel if:
- Building React or Next.js applications generated by AI tools
- Need fast global content delivery network (CDN) performance for dynamic content
- Require server-side rendering (SSR)
- Plan to upgrade to paid plans for commercial projects
Choose Netlify if:
- Building static sites or simple web applications
- Want built-in form handling and user authentication
- Need commercial deployment on free tier
- Prefer extensive built-in features over third-party integrations
With the platform comparison complete, let's walk through the actual deployment process, starting with Vercel.
Video: Deploy an app on Vercel and Netlify
Before we begin the step-by-step guide, you can watch a video that demonstrates the entire process. The video explains how to deploy an app on Vercel and Netlify from start to finish.
Deploy vibe coding projects on Vercel
If you prefer following along with written instructions, continue reading the detailed guide below.
Let's use a to-do list project as an example to show how to deploy any vibe-coded project from GitHub to Vercel.
Step 1: Prepare your GitHub repository
Ensure the project is pushed to GitHub with proper structure (using our to-do list example):
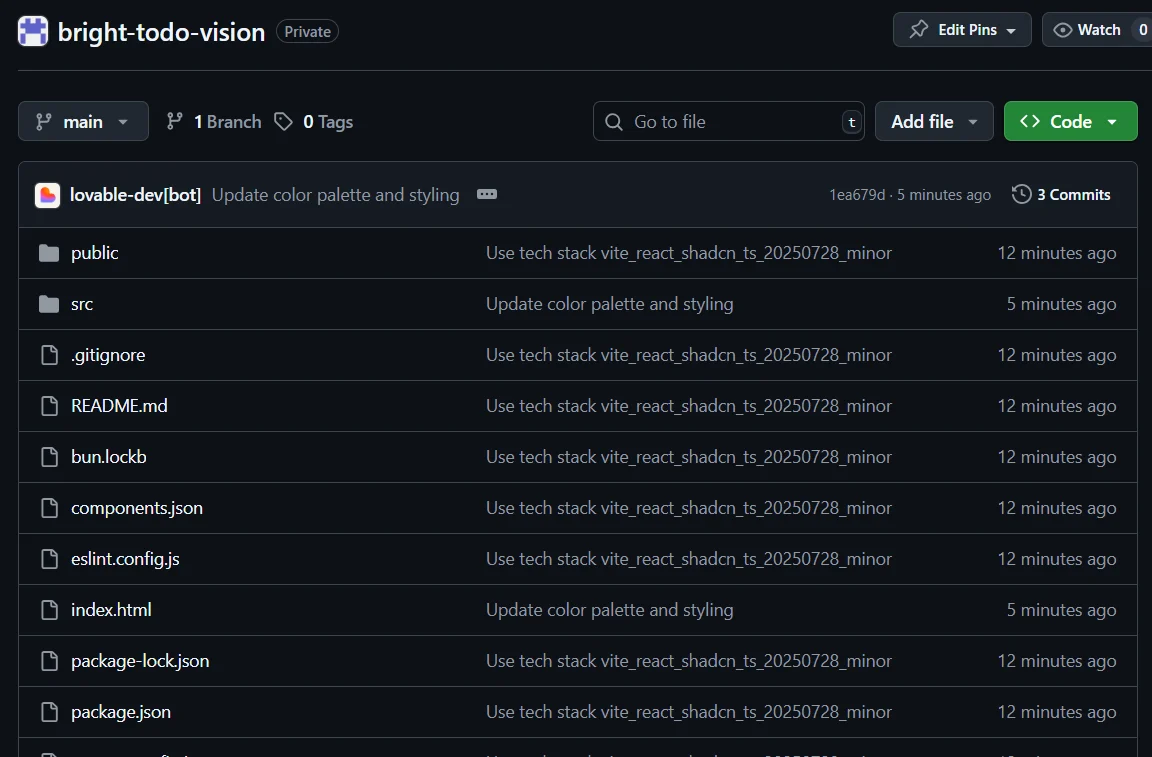
vibe-coding project in Github
Step 2: Create a Vercel account and connect GitHub
Visit Vercel's home page and sign up using your GitHub account for integration. This automatically grants Vercel access to your repositories.
Navigate to the Vercel dashboard and click "New Project". Vercel will automatically detect popular frameworks and configure build settings.
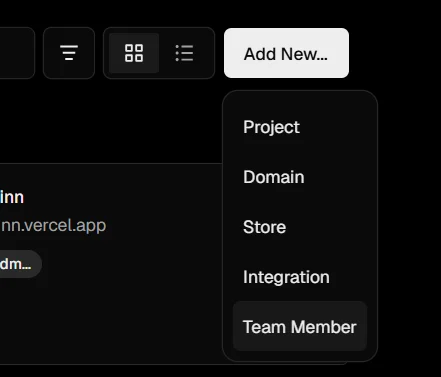
Vercel Dashboard to deploy vibe-coding project
Step 3: Import the project repository
- Click "Import Git Repository"
- Select the project from the repository list (our to-do list example)
- Vercel automatically detects the framework (React, Next.js, Vue) and configures deployment settings
- Review the detected settings: Framework Preset: Auto-detected (e.g., Next.js, Create React App) Build Command: npm run build or auto-detected Output Directory: dist, build, or auto-detected Install Command: npm install or auto-detected
- Framework Preset: Auto-detected (e.g., Next.js, Create React App)
- Build Command: npm run build or auto-detected
- Output Directory: dist, build, or auto-detected
- Install Command: npm install or auto-detected
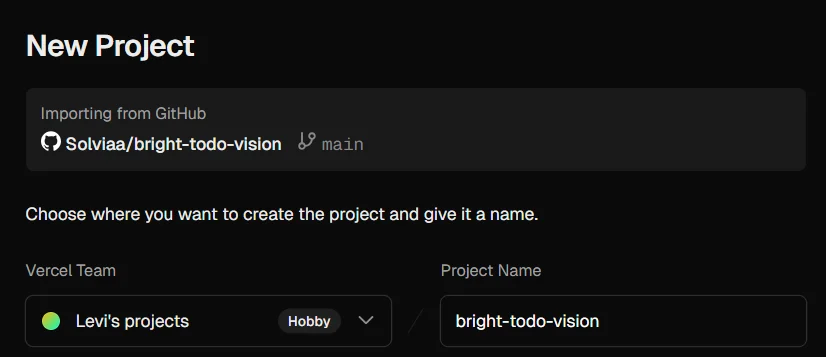
Review settings to deploy vibe-coding project
Step 4: Configure build settings (if needed)
For most vibe-coded projects, Vercel's auto-detection works perfectly. However, you can customize:
- Environment Variables: Add API keys for external services
- Build Command: Override if using custom build scripts
- Node.js Version: Specify if needed (defaults to latest LTS)
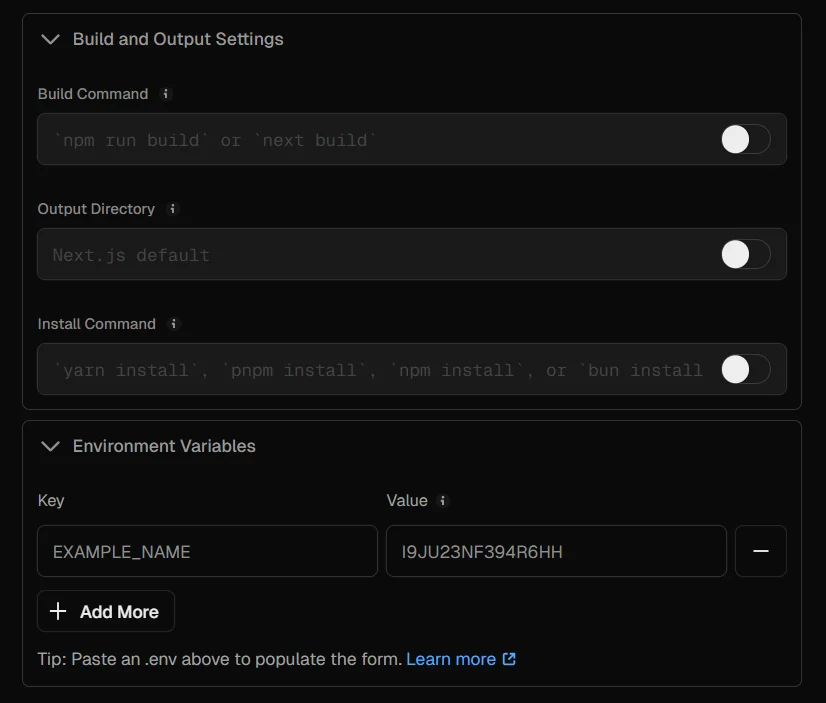
Vercel build settings configuration
Step 5: Deploy your vibe-coded project
Click "Deploy" and watch Vercel:
- Clone the repository
- Install dependencies
- Run the build process
- Deploy to global CDN
- Provide a live URL
Deployment typically completes in under 60 seconds.
Now let's see how the deployment process differs on Netlify using the same example project.
Deploy vibe coding projects on Netlify
Let's deploy the same example to-do list project to Netlify to demonstrate the process for any vibe-coded application.
Step 1: Prepare your project
We need to ensure the to-do list project includes proper build configuration. Create a netlify.toml file in your project root for custom settings:
[build] command = "npm run build" publish = "build" [build.environment] NODE_VERSION = "18"Step 2: Create a Netlify account
Go to Netlify and sign up for free. Connect your GitHub account for repository access.
Step 3: Connect your repository
- Click "Add New Project" and select "Import from GitHub"
- Authorize Netlify to access your GitHub repositories
- Select the project repository from the list (our to-do list example)
Click "Add New Project" and select "Import from GitHub"
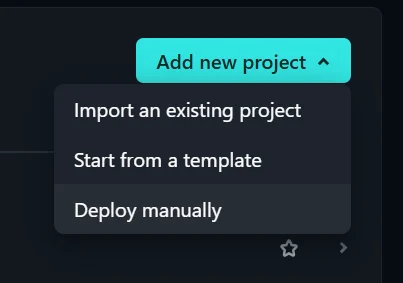
Netlify dashboard to deploy vibe-coding project
Authorize Netlify to access your GitHub repositories
Select the project repository from the list (our to-do list example)
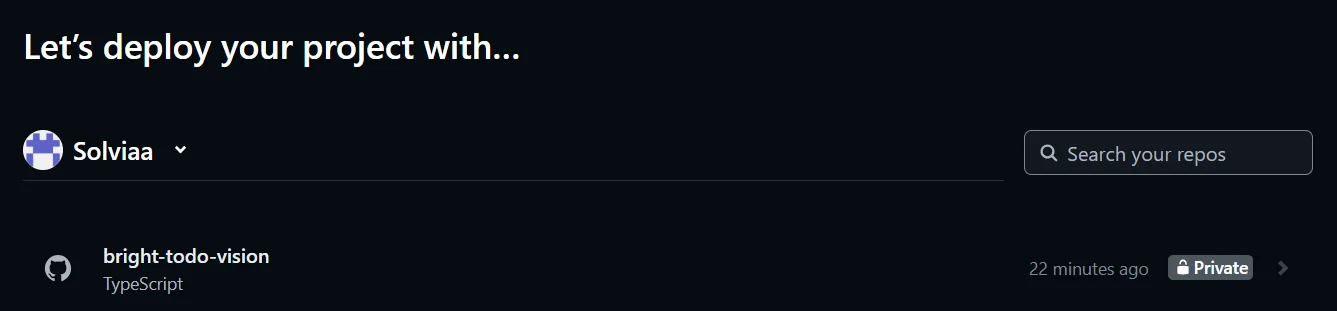
Select repository of vibe-coding project in Netlify
Step 4: Configure build settings
Configure your deployment options with proper build settings:
- Branch to deploy: Usually main or master
- Build command: npm run build (auto-detected for most frameworks)
- Publish directory: build, dist, or public (where build outputs)
- Advanced settings: Environment variables, if needed
Step 5: Deploy your site
Click "Deploy site" and Netlify handles the rest, typically completing in under a minute.
- Clone your repository
- Install dependencies
- Execute build command
- Deploy to global CDN
- Generate a unique URL
With both deployment processes covered, it's essential to understand how to securely manage sensitive data like API keys in the vibe coding projects.
Vibe coding environment variables and security best practices
Environment variables store sensitive information like API keys outside your codebase for security and flexibility.
Understanding environment variable requirements
Vibe coding applications often require external API integrations. Common examples include payment processors, authentication services, content management systems, and analytics platforms.
Never hardcode sensitive values in the source code. Use environment variables to maintain security while allowing different configurations for development, staging, and production.
Setting up environment variables on Vercel
Access the Vercel dashboard, select the project, and navigate to "Environment Variables" in project settings:
- Add Variable: Click "Add" and enter key-value pairs
- Environment Selection: Choose Development, Preview, or Production
- Sensitive Variables: Mark variables as sensitive for additional security
- Bulk Import: Upload .env files for multiple variables
Example configuration for a vibe-coded app:
DATABASE_URL=postgresql://user:pass@host:5432/db NEXT_PUBLIC_API_URL=https://api.example.com SECRET_KEY=your-secret-key-hereSetting up environment variables on Netlify
Access Netlify's environment variables through Site Settings -> Build & Deploy -> Environment Variables:
- Scope Selection: Choose scopes like Builds, Functions, or Runtime based on where variables are needed
- Deploy Context: Set different values for production, deploy previews, and branch deploys
- Secret Values: Mark variables as "Contains secret values" for additional access restrictions
Variables have character limits of 255 for keys and 5,000 for values.
Security best practices
Follow these essential security practices for vibe coding projects:
- Never Commit Secrets: Add .env.local to .gitignore
- Use Platform Variables: Set production variables directly on hosting platforms
- Client-Side Variables: Prefix browser-accessible variables with NEXT_PUBLIC_ in Next.js
- Rotate Keys Regularly: Update API keys periodically
- Limit Scope: Use scope restrictions to limit where variables are accessible
Once your vibe coding project is deployed and secure, you'll need to monitor its performance and plan for growth beyond the free hosting tiers.
Scaling vibe coding projects beyond free hosting tiers
Approaching free tier limits
Watch for these warning signs that indicate you're approaching limits:
- Build Minutes Depletion: Netlify's 300 minutes exhaust quickly with frequent deployments
- Bandwidth Overages: Both platforms charge for bandwidth overages once free limits are exceeded
- Function Usage: High API usage can quickly consume serverless function quotas
When to scale beyond free tiers
Consider upgrading when:
- Consistent Limit Breaching: Regularly exceeding free tier allowances
- Commercial Requirements: Vercel requires paid plans for commercial use
- Team Collaboration: Need multiple team members with deployment access
- Advanced Features: Require enhanced security, monitoring, or support
Plan for pricing increases as both platforms become expensive with real traffic and team growth.
Now that you understand how to use vibe coding to launch your AI projects effectively, you are ready to start and deploy them successfully.
Conclusion
Vibe coding makes building apps faster by using AI tools with simple hosting platforms. Here's what we learned:
- Use Vercel for React apps that need advanced features, and Netlify for simple websites with built-in forms and user login
- Both platforms deploy your code automatically when you push to GitHub and detect what type of project you have
- Store API keys in environment variables, never put them directly in your code, and use the security features that each platform provides
- Watch your usage numbers, make your builds faster, and be ready to upgrade when your app gets popular
- Netlify lets you run a business on the free plan, but Vercel makes you pay. Both get expensive with lots of visitors
- AI coding tools and easy hosting make it simple to build and launch apps quickly, so you can test ideas without wasting time.
Ready to start your vibe coding journey? Check out Codecademy's free course on Intro to Vibe Coding.
Frequently asked questions
1. Is vibe coding a real job?
Yes, many companies now hire people who can work with AI coding tools to build applications faster. It's becoming a valuable skill alongside traditional programming.
2. Should I choose Vercel or Netlify for my vibe coding projects?
Choose Vercel for React/Next.js apps that need dynamic features. Choose Netlify for simple websites, static sites, or if you want built-in forms and user authentication.
3. Is vibe coding good or bad?
Vibe coding is good for rapid prototyping and building simple applications quickly. However, it has limitations with complex logic and may require traditional coding skills for advanced features.
4. Can you vibe code with ChatGPT?
Yes, ChatGPT can generate code, but specialized tools like Cursor, v0, Replit, and Bolt are better designed for creating complete applications with proper file structures.
5. Is vibe coding free?
Many vibe coding tools offer free tiers. Cursor has a free plan, v0 gives free generations monthly, and Replit offers free projects. Paid plans provide more features and usage.
6. Can I deploy full-stack vibe coding applications on Vercel and Netlify for free?
Yes, but with limitations. Both platforms offer serverless functions on free tiers, but you'll need external databases. Free tiers work for small projects but require upgrades for production apps with real users.
'The Codecademy Team, composed of experienced educators and tech experts, is dedicated to making tech skills accessible to all. We empower learners worldwide with expert-reviewed content that develops and enhances the technical skills needed to advance and succeed in their careers.'
- What is vibe coding?
- Vibe coding platforms: Vercel vs Netlify
- Video: Deploy an app on Vercel and Netlify
- Deploy vibe coding projects on Vercel
- Deploy vibe coding projects on Netlify
- Vibe coding environment variables and security best practices
- Scaling vibe coding projects beyond free hosting tiers
- Conclusion
- Frequently asked questions
Complete Payment to Unlock Full Guide & Source Code
You are viewing the 30% preview. Join TopCourseAI Pro to unlock the remaining 70% of this article, unblur all code snippets, and gain full access to all 412 technical projects and guides.
Ready to access the complete step-by-step tutorial?
Gain full unhindered access to all 412 technical projects and guides, unblur all source code snippets, and download runnable scripts.
How to Delete a Git Branch Locally and Remotely
Next BlueprintHow to Differentiate Lesson Content with ChatGPT
Related Blueprints & Guides
View all 166 →A Complete Guide to Vercel's AI SDK
Vercel AI SDK is a powerful TypeScript-first toolkit that provides a unified interface for building AI applications with Next.js and other modern frameworks. It eliminates the traditional complexity of managing multiple ...
AI Agents & AutomationAG-UI: How the Agent-User Interaction Protocol Works
AG-UI (Agent-User Interaction Protocol) is an open, lightweight protocol that standardizes the way AI agents interact with frontend apps. Consider it a common language that eliminates the need for custom integration code...
Generative AI FoundationsAI vs Generative AI: Understanding the Difference
Artificial Intelligence, or AI, is everywhere, from chatbots helping you shop to recommendation engines suggesting your next binge. Yet not all AI is the same, and the term is often used loosely, leaving many confused be...
Ready to build production-grade AI systems?
Enjoyed this guide? Continue exploring our library of 166+ production blueprints, multi-agent swarms, and autonomous agent systems with 100% unblurred, executable source code.