
Getting Started with Git and GitHub Desktop
Getting Started with Git and GitHub Desktop
What is version control?
As a programmer, you’ll often find yourself working with many different types of files as well as collaborating with others on projects.
For example, imagine you and your team are working on a machine learning algorithm aimed at teaching a car to drive autonomously.
As you and your team collaborate on many different files, things can get pretty messy if you aren’t on the same page about the current state of the project. Aversion controlsystem(VCS) can help prevent this issue.
A version control system helps manage your files and track the history of changes in your projects. In simple terms, you can think of it as a Google Doc – for coders.
A version control system makes it clear which changes to the project are made, who made those changes, and when those changes occurred. Version control also makes it easy to rewind to a previous version of your project if, for example, you discover a bug in your code and want to revert to a past version.
What is Git?
Gitis a widely-used version control system used to manage code. Nearly 70% of developers use Git, according to aStack Overflow survey.
Git allows you to save drafts of your code so that you can look back at previous versions and potentially undo complicated errors. A project managed with Git is called arepository.
A repository contains all of the files and folders associated with your project. It also includes the revision history of each file. The file history is a series of snapshots in time, known ascommits. A commit tells Git that you made some changes which you want to record.
When you make a commit in Git you will see “commit to main.” This is referring to thedefaultbranch, which can be thought of as the production-ready version of your project.
Note:In the pastGitHubused the termmaster, but decided to rename the default branch tomain. You can read more about this changehere.
Interacting with Git
Many people get intimidated by Git at first because they imagine interacting with it might look something like this:
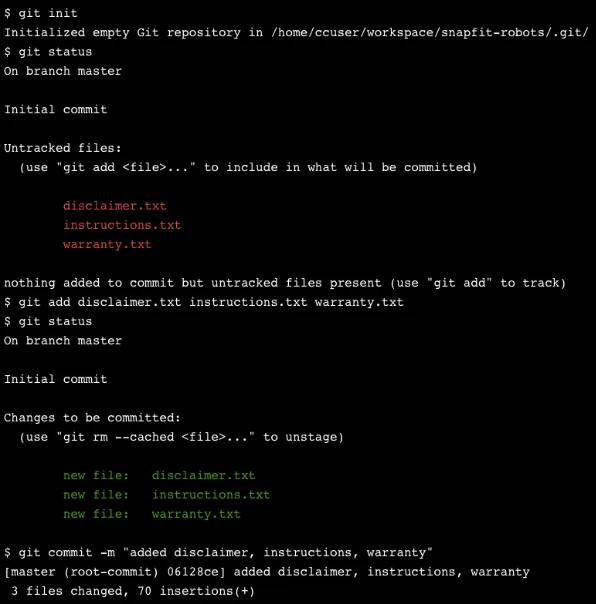
A command line containing instructions to commit changes to three files in a Git repository.
However, today there are ease-of-use interfaces that make it easy to interact with Git without using the command line.
Using such interfaces helps simplify your development workflow and allows you to focus on your coding instead of spending your time figuring out all of the intricacies of Git.
The interface we will be working with is calledGitHub Desktop.
What is GitHub?
Git and GitHub are the same thing…right? Not exactly.
GitHubis a popular hosting service for Git repositories. GitHub allows you to store your local Git repositories in the cloud. With GitHub, you can back up your personal files, share your code, and collaborate with others.
In short, GitHub is a tool for working with Git. There are other services to host Git repositories, but GitHub is a trusted, free service used by organizations across the world, big and small.
To use GitHub and GitHub Desktop, you will need a GitHub account.
If you already have a GitHub account, continue to the next section (GitHub Desktop). Otherwise, follow these steps:
In your browser:
- Open a new browser tab.
- Navigate togithub.com
- Create an account.
After you sign up, you will receive a verification email. Be sure to verify your email address to GitHub by following the instructions in that email.
Installing GitHub desktop
Once you have your GitHub account set up, you are ready to install GitHub Desktop.
In your browser:
- Open a new browser tab.
- Navigate todesktop.github.com
- Download GitHub Desktop.
Once installed, open the GitHub Desktop application. You should see a screen that looks like this:
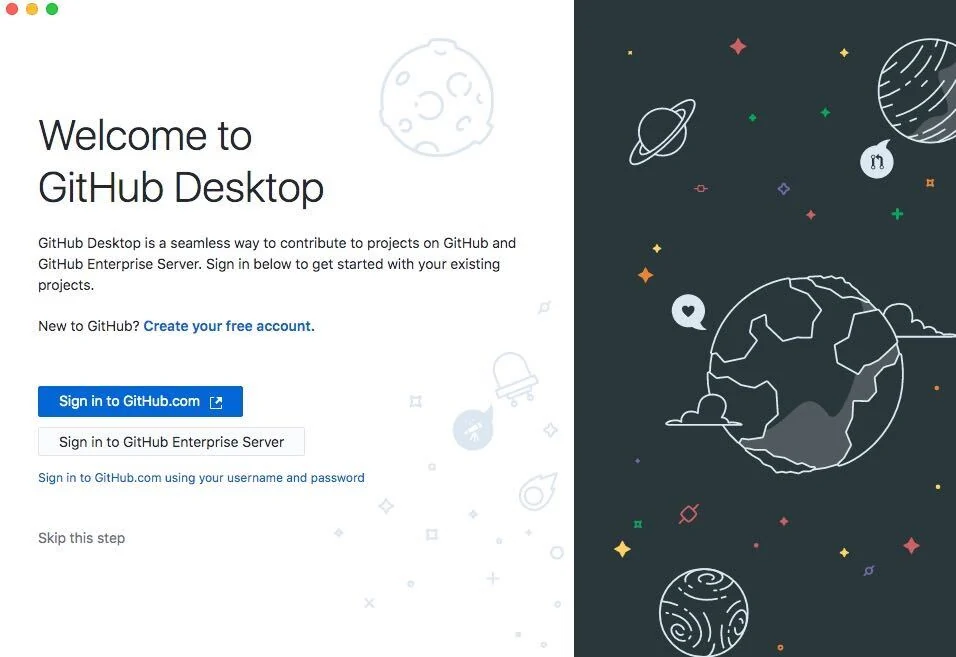
GitHub Desktop - Welcome Screen
Click “Sign in to GitHub.com” and sign in using your GitHub username (or email associated with your GitHub account) and password. You should now see this:
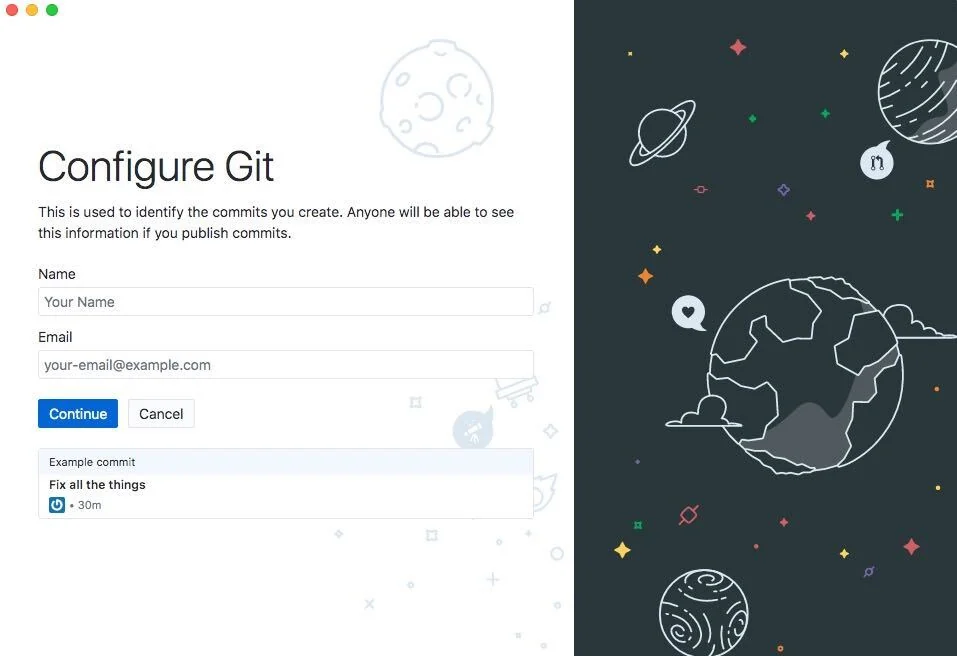
GitHub Desktop - Configure Screen
Here you should enter the name and email for your Git account – this information is used to identify the commits you create. You can use your GitHub username for your name and the email associated with your GitHub account for your email. Click “Continue” once you complete this step.
Click “Finish” on the next screen.
You’re now ready to start using GitHub Desktop!
Creating a repository in GitHub desktop
If you followed the steps correctly so far, you should see the following screen:
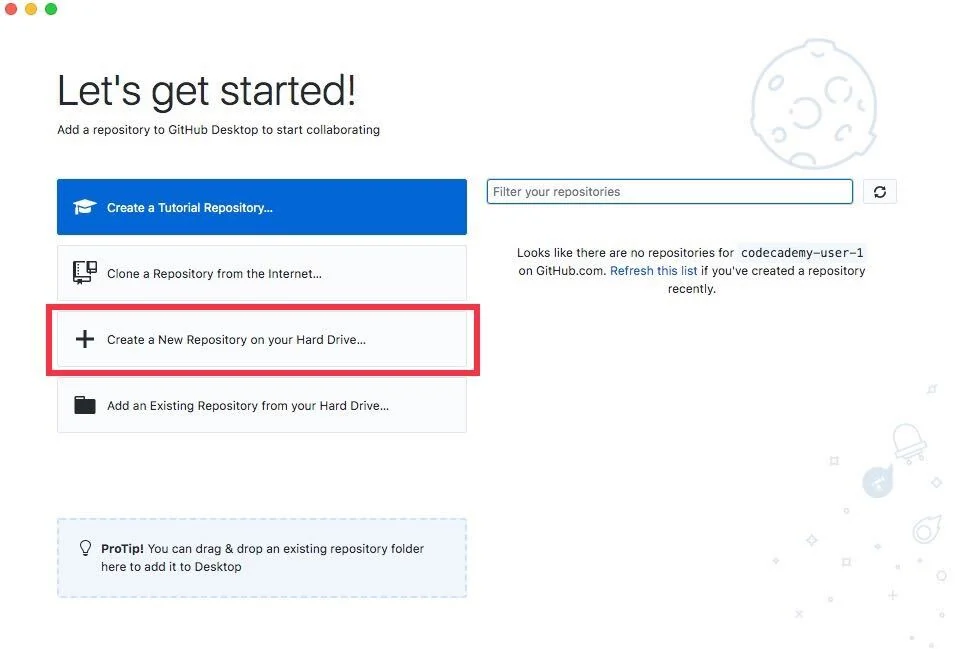
GitHub Desktop - Let's Get Started
To create a new repository in GitHub Desktop, start by clicking “Create a New Repository on your Hard Drive…”
Let’s name our repositorycodecademy-git-test.
For the local path, try to choose an easily accessible location, such as your Desktop. Also, make sure to check “Initialize this repository with a README” since we will be modifying the README file in this tutorial. Your screen should look like this:
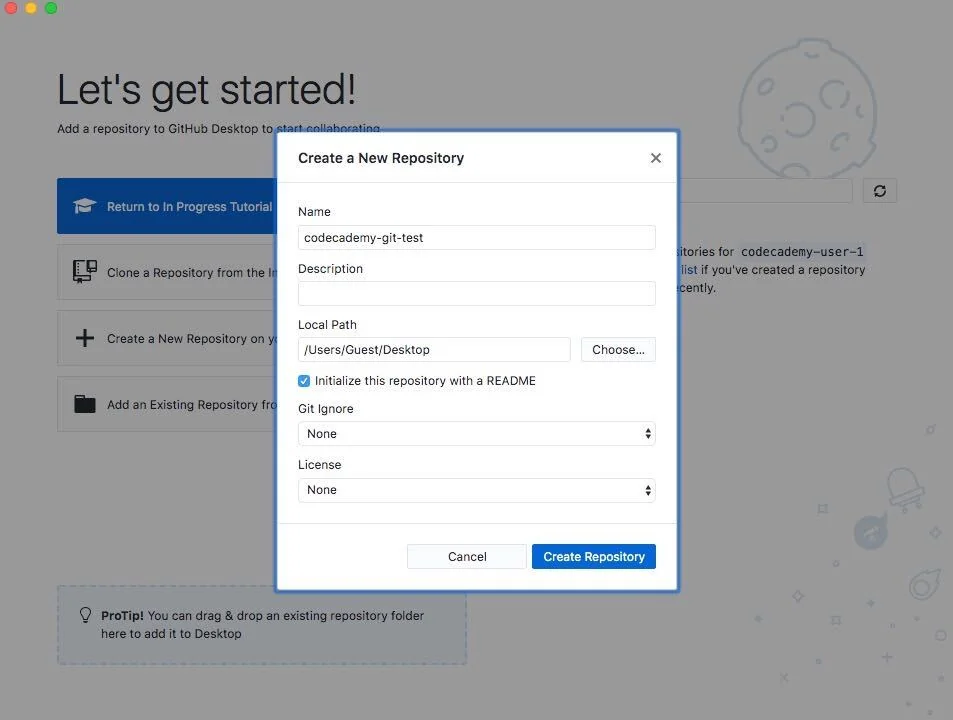
GitHub Desktop - Create Repository
Once you’re ready, click “Create Repository.”
Congratulations! You just learned how to create a new Git repository using GitHub Desktop. You should now see this:
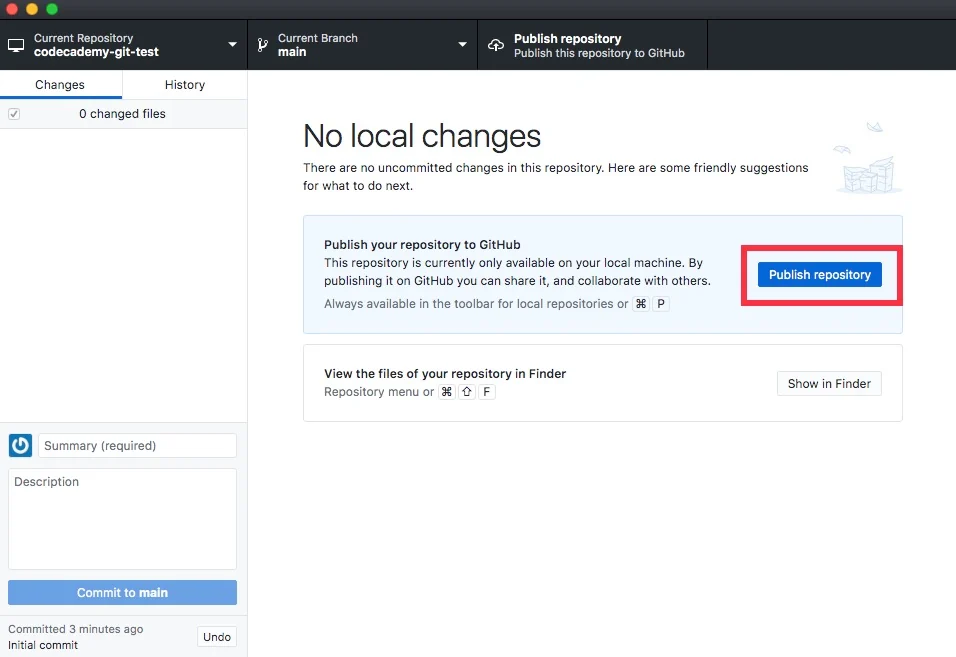
GitHub Desktop - Publish Repository
On the top bar, notice that our current repository,codecademy-git-test, is shown. Next to that, our current branch, thedefault branch, is shown. This repository is currently available only on our local machine. To publish it to GitHub, let’s click “Publish repository.”
Now when you navigate to your GitHub profile ongithub.com, you should see your newly created repository listed there:
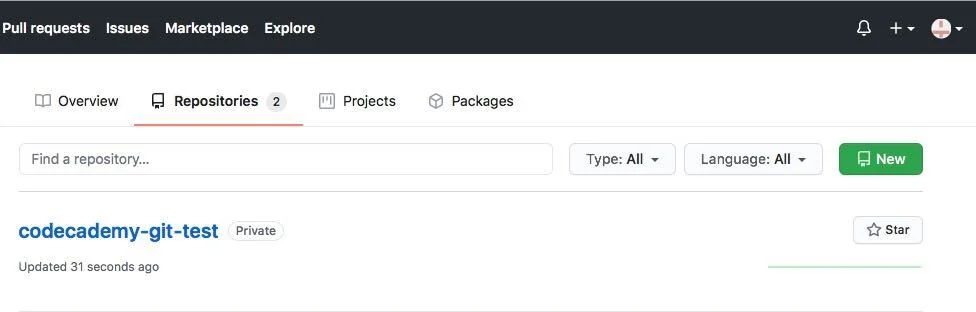
GitHub Repository
Working with commits in GitHub desktop
Now that you know how to create a repository in GitHub Desktop, let’s talk about commits. A commit tells Git that you made some changes to files in your repository and you want to record those changes.
To make our first commit, we first need to modify one of the files in our repository.
Navigate to thecodecademy-git-testfolder on your Desktop (or wherever you chose to locate it). You’ll notice that the only file contained in this folder is a README.md file.
Open this file with your preferred text or code editor and write a personalized message. For instance, we can write the following:

Git README File
Once you have finished your edits, save the README file and return to the GitHub Desktop application. You’ll notice that GitHub Desktop has already recognized the changes made to your file.
To commit these changes, we should first write a commit message on the bottom left of the screen. In this example, “Update README.md” is an appropriate commit message.
When we’re ready to commit, we can simply click “Commit to main.”
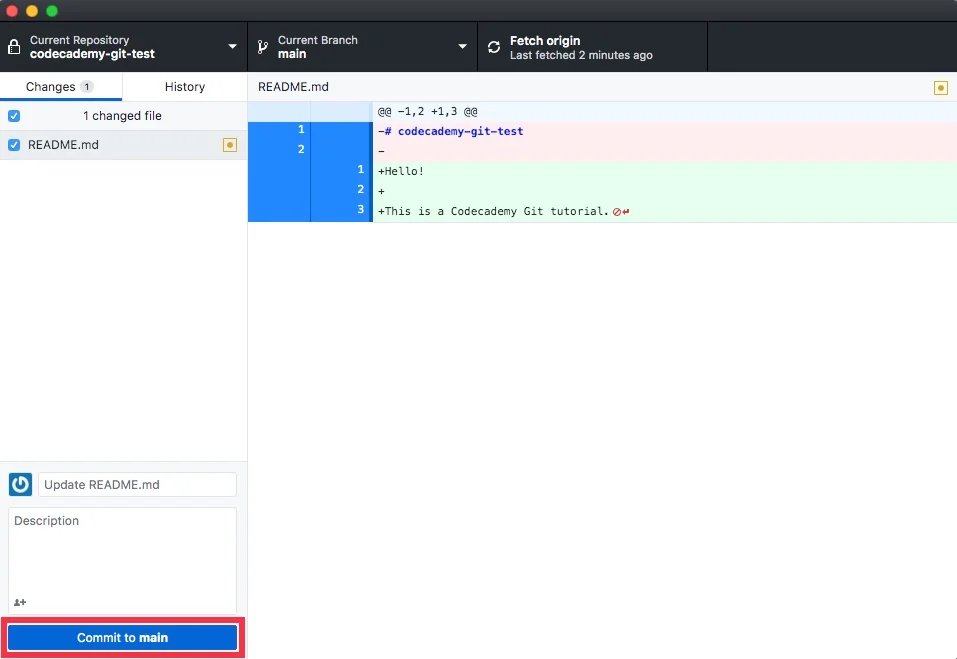
GitHub Desktop - Commit To Main
Congratulations! You just learned how to perform a Git commit using GitHub Desktop.
Your commit is currently local to your computer. If you want the changes to the README file to show on GitHub, you must click “Push origin” on the next screen:
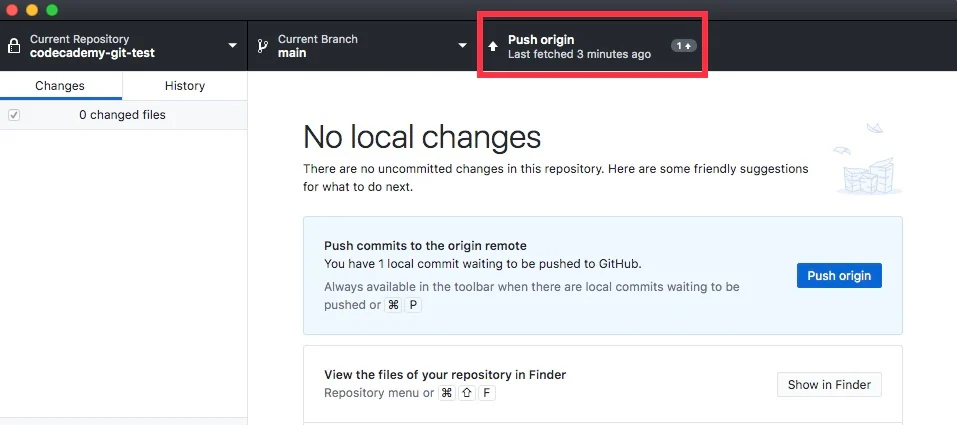
GitHub Desktop - Push Origin
Now when you navigate to yourcodecademy-git-testrepository ongithub.com, you should see your updated README file:
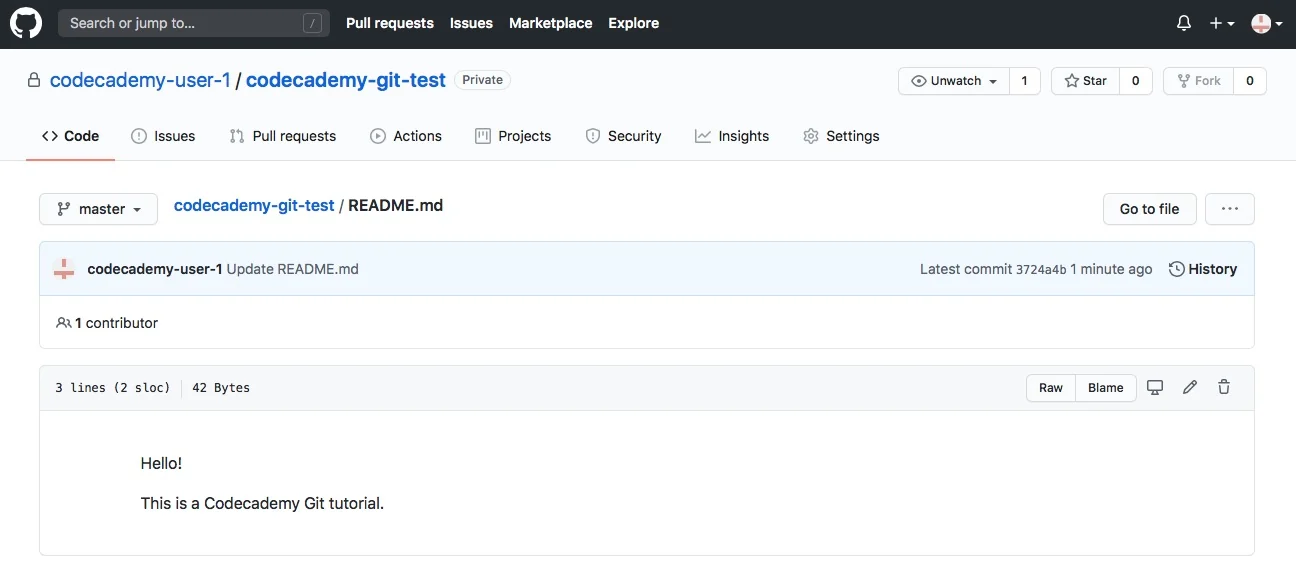
GitHub Desktop - Updated README
Fetching updates with GitHub desktop
When you collaborate with other people on a repository, you will want to see what everyone is working on and update your files with the most up-to-date changes.
In Git, fetching is the process of updating your files with the most recent changes. Luckily, GitHub Desktop makes fetching changes easy.
Let’s suppose that someone made an update to our README file from the previous example. The README file now looks like this:
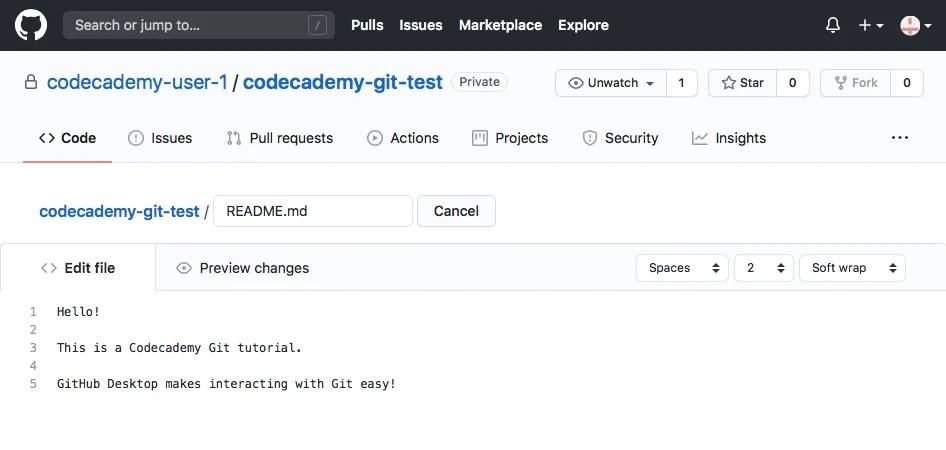
GitHub - Updated README
In order to fetch these changes in GitHub Desktop, we can simply click the “Fetch origin” button:
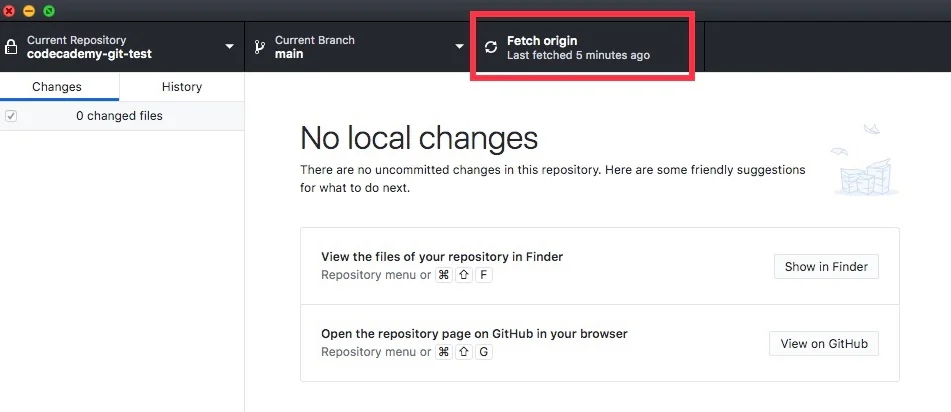
GitHub Desktop - Fetch Origin
Next, you should click “Pull origin” so that the changes are reflected in the files on your local machine:
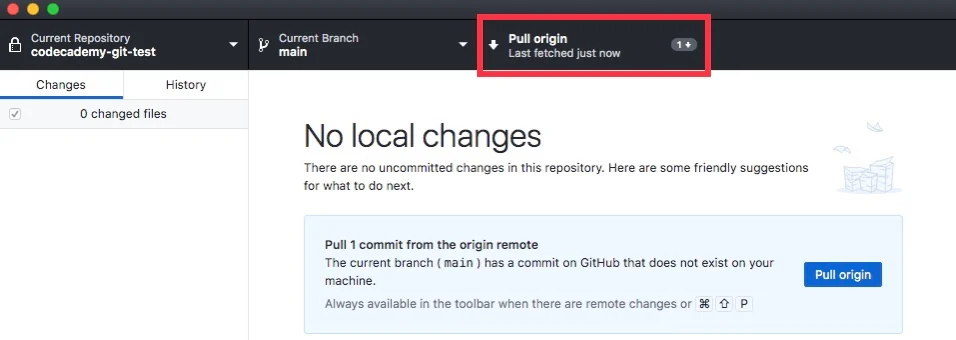
GitHub Desktop Pull Origin
Now, navigate to thecodecademy-git-testfolder on your Desktop (or wherever you chose to locate it). If you open the README file, you will notice that the changes made to the file are correctly shown:

Updated README On Local Computer
Cloning a repository with GitHub desktop
Cloning in Git is a way to download a Git project from an online repository to your own computer. Cloning a repository is easy to do with GitHub Desktop.
First, we need a repository to clone. For this tutorial, we’ll clone Codecademy’sdatasetsrepository. You can find this repositoryhere.
Click the “Code” button at the top right and then click “Open with GitHub Desktop” to clone and open the repository with GitHub Desktop:
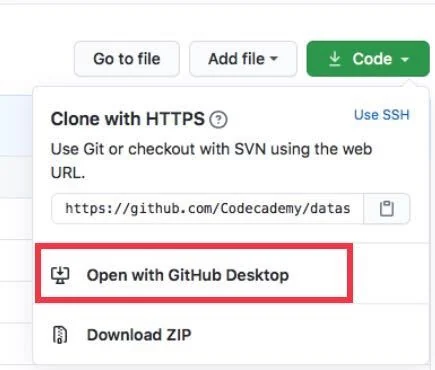
GitHub Desktop Clone Repository
Next, click “Choose…” to select a local path where you want to clone the repository. When you’re done, click “Clone” to clone the repository:
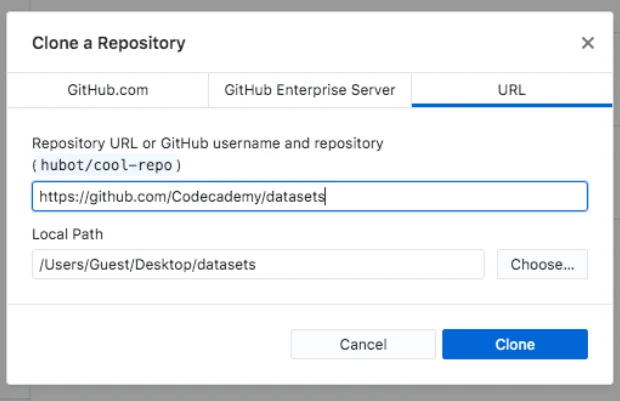
GitHub Desktop Clone Repository
That’s it! The repository should now be cloned on your computer.
Conclusion
We covered quite a bit in this article. We learned:
- A version control system helps manage files and track changes in projects. It’s like a Google Doc – for coders.
- The difference between Git and GitHub:Gitis a widely used version control system that lets you manage and keep track of your code.GitHubis a cloud-based hosting service that lets you manage your Git repositories. With GitHub, you can back up your personal files, share your code, and collaborate with others.
- Basic functions in Git includecommit,fetch, andclone. We usecommitto update our default branch,fetchto update our local repository with the updates from the default branch, andcloneto save a respository to our local computer.
- We can interact with Git without the command line using the GitHub Desktop interface.
You now have a better grasp of how to how to store, update and share your code using Git and GitHub Desktop! Check out ourLearn Git & GitHub courseto discover more Git commands and GitHub features.
'The Codecademy Team, composed of experienced educators and tech experts, is dedicated to making tech skills accessible to all. We empower learners worldwide with expert-reviewed content that develops and enhances the technical skills needed to advance and succeed in their careers.'
Complete Payment to Unlock Full Guide & Source Code
You are viewing the 30% preview. Join TopCourseAI Pro to unlock the remaining 70% of this article, unblur all code snippets, and gain full access to all 412 technical projects and guides.
Ready to access the complete step-by-step tutorial?
Gain full unhindered access to all 412 technical projects and guides, unblur all source code snippets, and download runnable scripts.
Getting Started with DALL-E for AI Image Generation
Next BlueprintGetting Started with Heroku
Related Blueprints & Guides
View all 166 →Android Studio Quick-Start Guide
Android Studio often intimidates beginners, but by learning a few handy shortcuts and getting the lay of the land, we can navigate this powerful development environment with ease.
Developer toolsApache Kafka Tutorial: A Complete Guide for Beginners
Apache Kafkais a well-known distributed event streaming platform designed to efficiently manage real-time data feeds. It was originally developed by LinkedIn in 2011 and later open-sourced. Apache Kafka has gained immens...
Developer toolsBuilding Websites with Wix
Creating a website has never been easier. Previously, making a presentable website meant learning HTML, CSS, andJavaScript. The whole process could take weeks, months, or even years before creating a website that you’re...
Ready to build production-grade AI systems?
Enjoyed this guide? Continue exploring our library of 166+ production blueprints, multi-agent swarms, and autonomous agent systems with 100% unblurred, executable source code.