
Wireframe to Wire-fame
Wireframe to Wire-fame
In this project, you will fire upAndroid Studio, create a brand new project, and design the layout needed to make Unquote a reality. You will use Android Studio and the Layout Editor to create a layout that will serve as the main game screen for Unquote, the trivia game that punishes players for spending too much time on the Internet… or not enough time… We’re not exactly sure!
This is thewireframeyou need to build:
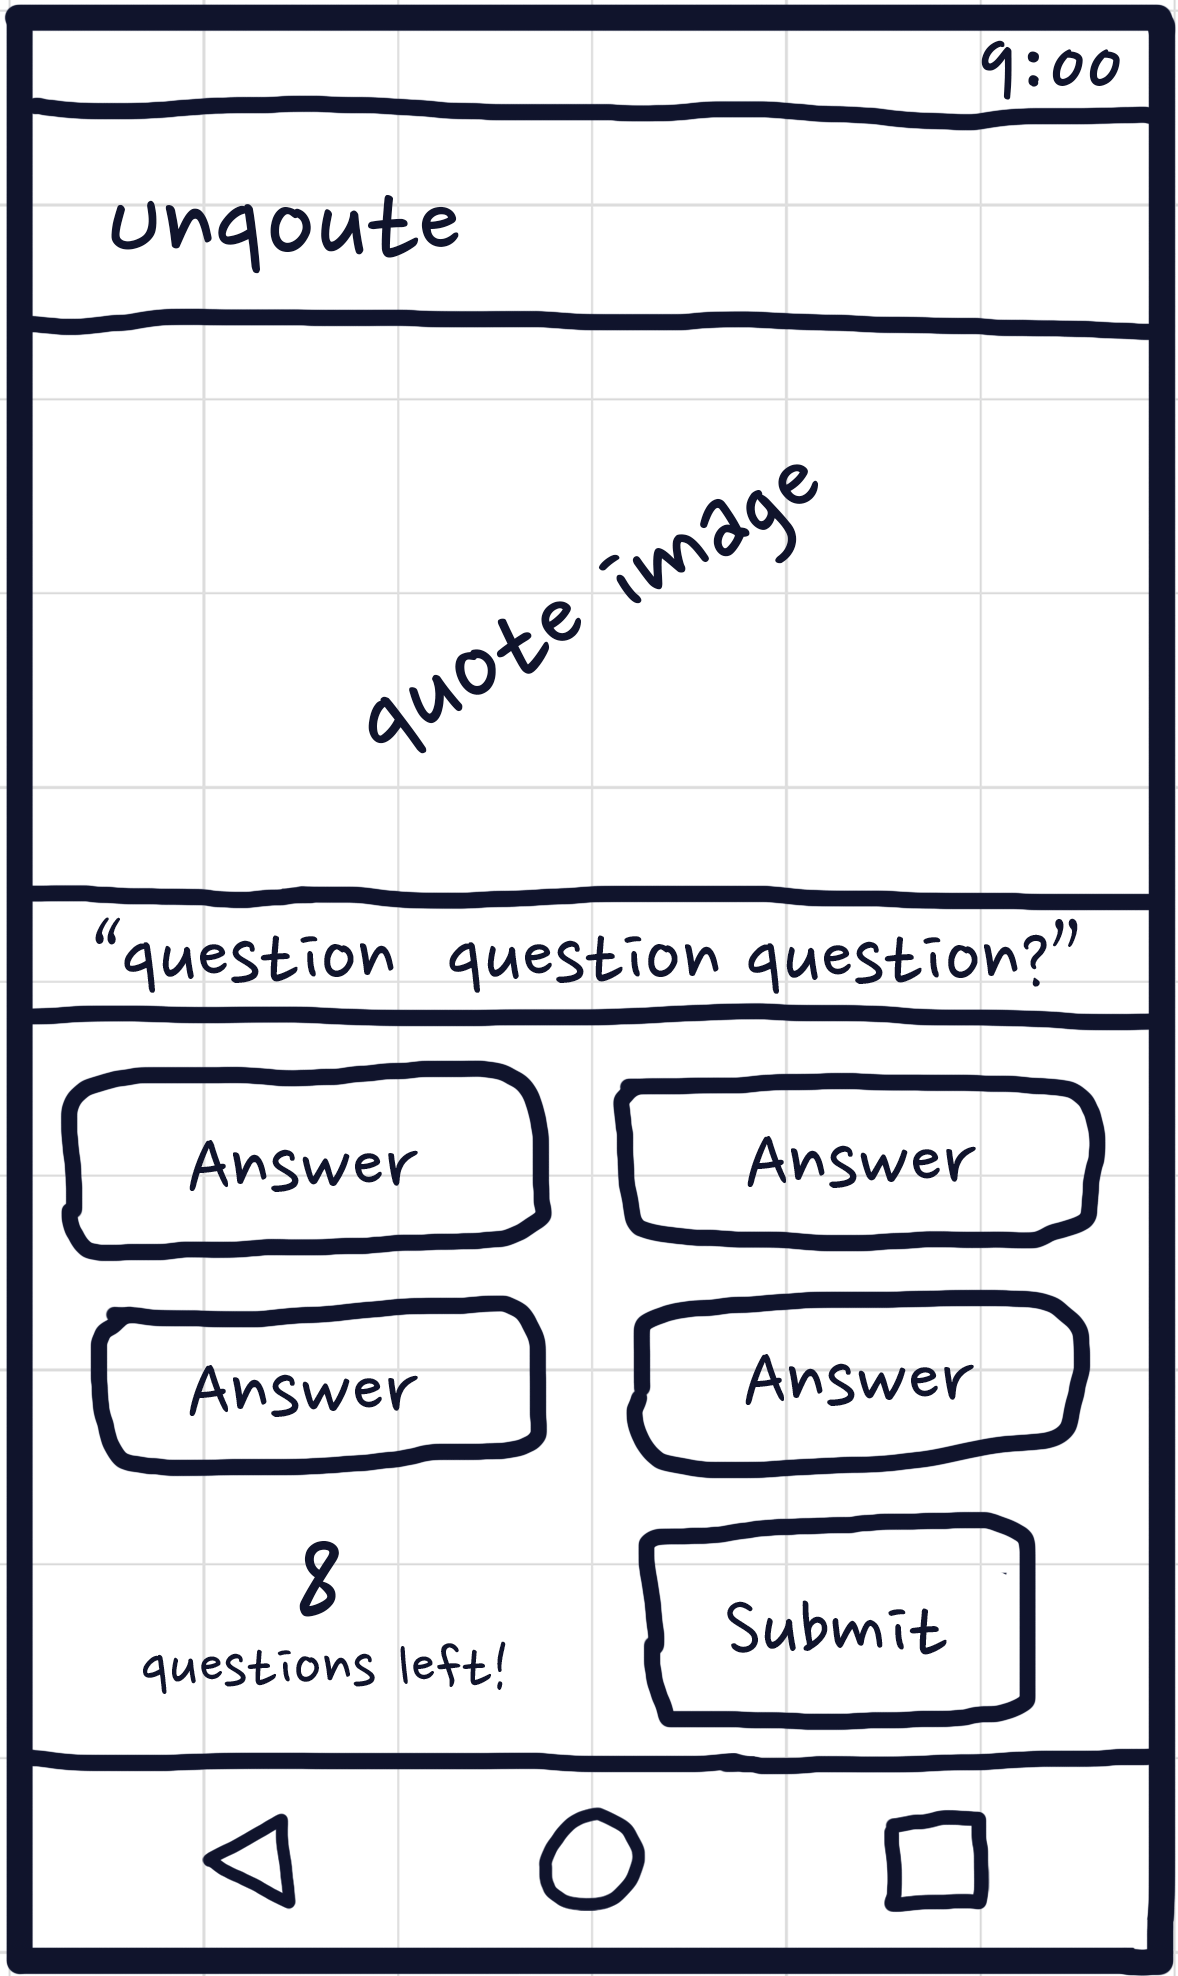
Demo of Project
Create a Brand New Android Studio project
We’re going to start Unquote with a clean slate. Begin by launching Android Studio.
Android Studio created all the files you’ll need for the remainder of this project.
Study the Wireframe
Given the final Unquote wireframe (pictured above) and everything you know of Android’s Views and ViewGroups, you can begin to deconstruct the drawing into its component parts.
If you drew a box around each element to represent the width and height each requires, what stands out about the answer button?
Begin to think about the layout implementation required to place elements side-by-side, horizontally in asingle-fileline.
Redraw the game screen wireframe on a sheet of paper, and add comments in the margins.
Label each element by its component name (Button,TextView, etc.). Label each ViewGroup by its component name (ConstraintLayout,LinearLayout).
Finally, for all components within yourConstraintLayout, draw constraints using little arrows.
You will recreate this diagram in Android Studio soon!
Analog to Digital
Now you will take your wireframe and begin recreating it in Android Studio’s layout editor.
In Design Mode, you will freely modify the design without writing the XML document by hand. If you prefer to build your layout in text, feel free to switch to Text Mode.
We will start this layout with a clean slate, remove the “Hello World!”TextViewin the middle of the layout.
Drag anImageViewfrom the Component Palette into the center of the layout, and choosebackgrounds/scenicfound underSample Dataas the default image content.
Based on the wireframe and design thinking you performed, which layout constraints should you place on theImageViewfor it to remain centered at the top of the game screen?
Click and drag the bubbles at the edges of theImageViewto apply constraints to the component.
Modify theImageViewattributes so that the component is only as tall as its content requires, as wide as its constraints demand, and grows (or shrinks) in height to maintain the original aspect ratio of the image.
This may require some poking around theAttributes Panelwith yourImageViewselected. Remember, you can hover over the name of any attribute to reveal its purpose.
To undo (or delete) an attribute, highlight the attribute under theDeclared Attributes Panel, and press theBackspaceorDELkey.
Bottom’s Up
With yourImageViewprepared, you are ready to create the game controls. The controls exist at the bottom of the screen and should remain there regardless of the length of the question text or height of the image.
You will construct the remainder of the layout using a bottom-up approach, meaning, you establish the bottom-most components first, then anchor the remaining components above them one horizontal layer at a time.
Let’s begin!
Drag aTextViewfrom theComponent Paletteinto your layout. ThisTextViewwill represent the number of questions remaining and will be the tallest component you anchor to the bottom of yourConstraintLayout.
Bind thisTextViewto the left and bottom of the screen with constraints.
Use a margin to give8dpof space between theTextViewand the left edge of the screen.
Use attributes to grow the text size to48sp, make the text bold, and present99as the default number of questions remaining.
Drag a secondTextViewonto your layout. ThisTextViewshould read,"questions remaining".
Use constraints to place this newTextViewimmediately to the right of the first one. Center it vertically between the top and bottom of the firstTextView.
Use attributes to place8dpof space between this newTextViewand the first.
Drag aButtoncomponent onto your layout, change the text to read"Submit".
Use constraints to bind thisButtonto the bottom-right of the screen and then put8dpof margin between theButtonand the right edge of the screen.
Use constraints to align thisButtonvertically with the firstTextView(the one which currently reads99).
To give thisButtona nicer look, change itsstyleattribute tostyle/Widget.AppCompat.Button.Colored.
An Answer For Everything
In an earlier task, you thought about creating two side-by-sideButtoncomponents that fill approximately half the width of the screen.
You may have considered constraints. By constraining the bottom of eachButtonto the same component and the left of oneButtonto the left edge of the parent and the right of the otherButtonto the right edge of the parent, you can level theButtoncomponents vertically.
Unfortunately, that approach forces you to hardcode the width of eachButtonto a fixed size. Without knowing the width of every device ahead of time, you cannot account for all possible screen sizes without incurring a series of crippling migraines.
Instead, you will use aLinearLayoutfeature to achieve this painlessly.
ThisLinearLayoutwill contain the bottom row of answerButtoncomponents (answers 2 and 3).
Use constraints to make yourLinearLayoutfill the width of the parent container, then constrain the bottom of yourLinearLayoutto the top of your “Submit”Button.
Add8dpof margin to the left, right, and bottom edge of yourLinearLayout.
Drag aButtoncomponent into yourLinearLayout. Then, drag anotherButtoncomponent right on top of the first one. Change each Button’sstyleattribute to match the ‘Submit’ button created earlier (style/Widget.AppCompat.Button.Colored).
Verify that bothButtoncomponents dropped directly into theLinearLayoutby examining theComponent Tree.
If you accidentally place theButtoninto the wrong ViewGroup (ConstraintLayout), undo your last action withCtrl/CMD+Zand try again.
What happens after placing twoButtoncomponents inside of yourLinearLayout?
Change thelayout_heightattribute of yourLinearLayoutsuch that it grows only as tall as its content requires.
Create another row of answer buttons that will representanswer0andanswer1. Constrain this row immediately above the previous row.
- Drag anotherLinearLayout (horizontal)onto your layout.
- Constrain theLinearLayoutto the left and right edges of the screen
- Set itslayout_widthto0dp
- Apply8dpmargins to its left and right edges
- Constrain the bottom of theLinearLayoutto the top of the previousLinearLayout
- Add twoButtoncomponents inside thisLinearLayout
- Change the height of theLinearLayouttowrap_content
You can always undo something withCtrl/CMD+Z, and retry steps 1 through 4 again to build your confidence.
Add a third and finalTextViewto your layout (ConstraintLayout)—one to present the question text to the player.
Use constraints to align theTextViewto the left and right of its parent container, and constrain the bottom of theTextViewto the top of theLinearLayoutyou created in step 5.
Surround theTextViewwith8dpmargins.
Use attributes found in theCommon Attributes Panelto change the size of the text to18sp, thetypefacetosans-serif-thinand thetools:textto a default question, something like,"Famous advice from an iconic mentor. Which fictional character really imparted this bit of sage wisdom?".
Minor Touch-Ups
With all of your elements in place, it’s time to make some small design tweaks to please the eye.
Open up theResource Manager, and choose the tab labeled,Color. Double click eithercolorAccent,colorPrimary, orcolorPrimaryDark.
colors.xmlis a value XML file. Within a<resources>element, this file can store strings, colors, dimensions, and so much more.
- Change the value ofcolorPrimaryto#EFD9CA
- Change the value ofcolorPrimaryDarkto#C4B2A6
- Change the value ofcolorAccentto#FD4D3F
Back in your main layout file, highlight the main ViewGroup, yourConstraintLayout.
In theAttributes Panel, click the search icon (magnifying glass symbol), and type “background” into the search bar.
If a value is present for thebackgroundattribute, white for example (#FFFFFF), click the color square to reveal a color-picker window. Switch to theResourcestab within the color-picker, then choosecolorPrimary, this will change the background color of yourConstraintLayout.
Neat, huh?
Lastly, you will need to fix the resource identifier for each component you plan to use in your code.
Namely, you need to customize the ID for theImageView, theTextViewwhich displays the question, the four answer buttons, theTextViewthat displays the number of questions remaining, and the “Submit” button.
Follow Android’s naming convention to modify the ID of each of these components.
Your layout is set for success. Once your Activity displays this layout, you’re ready to populate the components with the data necessary for your player to enjoy Unquote!
Great job! 👍
'The Codecademy Team, composed of experienced educators and tech experts, is dedicated to making tech skills accessible to all. We empower learners worldwide with expert-reviewed content that develops and enhances the technical skills needed to advance and succeed in their careers.'
Complete Payment to Unlock Full Guide & Source Code
You are viewing the 30% preview. Join TopCourseAI Pro to unlock the remaining 70% of this article, unblur all code snippets, and gain full access to all 412 technical projects and guides.
Ready to access the complete step-by-step tutorial?
Gain full unhindered access to all 412 technical projects and guides, unblur all source code snippets, and download runnable scripts.
Related Blueprints & Guides
View all 166 →Accessibility on the Platform
Codecademy is committed to providing a high-quality learning experience for all learners. That includes accommodating different usage forms such as auditory, motor, or visual restrictions, limited hardware, or other acce...
Web developmentAffordances, Signifiers, and Clickability
For users on the web, the mouse click is perhaps the most fundamental human-computer interaction. The webbecamethe web partially through the power ofhypertext, or text in one document that links to other documents or res...
Web developmentAuthentication and OAuth
Authenticationis the process used by applications to determine and confirm identities of users. It ensures that the correct content is shown to users. More importantly, it ensures that incorrect content is secured and u...
Ready to build production-grade AI systems?
Enjoyed this guide? Continue exploring our library of 166+ production blueprints, multi-agent swarms, and autonomous agent systems with 100% unblurred, executable source code.