
The Box Model in DevTools
The Box Model in DevTools
Introduction
All HTML elements are boxes made up of four components: a content container, padding, border, and margin. In ourBox Model lessonwe introduce these four properties and use them to position elements on a website. If you have not taken this lesson, we recommend you do so now, before continuing.
In this article, we will introduce how Google Chrome’s DevTools can be used to view the box around each element on a web page.
You can use Google Chrome’s DevTools to view the box around every element on a web page. There are a few different ways to open DevTools, depending on your platform:
Mac
- command+option+ i
- View > Developer > Developer Tools
- Chrome 3 dot menu ⋮ > More Tools > Developer Tools
Windows
- control+shift+ i
- F12
- Chrome 3 dot menu ⋮ > More Tools > Developer Tools
Use whichever method works best for you. When you have the DevTools open, navigate to theElementstab.

Elements Tab
In this tab you can view all of the elements on the current page. From this view, you can select the element of interest, which will open a new column on the right side of DevTools. Select the tab labeledComputedon the top of the rightmost column.
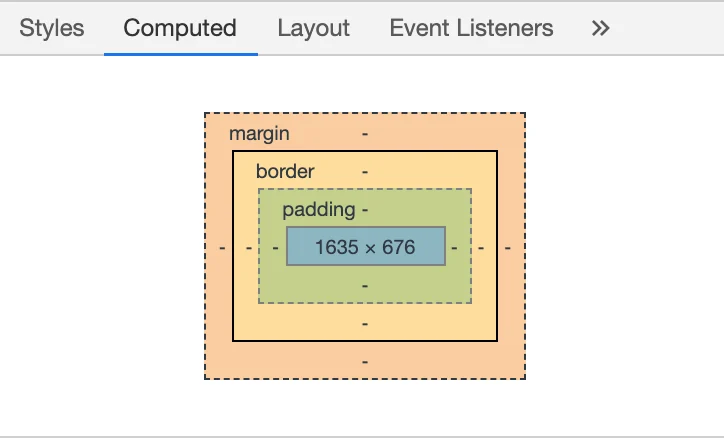
Computed Tab
The selected element’s box should appear at the top of the pane. Hovering over each property of the box will cause the property to be highlighted in the web page.
If you know the element you want to inspect, going through all of the steps listed above is unnecessary. Instead, you can right click the element you want to observe and select the Inspect button. This will display DevTools on the right side of the browser with the element selected in the Elements tab. To view the element’s box, you can select the Computed tab.
If you’d like some more info or a refresher on how to use Google Dev Tools, take a look atthis video.
Exercise I: View a Website’s Box Model Dimensions
Complete the following steps within the current web browser view.
- In a new tab navigate to the CodecademyWikipediapage.
- Right click (orCtrland click simultaneously) the Contents navigation box displayed in the image below:
- SelectInspect.
- Select the Computed tab at the top of the rightmost column.
- Hover over the different properties of the logo’s box. The corresponding space on the web page should be highlighted when you do this.
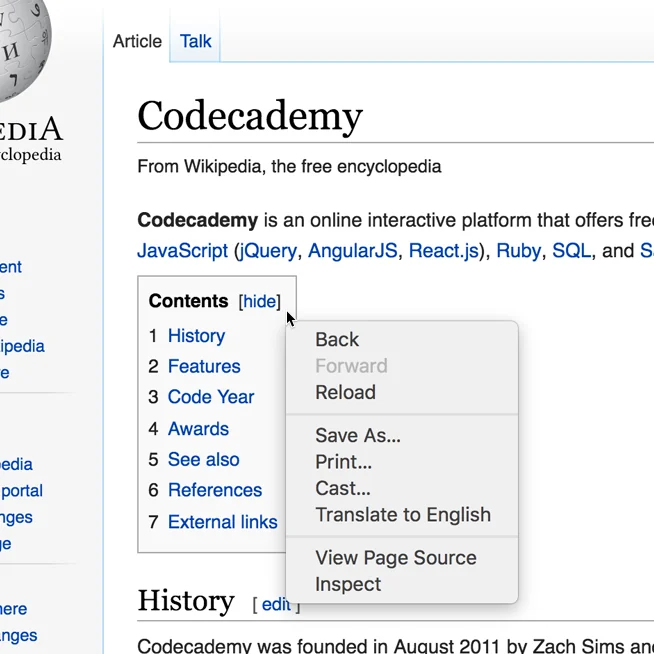
Dropdown image
Now that you know how to view the box of an element we’ll modify the box’s values with DevTools.
To modify the values of the box double click the property value, assign it a new number, and press enter. You can also adjust the value incrementally by double clicking the value and using the up or down arrow keys.
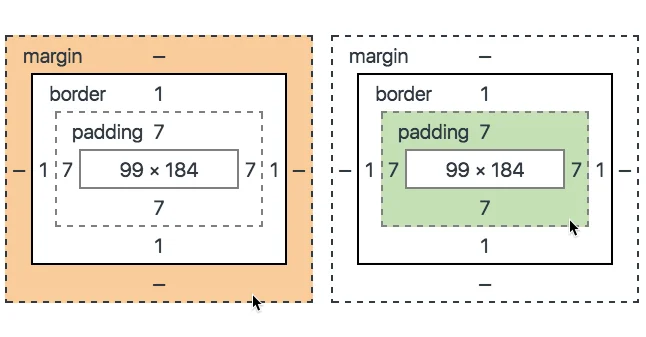
Selecting Values
In the image above, the border on each side is set to1and the padding is set to7. These values can be changed by double clicking the values in the box and assigning them new numbers, or using the up or down arrow keys on your keyboard.
Note:If you inspect an element and find that the border is set to-, adding a numerical value will not make a border appear. The border color, style, and width must be set in the CSS document in order to see the border.
Exercise II: Modify a Website’s Box Model Dimensions
Pick up where you left off in Exercise 1.
- Double click the top padding of the element.
- Use the up and down arrows to adjust the element’s padding. Observe how the appearance changes on the web page.
- Change the left margin to 200. Observe how the element’s appearance changes.
Rememberthe changes you make in DevTools are not saved. If you are using DevTools to make adjustments to a personal project, make sure to adjust values in the HTML and CSS documents.
'The Codecademy Team, composed of experienced educators and tech experts, is dedicated to making tech skills accessible to all. We empower learners worldwide with expert-reviewed content that develops and enhances the technical skills needed to advance and succeed in their careers.'
Complete Payment to Unlock Full Guide & Source Code
You are viewing the 30% preview. Join TopCourseAI Pro to unlock the remaining 70% of this article, unblur all code snippets, and gain full access to all 412 technical projects and guides.
Ready to access the complete step-by-step tutorial?
Gain full unhindered access to all 412 technical projects and guides, unblur all source code snippets, and download runnable scripts.
Testing Types
Next BlueprintThe Machine Learning Process: Look What Taylor Swift Made Me Do
Related Blueprints & Guides
View all 166 →Android Studio Quick-Start Guide
Android Studio often intimidates beginners, but by learning a few handy shortcuts and getting the lay of the land, we can navigate this powerful development environment with ease.
Developer toolsApache Kafka Tutorial: A Complete Guide for Beginners
Apache Kafkais a well-known distributed event streaming platform designed to efficiently manage real-time data feeds. It was originally developed by LinkedIn in 2011 and later open-sourced. Apache Kafka has gained immens...
Developer toolsBuilding Websites with Wix
Creating a website has never been easier. Previously, making a presentable website meant learning HTML, CSS, andJavaScript. The whole process could take weeks, months, or even years before creating a website that you’re...
Ready to build production-grade AI systems?
Enjoyed this guide? Continue exploring our library of 166+ production blueprints, multi-agent swarms, and autonomous agent systems with 100% unblurred, executable source code.