
Setting Up Postman
Setting Up Postman
The Postman App
Postman is a GUI that aids in the development of APIs by making it easy to test requests and their responses in an organized way. Everything you can do in Postman you can also do through the command line, but Postman makes the process quicker and easier by providing a clean interface and powerful set of tools.
You can download the App for free atGet Postman. Choose the package for your operating system, and then unzip it to install.
We have created a simple backend that you can interact with to get comfortable with makingHTTP requests. This backend uses aSQLitedatabase to store users. Each user has only a username (String) and a password (String). For now, we only have the GET and POST requests set up.
Follow these steps to get the example backend set up:
- Download the example backend directoryhere.
- Unzip the file.
- Navigate into the directory through your command line (usecd example_backendfrom whichever directory you unzipped it into).
- Make sure you have Node installed. To check, you can runnpm -von your command line. If you see a version number, you have Node. If the npm command is not found, you should followthese stepsto install Node.
- Runnpm installfrom inside theexample_backenddirectory to install all of the project’s dependencies.If you run into anynpmorgyperrors, try running the following commands to update and re-install anynpmpackages.npm install -g npm-check-updates npm-check-updates -u npm install
- To start the server, runnode server.jsfrom inside theexample_backenddirectory. Now, this simple server should be running athttp://localhost:4000.
npm install -g npm-check-updates
npm-check-updates -u
npm install
Next, we’ll see how to interact with this server using Postman.
With the example backend running atlocalhost:4000, open the Postman App. You should see an interface that looks like this:
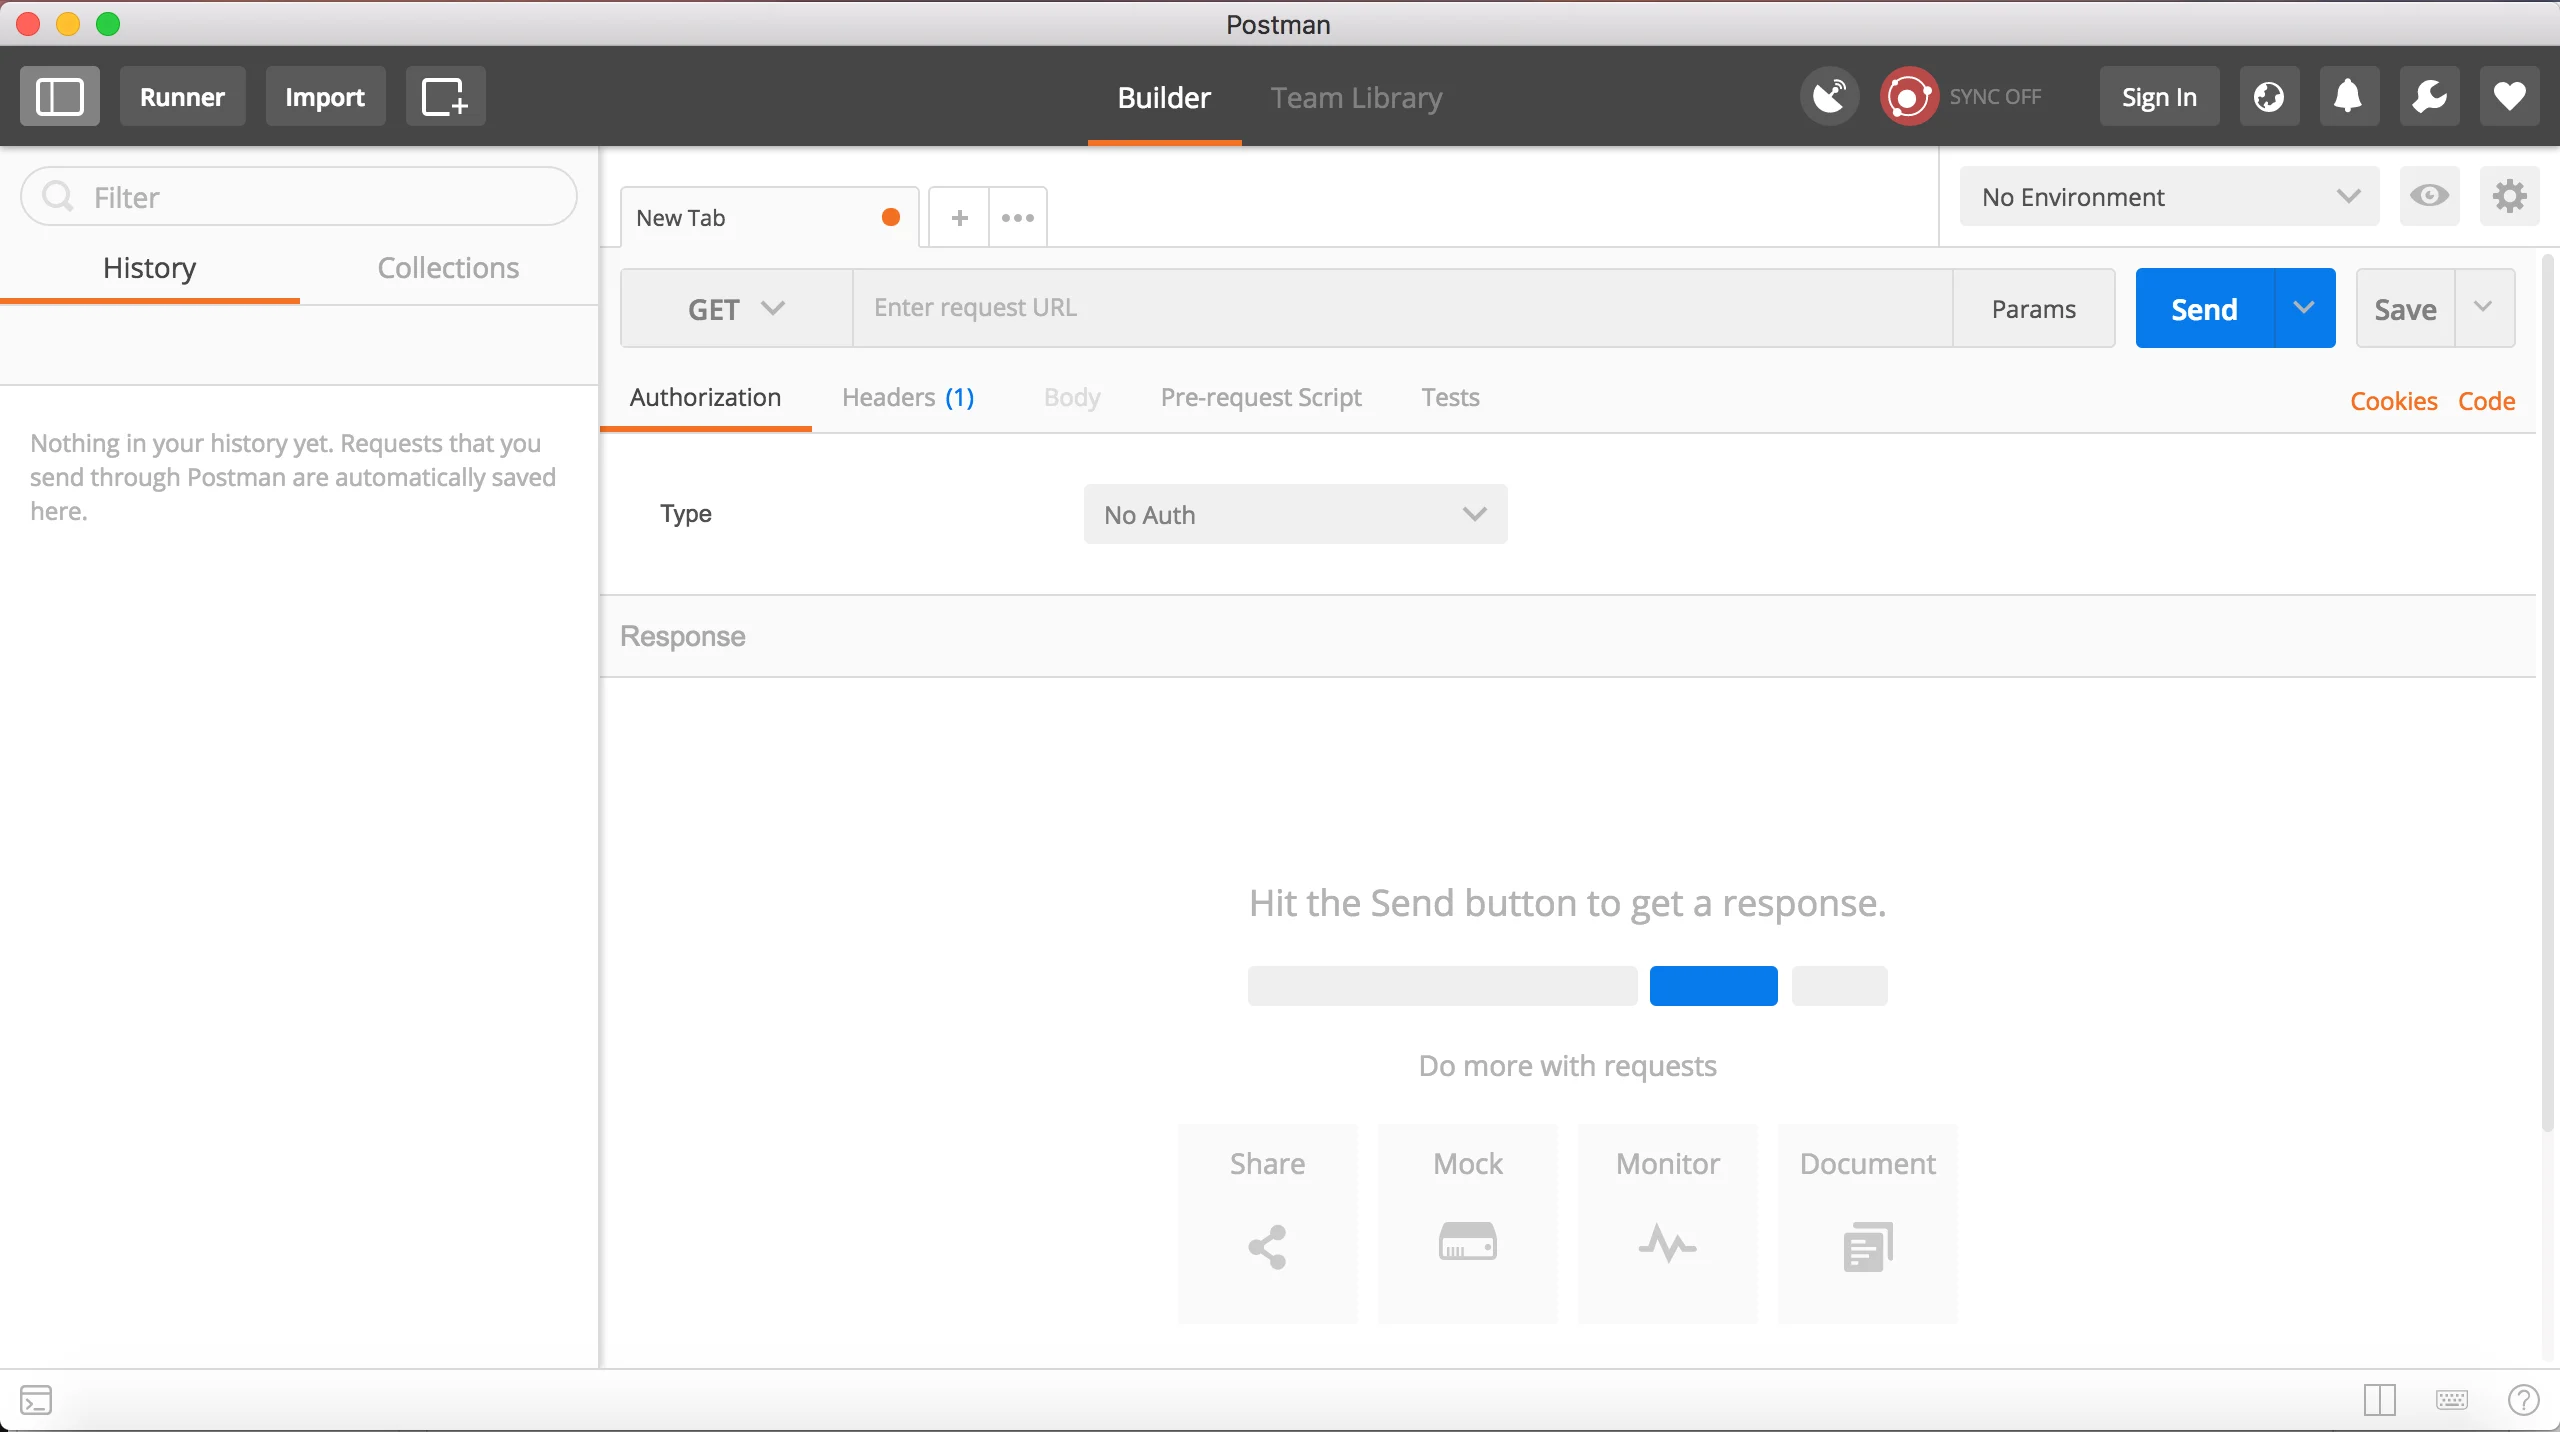
postman_interface
At the top of the window, you can see a dropdown that lets you choose what kind of HTTP operation to perform. By default, it is set to GET. If you expand the dropdown, you will see all of the possible HTTP methods you can use to interact with this system:
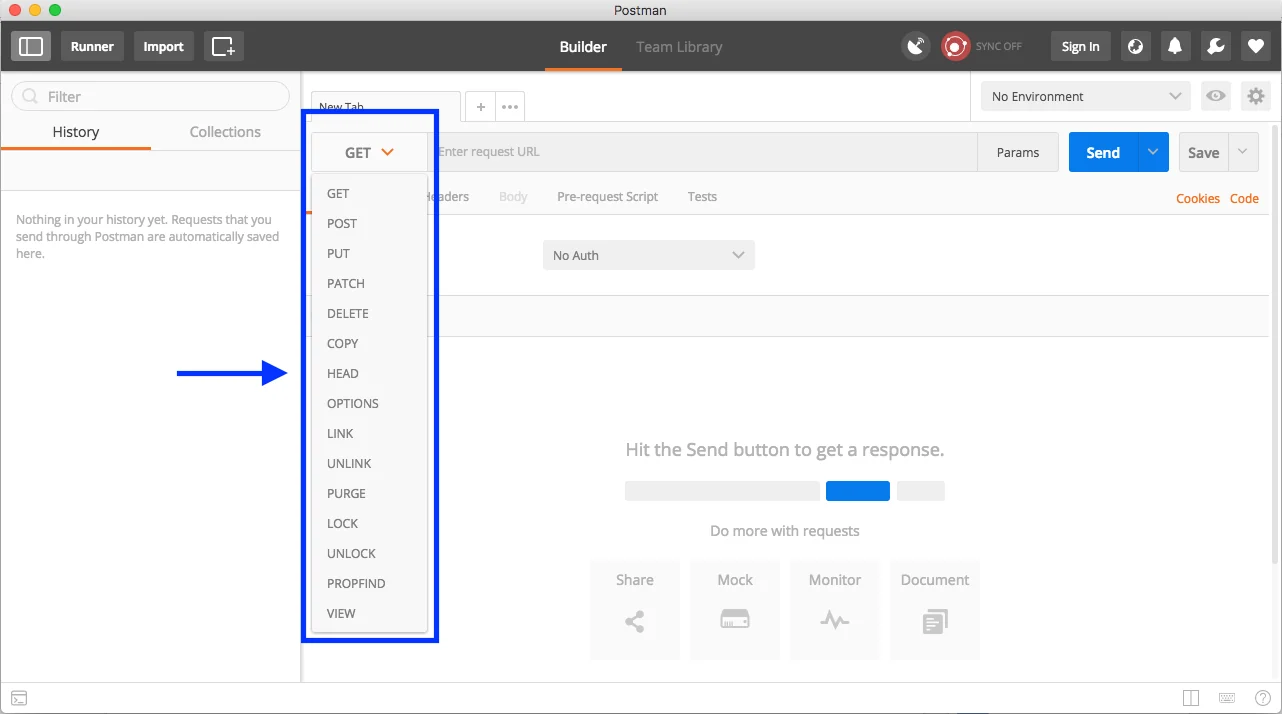
requests_dropdown
To see all of the users that are currently in the database, make a GET request tolocalhost:4000/users. To do this, you should:
- Make sure the dropdown is set to GET.
- Enter the URLlocalhost:4000/usersin the textbox that says “Enter request URL”.
When the you have entered this information, press the Send button:

send_get_request
The body of the response will appear in the panel at the bottom of the window. You should see two users stored, each with a uniqueid:
{
    "users": [
        {
            "id": 1,
            "username": "1lameuser",
            "password": "secret_password"
        },
        {
            "id": 2,
            "username": "cool_user_87",
            "password": "notPassword!"
        }
   ]
}
This tells us that there are currently two users stored in the database. One has ausernamewith the value“1lameuser”and apasswordwith the value“secret_password”, and the other has ausernamewith the value“cool_user_87”and apasswordwith the value“notPassword!”.
We can also GET a specific user by specifying anidin the URL of the GET request. To get the user“1lameuser”, for example, we can send this GET request:localhost:4000/users/1. The response to this request should be:
{
    "user": {
        "id": 1,
        "username": "1lameuser",
        "password": "secret_password"
    }
}
These GET requests only retrieved resources from the server. No information was changed. Next, we’ll look at how to use Postman to send requests to add users to the system.
We can use POST requests to add users to the database. Let’s practice with sending some POST requests.
- Change the type of request from GET to POST using Postman’s dropdown selector.
- Add the request URL (localhost:4000/users) in the appropriate textbox.
- In order to create a new resource in this database, we need to supply auserobject to create in the body of the POST request. Select the “Body” tab and check the “raw” radio button to specify input.
- The type of input should be aJSONobject, so select the dropdown that says “Text” and change it to “JSON (application/json)”:
- In the text input field underneath the radio buttons, type in whateveruserobject you want to add. For a valid POST request for this server, you should include JSON in the request body that has this format:{"user": {"username":<String>, "password":<String>}}Here is an example of what the interface will look like before you send the request:
- Press the Send button to send the POST request.Look at the output. What is contained in the response body? Is this what you would expect? For the above example, the output in the response body looks like:{ "user": { "id": 3, "username": "wholeNewUser", "password": "IllNeverTell" } }This response means that a user withusername“wholeNewUser”,password“IllNeverTell”, andid3 was added to theusersresource.
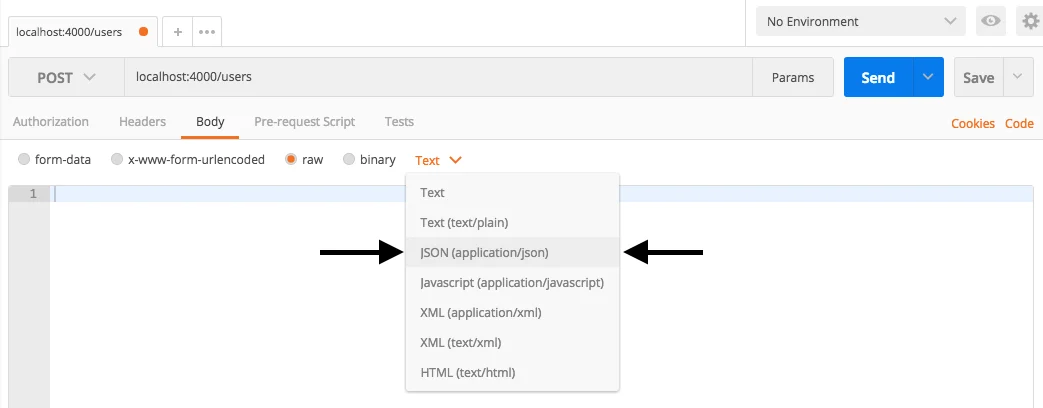
request_type
{"user": {"username":<String>, "password":<String>}}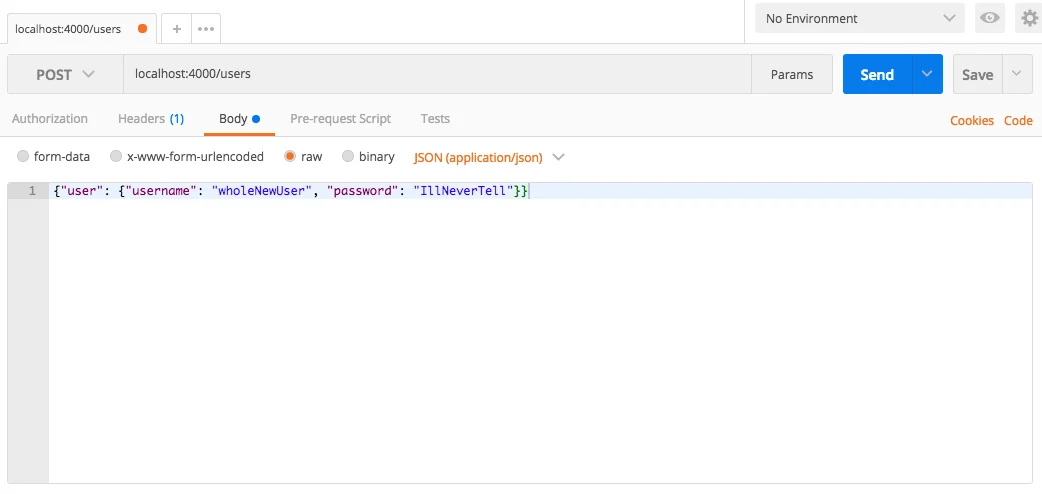
post_request
{
    "user": {
        "id": 3,
        "username": "wholeNewUser",
        "password": "IllNeverTell"
    }
}
Let’s try sending some more requests.
- Add a user to the system with your first name (as a String) as the username and your last name (as a String) as the password. Use POST to do this, with auserobject in the body as a JSON.
- Look at all of the users contained in theusersresource now. Use a GET request to do this.
- Retrieve the user withid4 only. Use a GET request with a specifiedidto do this.
Great work! You now can use Postman to make requests and see the corresponding responses. This will be very helpful in testing and understanding the APIs you build.
'The Codecademy Team, composed of experienced educators and tech experts, is dedicated to making tech skills accessible to all. We empower learners worldwide with expert-reviewed content that develops and enhances the technical skills needed to advance and succeed in their careers.'
Complete Payment to Unlock Full Guide & Source Code
You are viewing the 30% preview. Join TopCourseAI Pro to unlock the remaining 70% of this article, unblur all code snippets, and gain full access to all 412 technical projects and guides.
Ready to access the complete step-by-step tutorial?
Gain full unhindered access to all 412 technical projects and guides, unblur all source code snippets, and download runnable scripts.
Related Blueprints & Guides
View all 166 →Accessibility on the Platform
Codecademy is committed to providing a high-quality learning experience for all learners. That includes accommodating different usage forms such as auditory, motor, or visual restrictions, limited hardware, or other acce...
Web developmentAffordances, Signifiers, and Clickability
For users on the web, the mouse click is perhaps the most fundamental human-computer interaction. The webbecamethe web partially through the power ofhypertext, or text in one document that links to other documents or res...
Web developmentAuthentication and OAuth
Authenticationis the process used by applications to determine and confirm identities of users. It ensures that the correct content is shown to users. More importantly, it ensures that incorrect content is secured and u...
Ready to build production-grade AI systems?
Enjoyed this guide? Continue exploring our library of 166+ production blueprints, multi-agent swarms, and autonomous agent systems with 100% unblurred, executable source code.