
Set Up with Git and GitHub
Set Up with Git and GitHub
In this tutorial, we walk through the process for using Git locally on your personal computer and usingGitHubto back it up. Specifically, we’ll walk through creating your personal GitHub account, setting up Git on your computer, starting your first Git repository, and connecting that repository to a GitHub repository.
This tutorial assumes that you’ve completed the lessons onLearn the Command LineandLearn Git. Now, prepare to use those skills on your personal computer! If some steps in this tutorial are confusing, have no fear; it will all come together by the end.
What are Git and GitHub?
This tutorial refers to Git and GitHub repeatedly.Gitis a widely-used version control system used to manage code. Git allows you to save drafts of your code so that you can look back at previous versions and potentially undo complicated errors. A project managed with Git is called aGit repository.
GitHubis a popular hosting service for Git repositories. GitHub allows you to store your local Git repositories in the cloud. With GitHub, you can backup your personal files, share your code, and collaborate with others.
In short, GitHub is a tool for working with Git. There are other services to host Git repositories, but GitHub is a trusted, free service used by organizations across the world, big and small.
Create a GitHub Account
To use GitHub, you will need a GitHub account.
In your own browser:
- Open a new browser tab
- Navigate tohttps://github.com/
- Create an account
If you already have a GitHub account, continue to the next exercise.
After you sign up, you will receive a verification e-mail. Be sure to verify your e-mail address to GitHub by following the instructions in that e-mail.
Git Setup for Mac and Windows
Next, we will set up Git on your personal computer. Follow the instructions for your operating system.
Mac users:
1. Launch theTerminalapplication. You can find it in/Applications/Utilities/. You can also use theSpotlightsearch tool (the little magnifying glass in the top right of your screen) to search forTerminal. OnceSpotlightlocates it, click on the result that saysTerminal.
2. WhenTerminalopens, type ingitand press enter.
3. If you don’t already have Git installed, a dialog will appear saying that “The ‘git’ command requires the command line developer tools. Would you like to install the tools now?” Click “Install”.
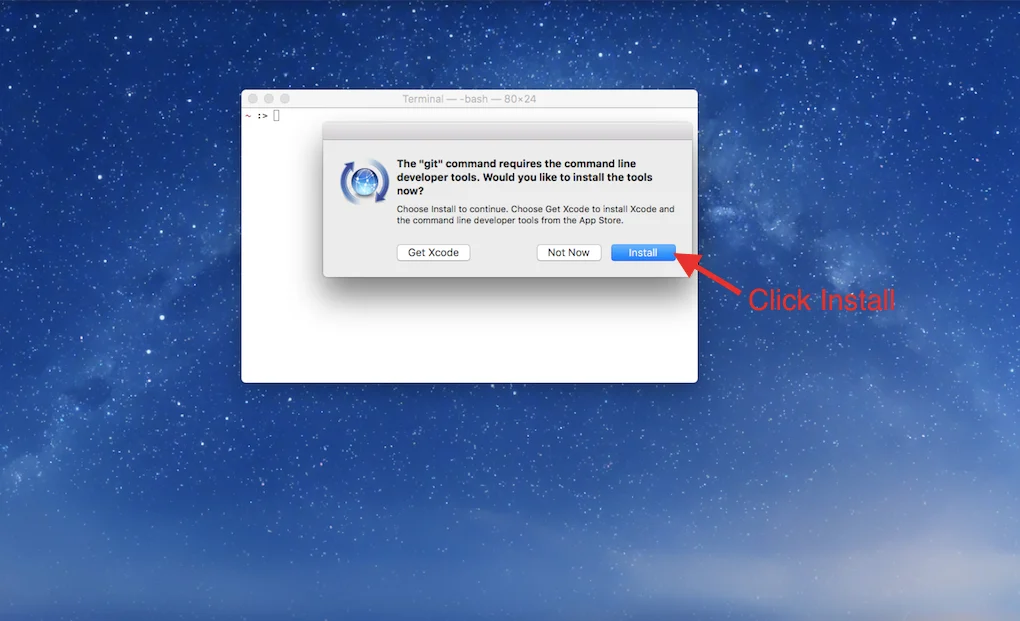
macInstall
Then click “Agree to the Terms of Service” when requested.
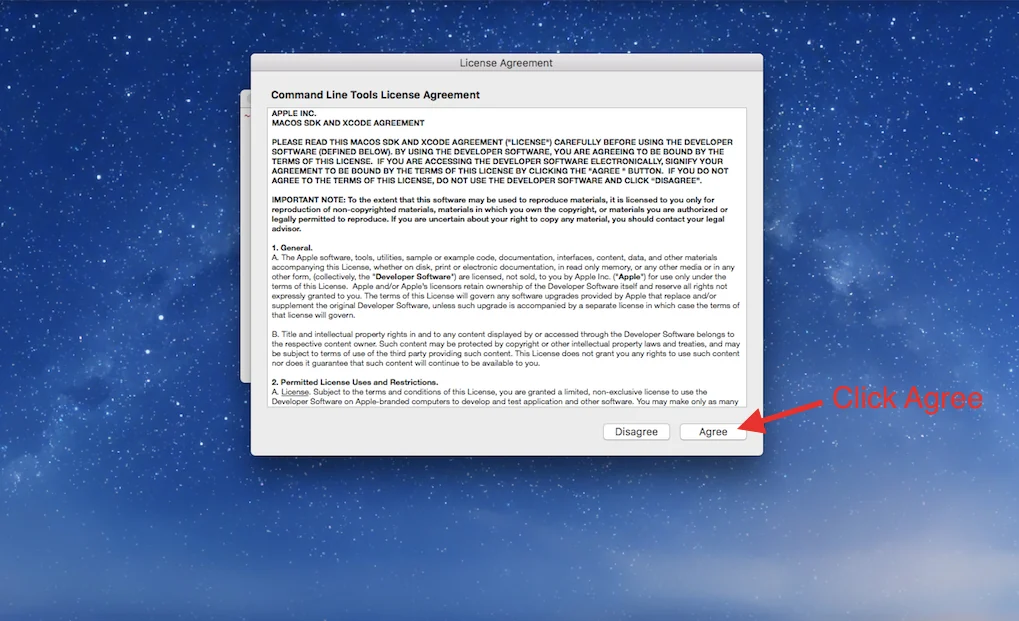
macAgree
4. When the download finishes, the installer will go away on its own signifying that Git is now installed! Click “Done” to finish the installation process.
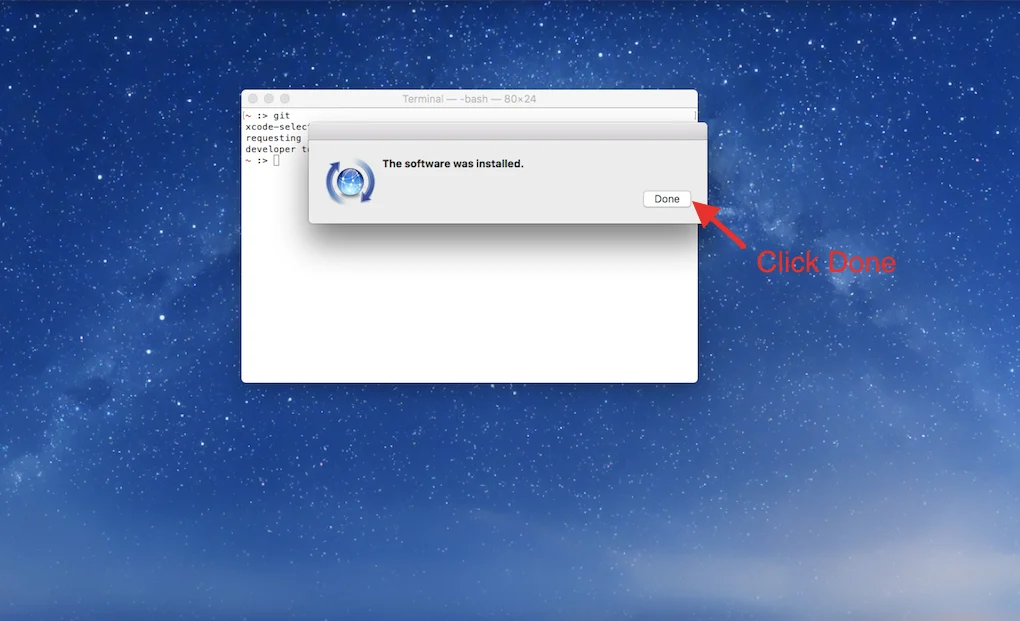
macDone
Now skip down to the “Final Setup” section below to finish setting up.
Windows users:
This portion of the guide assumes you have already installed a program called Git Bash which allows us access to Git on Windows. If you have not installed Git Bash, please refer to the previous tutorial on Command Line Interface (CLI) Setup and follow the instructions for installing Git Bash on Windows. Once you complete that you can continue with this guide.
1. Open the Start menu and search for the app, git bash. You should see ‘Git Bash Desktop app’ appear. Press Enter or click on the Git Bash icon to open the app.
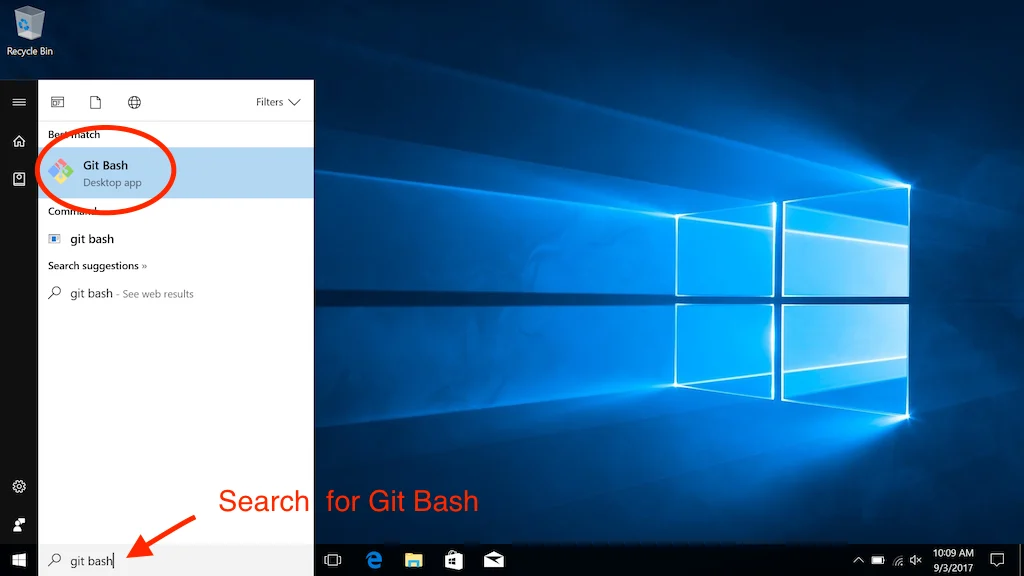
gitBashOpen
A new window will open that looks like this:
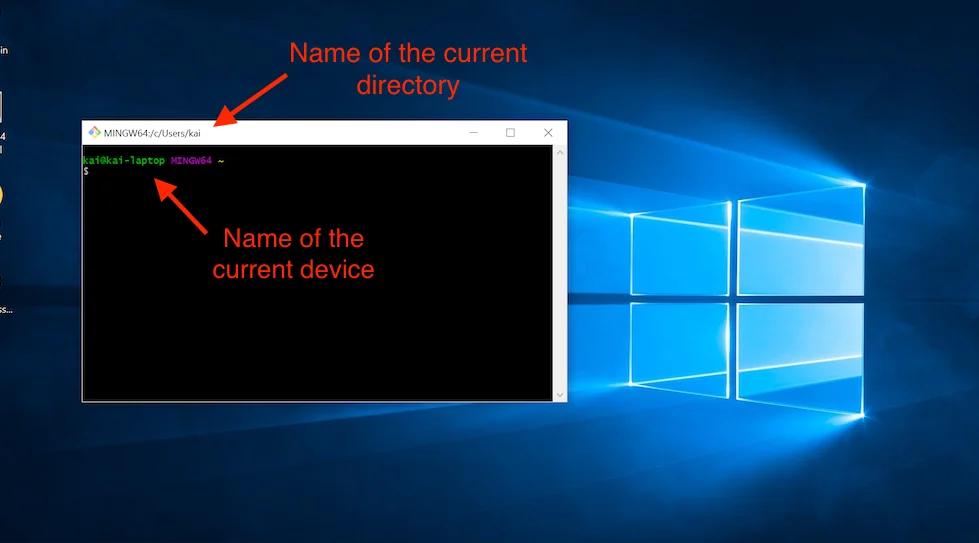
gitBashShell
This window is our CLI, where we will use our Git commands.
2. If you want to make sure that Git is installed, rungit --versionin the CLI. You should see a response that gives you the version of Git installed. It will look like this:
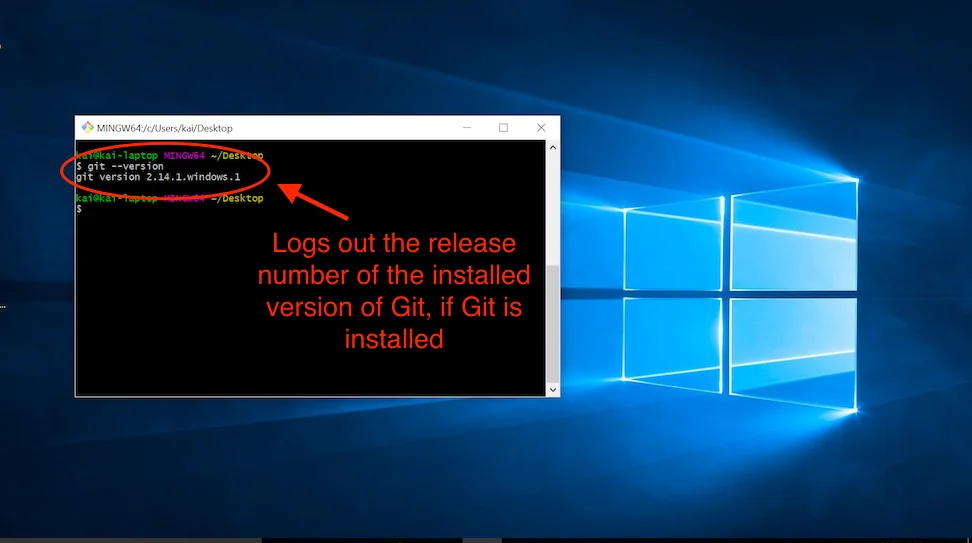
gitVersion
Git can now be used in the Git Bash app!
Continue on to finish setting up.
Final Setup
- Navigate to GitHub’s articles on setting up yourGit usernameandemailand follow the instructions for each using Git Bash.
- GitHub offers two authentication options, HTTPS and SSH, to keep your work secure. This is a security measure that prevents anyone who isn’t authorized from making changes to your GitHub repository. In this article, we will use HTTPS.To authenticate yourself in the terminal, you will need to generate aPersonal Access Tokenon GitHub. Navigate to GitHub’s article oncreating a personal access tokenand follow the instructions for creating a classic token. Be sure to check the box that grants the tokenreposcope — this will allow you to write to the repository from the terminal on your machine.Once you get the token, make sure to copy it or keep the page open — you will not be able to view the token again once you navigate away from the page and you’ll need it later in the instructions!
Try It Out!
Now you have everything you need to practice your Git skills on your local computer. Take a moment to run the commands below to initialize a Git repository. We will use this Git repository again later in this tutorial so make sure you complete these steps exactly as described.
- mkdir git_practiceto make a new directory to practice.
- cd git_practiceto make the new directory your working directory.
- git initto turn the current, empty directory into a fresh Git repository.
- echo "Hello Git and GitHub" >> README.txtto create a new README file (more on this later) with some sample text.
- git add README.txtto add the new file to the Git staging area.
- git commit -m "First commit"to make your first commit with the new README file.
Your First Remote Repository on GitHub
Finally, we’ll create a repository on GitHub and then link it to a local repository on your computer. This allows you to backup your work constantly and safely, so you never need to worry about losing your work again!
Now, let’s connect our local Git repository to GitHub.
Instructions
1. In your Command Line Interface, make sure your current working directory is your new Git repository. Navigate there if not.
2. Check the status of which files and folders are new or have been edited. There should be no files modified.
$ git status3. On GitHub, create a new repository by clicking theNew repositorybutton on the home page.
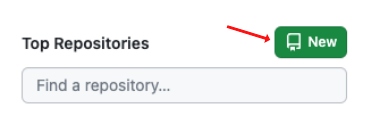
newRepository
4. On the new repository page, give your repository a name. It’s not necessary, but it would be convenient to name it the same as the directory,git_practice. After naming the repository, clickCreate repository.
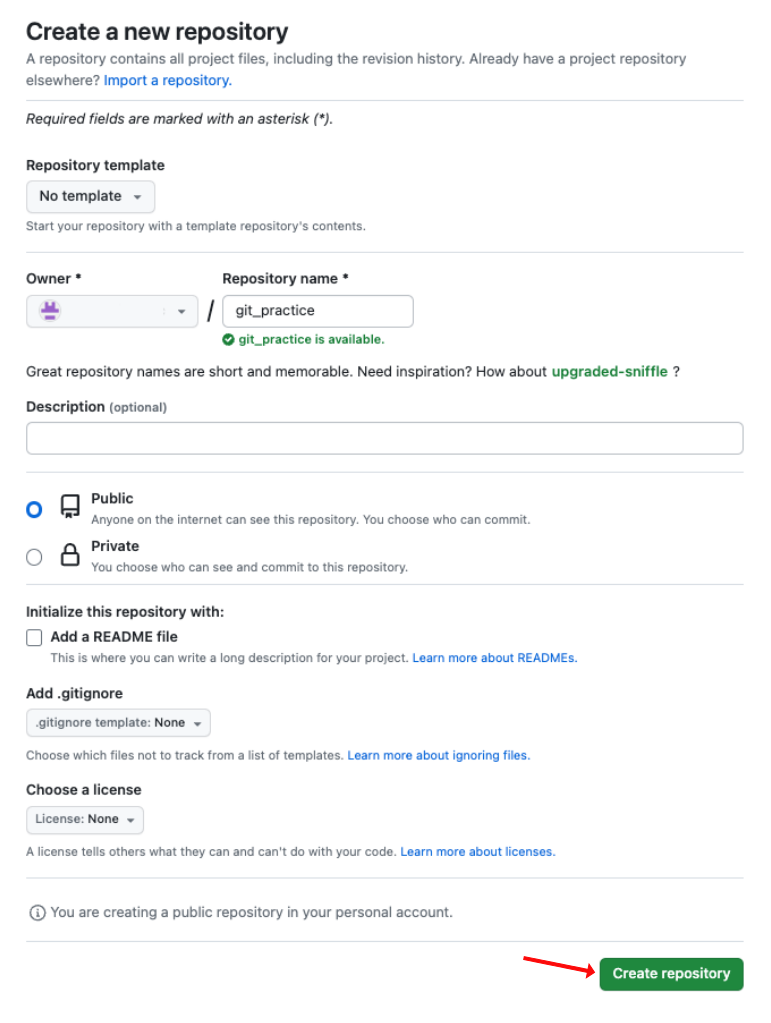
createRepository
5. After creating a repository, GitHub displays the repository page. At the top of the page, make sure “HTTPS” is selected.
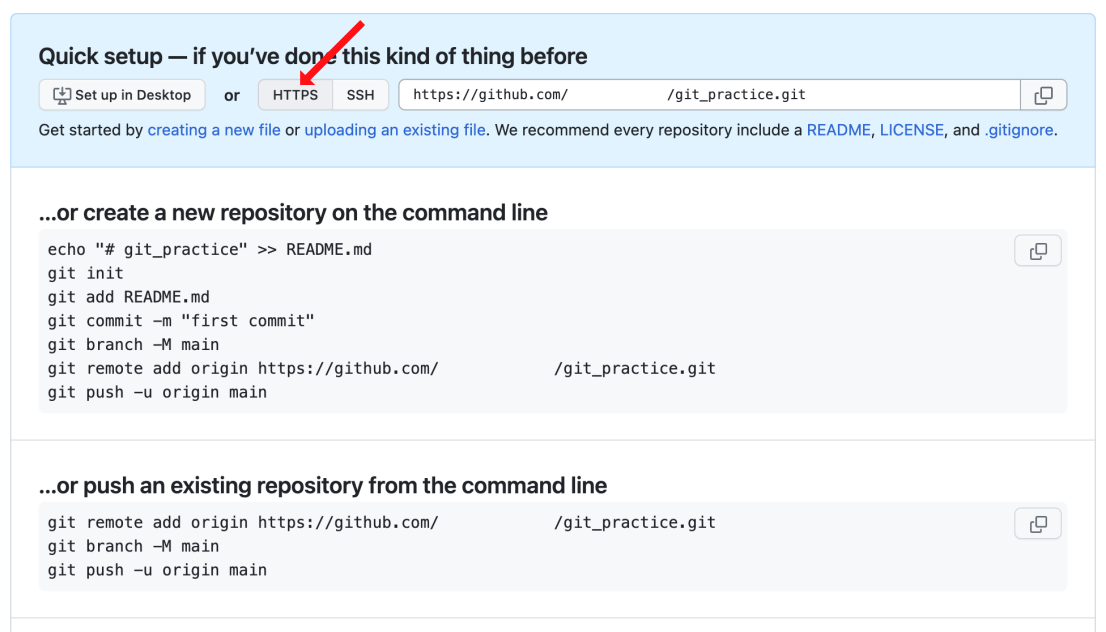
githubHttps
6.The repository is empty, so it’s time to connect it to your existing work. Copy the Git commands on the GitHub page, under the title “…or push an existing repository from the command line”, and paste them into your Command Line Interface. Running these commands will add a remote repository, and then push your local repository to the remote repository.
When asked for a username and password, type in your GitHub username as the username and paste your personal access token as the password, pressingEnter(orreturn) after each. Don’t be alarmed if you can’t see the characters you are typing, they are intentionally hidden as a security measure.
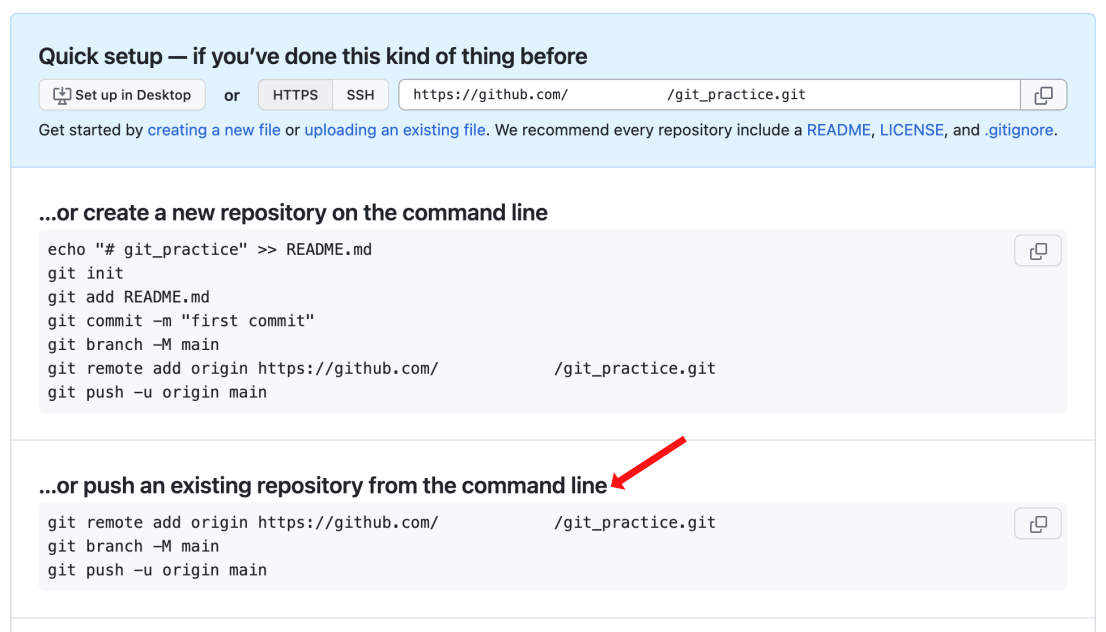
githubCommands
7. Once your Command Line Interface reports that the push is complete, refresh the page on GitHub. You should now see the text you wrote earlier in the README file, “Hello Git and GitHub.”
GitHub automatically displays the contents of a file namedREADME.txtif it exists in the repository. The README file is the perfect place to write a description of your project.
There you have it! Your first GitHub repository, linked to your local Git repository. You’ve taken some huge leaps, so be proud! Now you can use your knowledge of Git to track progress on your local computer and push that progress to GitHub whenever you want. You can rest easy knowing that each step of your progress is safely stored in GitHub.
'The Codecademy Team, composed of experienced educators and tech experts, is dedicated to making tech skills accessible to all. We empower learners worldwide with expert-reviewed content that develops and enhances the technical skills needed to advance and succeed in their careers.'
Complete Payment to Unlock Full Guide & Source Code
You are viewing the 30% preview. Join TopCourseAI Pro to unlock the remaining 70% of this article, unblur all code snippets, and gain full access to all 412 technical projects and guides.
Ready to access the complete step-by-step tutorial?
Gain full unhindered access to all 412 technical projects and guides, unblur all source code snippets, and download runnable scripts.
Seaborn Styling, Part 1: Figure Style and Scale
Next BlueprintSetting Up Command Line
Related Blueprints & Guides
View all 166 →Accessibility on the Platform
Codecademy is committed to providing a high-quality learning experience for all learners. That includes accommodating different usage forms such as auditory, motor, or visual restrictions, limited hardware, or other acce...
Web developmentAffordances, Signifiers, and Clickability
For users on the web, the mouse click is perhaps the most fundamental human-computer interaction. The webbecamethe web partially through the power ofhypertext, or text in one document that links to other documents or res...
Web developmentAuthentication and OAuth
Authenticationis the process used by applications to determine and confirm identities of users. It ensures that the correct content is shown to users. More importantly, it ensures that incorrect content is secured and u...
Ready to build production-grade AI systems?
Enjoyed this guide? Continue exploring our library of 166+ production blueprints, multi-agent swarms, and autonomous agent systems with 100% unblurred, executable source code.