
SAM3 by Meta: Text-Prompted Image Segmentation Tutorial
SAM3 by Meta: Text-Prompted Image Segmentation Tutorial
Have you noticed that the traditional segmentation models work only with predefined objects, and they can't understand text like "red bottle" or "person wearing white dress". We need to retrain them for every new object type. The SAM3 model overcomes this.
In this article, we'll explore Meta's SAM3, build a text-prompted cutout tool, compare it to other models, and see real-world applications.
What is SAM3?
SAM3 (Segment Anything Model) is Meta's latest segmentation model that finds and outlines objects in images and videos based on what you type. Released in November 2025, it lets you describe what you're looking for in plain English instead of clicking on objects one by one.
Type "yellow school bus" and SAM3 finds every yellow school bus in your image. Type "striped cat" and it identifies all striped cats. The model understands more than 4 million different concepts, ranging from common objects like cars to specific descriptions like "person in red shirt" or "shiny surface."
SAM3 has three main improvements over previous versions:
- Just type what you want to find in plain English prompts. No need to click points or draw boxes around objects.
- It finds everything at once, i.e., instead of marking one object at a time, SAM3 finds all matching objects in a single pass and gives each one a unique identifier.
- SAM3 tracks objects in videos. It follows objects across video frames, even when they're temporarily hidden or in crowded scenes.
SAM3 was trained on 126,000 images and videos covering millions of concepts. It performs at 75-80% of human accuracy on segmentation tasks and works with objects it has never seen during training. This zero-shot capability means you can use SAM3 without additional training or fine-tuning for your specific use case.
Now that you understand what SAM3 does, let's build a tool that will extract objects from images using text.
Build a text-prompted cutout tool with Meta SAM3
Let's build a tool that creates transparent cutouts of objects from your images. We'll type what is to be extracted, something like "red bottle" or "cat", and get a clean PNG cutout with the background removed.
Let's start with the first step.
Step 1: Set up the environment
1. Start by creating a project folder and navigating inside it:
# Create project folder mkdir sam3-cutout-tool cd sam3-cutout-tool2. Set up a virtual environment to keep your dependencies organized:
# Create virtual environment  python -m venv sam3_env
# Activate it
# On Windows:  sam3_env\Scripts\activate
# On Mac/Linux:  source sam3_env/bin/activate
3. Install the required packages
pip install torch transformers pillow numpy huggingface_hub- torch: The deep learning framework that manages GPU processing and powers SAM3
- transformers: Hugging Face library that manages model loading and gives access to SAM3
- pillow: Opens, modifies, and stores images in transparent PNGs and other formats
- numpy: Carries out mask operations and processes image data as arrays
- huggingface_hub: Verifies your authorization to download the SAM3 model from Hugging Face
torch: The deep learning framework that manages GPU processing and powers SAM3
transformers: Hugging Face library that manages model loading and gives access to SAM3
pillow: Opens, modifies, and stores images in transparent PNGs and other formats
numpy: Carries out mask operations and processes image data as arrays
huggingface_hub: Verifies your authorization to download the SAM3 model from Hugging Face
Depending on your internet speed, the installation may take several minutes. Once complete, you're ready for the next step.
Step 2: Authenticate with Hugging Face
SAM3 is a gated model, which means you need permission to access it. This is a one-time setup.
Get your access token
- Go to the token page of Hugging Face
- Select the "New token" option
- Name it (e.g., "sam3-access")
- Select "Read" permissions
- Choose "Generate token."
- Copy the token (starts with hf_)
Request access to SAM3
- Visit the SAM3 model page
- Select "Request Access."
- Accept the terms
- Approval is usually instant, but it may take around 5-10 minutes
Login with your token
You can either log in via the command line:
huggingface-cli loginThen paste your token when prompted.
Alternatively, you can add it directly to your Python code (which we'll do in the next step).
Once authenticated, the access is saved on your machine, and you won't need to do this again.
Step 3: Set up the project structure
Create the files and folders you'll need for this project:
- In your project folder, create a new file called main.py. This is where all your code will go.
- Place any image in the same folder and name it photo.png. This will be the image you'll create cutouts from.
This is how your project structure should look:
sam3-cutout-tool/ ├── sam3_env/ # Virtual environment (created in Step 1) ├── main.py # Your code (create this now) └── photo.png # Input image (add your test image here)Let's start writing the code.
Step 4: Import libraries and authenticate
Open your main.py file and add the required libraries and authentication:
from huggingface_hub import login from transformers import Sam3Processor, Sam3Model from PIL import Image import torch import numpy as npThese imports give you access to:
- Hugging Face authentication
- The SAM3 model and processor
- Image handling capabilities
- PyTorch for running the model
- NumPy for array operations
Hugging Face authentication
The SAM3 model and processor
Image handling capabilities
PyTorch for running the model
NumPy for array operations
Below the imports, add your authentication token:
# Replace with your token from Step 2 login(token="hf_your_token_here")Replace "hf_your_token_here" with the actual token you copied in Step 2. This line authenticates you with Hugging Face so you can download and use the SAM3 model.
Step 5: Create the cutout function
Let's build the main function that handles the entire cutout process. We'll break this into three parts:
Loading the SAM3 model
First, we define our function and load the SAM3 model. The model checks if you have a GPU available (much faster), otherwise chooses CPU:
def create_cutout(image_path, text_prompt, output_path="cutout.png"):   print(f"Loading SAM3 model...")   device = "cuda" if torch.cuda.is_available() else "cpu"   model = Sam3Model.from_pretrained("facebook/sam3").to(device)   processor = Sam3Processor.from_pretrained("facebook/sam3")
  print(f"Processing image with prompt: '{text_prompt}'")
This code creates a function that accepts an image path, a text description of what to find, and where to save the output.
The first time you run this, it downloads the 3.4GB SAM3 model (takes 5-10 minutes). After that, it's cached and loads instantly.
Process the image and get segmentation masks
Next, we load the image, run SAM3 with your text prompt, and extract the masks for detected objects:
  # Load image   image = Image.open(image_path).convert("RGB")
  # Run SAM3   inputs = processor(images=image, text=text_prompt, return_tensors="pt").to(device)    with torch.no_grad():     outputs = model(**inputs)    # Get results   results = processor.post_process_instance_segmentation(     outputs,     threshold=0.5,     mask_threshold=0.5,     target_sizes=inputs.get("original_sizes").tolist()   )[0]    print(f"Found {len(results['masks'])} objects")    if len(results['masks']) == 0:     print("No objects found. Try lowering the threshold or different prompt.")     return None
Note: This code continues inside the create_cutout function so indentation is maintained in it.
This opens your image, combines it with your text prompt, and runs the SAM3 model. The threshold=0.5 means it only keeps detections with a confidence level of 50% or higher.
The results include masks (indicating the location of objects), bounding boxes, and confidence scores.
Create transparent cutout and save image
Finally, we combine all the masks, create a transparent PNG, and save the output:
  # Create a separate cutout for each detected object   image_array = np.array(image)   h, w = image_array.shape[:2]
  cutouts = []
  for i, mask in enumerate(results['masks']):     mask_array = mask.cpu().numpy()
    # Create RGBA for this specific object     rgba = np.zeros((h, w, 4), dtype=np.uint8)     rgba[:, :, :3] = image_array     rgba[:, :, 3] = (mask_array * 255).astype(np.uint8)
    # Save with numbered filename     individual_output = output_path.replace('.png', f'_{i+1}.png')     cutout = Image.fromarray(rgba, 'RGBA')     cutout.save(individual_output)     print(f"Saved cutout {i+1} to: {individual_output}")
    cutouts.append(cutout)
  return cutouts
Note: This code also continues inside the create_cutout function so indentation is maintained in it.
This combines all detected object masks into one, creates an RGBA image (with transparency channel), and saves it as a PNG.
Pixels inside the mask are kept visible; everything else becomes transparent.
Step 6: Run the cutout tool
Now that your function is complete, add the code to use it at the end of your main.py file:
# Use it create_cutout( image_path="photo.png", text_prompt="red bottle", output_path="bottle_cutout.png" )This calls your function with:
- image_path: The image you want to process
- text_prompt: What you want to extract (e.g., "red bottle", "cat", "person wearing red hat")
- output_path: Where to save the transparent cutout
That's it, the code has been created. Now, it's time to test it.
Step 7: Run and test the tool
Now it's time to run your script and see the results. Run your script using:
python main.pyHere's what you'll see on the output:
Loading SAM3 model... model.safetensors: 100%|████████| 3.44G/3.44G [05:23<00:00, 10.6MB/s] Processing image with prompt: 'red bottle' Found 1 objects Saved cutout to: bottle_cutout.pngNote: On first run, the model downloads (this takes 5-10 minutes for the 3.4GB file). On subsequent runs, the model loads instantly from cache.
For our tool, this is the input image we gave:

Kitchen countertop scene with fruits, a white cup, and a red bottle before segmentation, used as input for a SAM3 by Meta object cutout tool.
The output for the image is the following cutout that was saved in the folder:
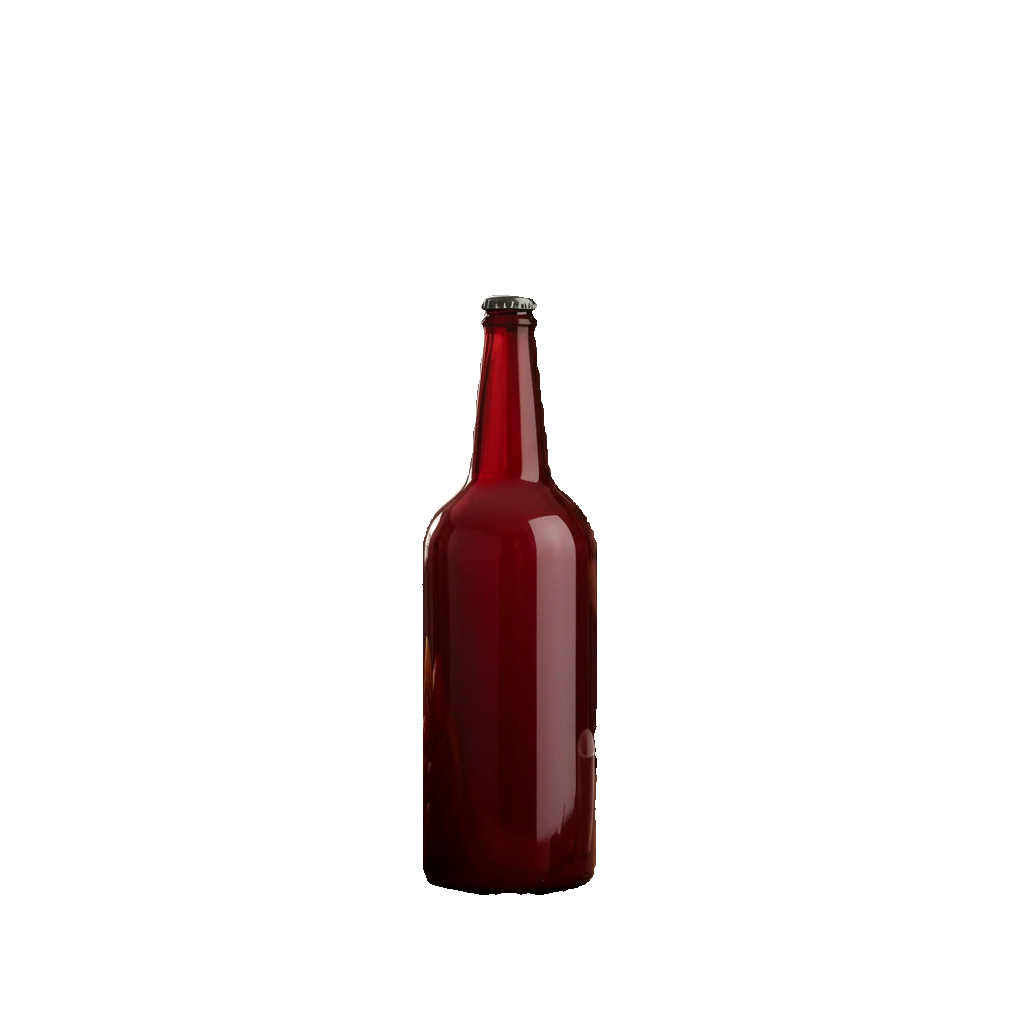
Red bottle isolated on a transparent background after object segmentation using the SAM3 model by Meta for AI-powered image cutout.
Our cutout tool is now working, and as we see, it cuts the red bottle with clean edges with a transparent background.
If no objects are found
- Try a different text prompt that matches what's in your image
- Lower the confidence threshold by changing threshold=0.5 to threshold=0.3 in the code
- Make sure your image clearly shows the object you're searching for
Try a different text prompt that matches what's in your image
Lower the confidence threshold by changing threshold=0.5 to threshold=0.3 in the code
Make sure your image clearly shows the object you're searching for
Step 8: Test with various prompts
The power of SAM3 lies in its ability to understand millions of concepts. You can test it with various prompts to see what it can do. Some example prompts are:
# Extract a cat create_cutout( image_path="cat_photo.png", text_prompt="cat", output_path="cat_cutout.png" )Specific attributes
# Find people wearing specific colors create_cutout( image_path="group_photo.png", text_prompt="person wearing red shirt", output_path="person_in_red_cutout.png" )Extract multiple objects at once
# Finds ALL people in the image create_cutout( image_path="team_photo.png", text_prompt="person", output_path="all_people_cutout.png" )Experiment with different descriptions to find what works best for your images.
But can our code extract multiple objects and save them as separate objects?
Create separate cutouts for multiple objects with SAM3
The tool we built combines all detected objects into a single cutout. But what if you want each object in its own separate file? Let's modify the code to handle this.
The current behavior is:
- Prompt: "person" in a group photo with 3 people
- Output: One PNG file with all 3 people together on a transparent background
The required behavior is:
- Prompt: "person" on a group photo with 3 people
- Output: Three PNG files (person_1.png, person_2.png, person_3.png), each with one person
To perform this, just replace the third part of the create_cutout function with the following:
## Create separate cutout for each detected object image_array = np.array(image) h, w = image_array.shape[:2] cutouts = [] for i, mask in enumerate(results['masks']): mask_array = mask.cpu().numpy() # Create RGBA for this specific object rgba = np.zeros((h, w, 4), dtype=np.uint8) rgba[:, :, :3] = image_array rgba[:, :, 3] = (mask_array * 255).astype(np.uint8) # Save with numbered filename individual_output = output_path.replace('.png', f'_{i+1}.png') cutout = Image.fromarray(rgba, 'RGBA') cutout.save(individual_output) print(f"Saved cutout {i+1} to: {individual_output}") cutouts.append(cutout) return cutoutsInstead of combining all masks with the OR operation, this code:
- Loops through each mask individually as it processes one detected object at a time
- Creates a separate RGBA image and each object gets its own transparent PNG
- Saves with numbered filenames. If you specify apple_cutout.png, it creates apple_cutout_1.png, apple_cutout_2.png, etc.
- Returns a list of cutouts, which is useful if you want to process them further in your code
Loops through each mask individually as it processes one detected object at a time
Creates a separate RGBA image and each object gets its own transparent PNG
Saves with numbered filenames. If you specify apple_cutout.png, it creates apple_cutout_1.png, apple_cutout_2.png, etc.
Returns a list of cutouts, which is useful if you want to process them further in your code
An example usage of this code is:
# Find all bottles and create separate cutouts create_cutout( image_path="photo.png", text_prompt="apple", output_path="apple_cutout.png" )The output will be as:
Processing image with prompt: 'apple' Found 3 objects Saved cutout 1 to: apple_cutout_1.png Saved cutout 2 to: apple_cutout_2.png Saved cutout 3 to: apple_cutout_3.pngYou now have three separate files, each containing one apple on a transparent background.
Next, let's understand how the model actually works under the hood.
Architecture of SAM3
SAM3 builds on the foundations of SAM1, SAM2, and Meta's Perception Encoder to create a unified model for text-prompted segmentation.
SAM3 uses a dual encoder-decoder transformer with two main parts:
- A DETR-style detector for finding objects
- A SAM2-inspired tracker for videos. Both share a unified Perception Encoder.
A DETR-style detector for finding objects
A SAM2-inspired tracker for videos. Both share a unified Perception Encoder.
The core components of the architecture are:
- Perception Encoder aligns visual features from images with text embeddings, creating a joint space where vision and language connect. This enables SAM3 to match text descriptions like "red bottle" directly to visual content.
- DETR-Style Detector scans images to locate all instances matching your prompt simultaneously using a transformer-based approach.
- Presence Head is a new addition in SAM3 that first verifies if the target concept exists before attempting localization. This separation of recognition (what) from localization (where) reduces false positives and improves accuracy on unseen concepts.
- Memory-Based Tracker maintains object identities across video frames, handling occlusions and crowded scenes through a memory mechanism inherited from SAM2.
Perception Encoder aligns visual features from images with text embeddings, creating a joint space where vision and language connect. This enables SAM3 to match text descriptions like "red bottle" directly to visual content.
DETR-Style Detector scans images to locate all instances matching your prompt simultaneously using a transformer-based approach.
Presence Head is a new addition in SAM3 that first verifies if the target concept exists before attempting localization. This separation of recognition (what) from localization (where) reduces false positives and improves accuracy on unseen concepts.
Memory-Based Tracker maintains object identities across video frames, handling occlusions and crowded scenes through a memory mechanism inherited from SAM2.
This architecture enables zero-shot segmentation across 4 million concepts without additional training.
Next, let's see how SAM3 compares to other popular segmentation models.
SAM3 vs. SAM2 vs. YOLO
SAM3 isn't the only segmentation model available. Let's compare it with SAM2 and YOLO to understand when to use each one.
Choose SAM3 when you need text-based segmentation, work with custom concepts, or prioritize flexibility over speed.
Choose SAM2 when you prefer manual control, work extensively with video, or don't need text prompts.
Choose YOLO when speed is critical, you're working with standard object categories, or deploying on resource-constrained devices.
Beyond building cutout tools, SAM3's text-prompted segmentation opens up possibilities across multiple industries and workflows.
Applications of SAM3
SAM3's text-based segmentation makes it useful across different fields and projects:
1. Image and video editing: Remove backgrounds, isolate subjects, or replace elements by simply typing what you want. Video editors can track objects across frames without manual masking on each frame.
2. Dataset creation: Generate labeled training data automatically. Instead of manually marking thousands of images, type "stop sign" or "pedestrian" and let SAM3 create the labels.
3. Robotics: Help robots identify objects using natural language. A warehouse robot can find "boxes" or "pallets" without being programmed for specific items.
4. AR/VR development: Extract real-world objects for virtual environments. Isolate furniture, people, or architectural elements to blend digital content with reality.
5. Design and content creation: Quickly extract objects from photos for marketing materials, social media posts, or product mockups without manual selection tools.
6. Video tracking: Track specific objects or people throughout videos. Useful for sports analysis, surveillance, or applying effects to moving subjects.
SAM3 adapts to your specific needs without retraining, making it practical for automation, creative work, and specialized vision tasks.
Conclusion
SAM3 is Meta's breakthrough in image segmentation that brings natural language understanding to visual tasks. Instead of relying on predefined categories or manual selection, you can now segment any object by simply describing it in plain text. This open-vocabulary approach makes SAM3 flexible enough for creative projects, dataset creation, robotics, and automation workflows where traditional models fall short.
To understand the transformer architectures and neural network fundamentals behind models like SAM3, check out Codecademy's Learn Neural Network Architectures course.
Frequently asked questions
1. What is the meta-sam model?
Meta SAM (Segment Anything Model) is a series of AI models developed by Meta for image and video segmentation. The latest version, SAM3, can detect and segment objects using text prompts, making it capable of understanding over 4 million concepts without additional training.
2. What is the SAM model used for?
SAM models are used for extracting objects from images and videos, creating transparent cutouts, automated dataset labeling, video editing, robotics vision, and AR/VR applications. They provide pixel-perfect masks for any object you want to isolate.
3. What are the 4 types of segmentation?
The four main types of image segmentation are:
- Semantic segmentation - labels each pixel by category
- Instance segmentation - separates individual objects of the same category
- Panoptic segmentation - combines semantic and instance segmentation
- Interactive segmentation - segments objects based on user input like clicks or text prompts (which SAM3 does).
Semantic segmentation - labels each pixel by category
Instance segmentation - separates individual objects of the same category
Panoptic segmentation - combines semantic and instance segmentation
Interactive segmentation - segments objects based on user input like clicks or text prompts (which SAM3 does).
4. Is the Meta SAM 2 good for gaming?
SAM2 isn't designed for real-time gaming applications due to its processing speed. It's better suited for game development tasks like creating asset libraries, extracting sprites, or generating training data for game AI. For in-game real-time detection, faster models like YOLO are more appropriate.
5. Is Sam 2 better than Sam?
SAM2 is better than SAM1 for video segmentation and temporal tracking but doesn't support text prompts. SAM3 is the most advanced, combining SAM2's video capabilities with text-based prompting. Choose SAM2 for manual video segmentation, SAM3 for text-based workflows, and SAM1 for basic image segmentation.
'The Codecademy Team, composed of experienced educators and tech experts, is dedicated to making tech skills accessible to all. We empower learners worldwide with expert-reviewed content that develops and enhances the technical skills needed to advance and succeed in their careers.'
- What is SAM3?
- Build a text-prompted cutout tool with Meta SAM3
- Create separate cutouts for multiple objects with SAM3
- Architecture of SAM3
- SAM3 vs. SAM2 vs. YOLO
- Applications of SAM3
- Conclusion
- Frequently asked questions
Complete Payment to Unlock Full Guide & Source Code
You are viewing the 30% preview. Join TopCourseAI Pro to unlock the remaining 70% of this article, unblur all code snippets, and gain full access to all 412 technical projects and guides.
Ready to access the complete step-by-step tutorial?
Gain full unhindered access to all 412 technical projects and guides, unblur all source code snippets, and download runnable scripts.
Runway Aleph: A Complete Guide with 5 Practical Examples
Next BlueprintScikit-Learn Cheatsheet
Related Blueprints & Guides
View all 166 →A Complete Guide to Vercel's AI SDK
Vercel AI SDK is a powerful TypeScript-first toolkit that provides a unified interface for building AI applications with Next.js and other modern frameworks. It eliminates the traditional complexity of managing multiple ...
AI Agents & AutomationAG-UI: How the Agent-User Interaction Protocol Works
AG-UI (Agent-User Interaction Protocol) is an open, lightweight protocol that standardizes the way AI agents interact with frontend apps. Consider it a common language that eliminates the need for custom integration code...
Generative AI FoundationsAI vs Generative AI: Understanding the Difference
Artificial Intelligence, or AI, is everywhere, from chatbots helping you shop to recommendation engines suggesting your next binge. Yet not all AI is the same, and the term is often used loosely, leaving many confused be...
Ready to build production-grade AI systems?
Enjoyed this guide? Continue exploring our library of 166+ production blueprints, multi-agent swarms, and autonomous agent systems with 100% unblurred, executable source code.