
HTTP Requests in Velo
HTTP Requests in Velo
Different HTTP Requests
Previously, we covered howgetJSON()can be used to “ask” for information from another website through a GET request. The GET request works by calling a URL endpoint, which is the specified location from where we can retrieve resources. When we call thegetJSON()function, Wix handles the GET request behind the scenes based on the URL we provide, allowing us to easily retrieve data from the server.
Types of HTTP Requests
Our websites could be boring if we’re only able to GET information and not manipulate it in any other way. Fortunately, there are otherHTTP requestverbsthat perform various actions for our websites:
- GET: retrieve a specific resource by ID or a collection of resources.
- DELETE: remove a specific resource by ID.
- PUT: update a specific resource by ID.
- POST: create a new resource.
In this article, we will focus on using a POST request to allow for even more user interaction on your Wix websites!
Making a POST Request
POST requests are important because they allow the browser to send data to the server and create a new resource. With POST requests, we can expand the capabilities of our websites to access other sites and gain a wealth of additional functionality.
In fact, you have likely used POST requests many times before — including today! For example, when you log in to the Codecademy website, you are sending your username and password to the server using a POST request. The server will then check whether your login credentials are valid and send back a response that will allow or deny access to your personal Codecademy dashboard.
Syntax of the POST Request
To implement a POST request, we must again use thefetch()function of thewix-fetchmodule, which often occurs on the backend.
import { fetch } from 'wix-fetch';
fetch('https://someapi.com/api/endpoint', {  'method': 'post',  'headers': {    'Content-Type': 'application/x-www-form-urlencoded'  },  'body': 'somekey=somevalue'})
Copy to clipboard
import { fetch } from 'wix-fetch';
fetch('https://someapi.com/api/endpoint', { 'method': 'post', 'headers': { 'Content-Type': 'application/x-www-form-urlencoded' }, 'body': 'somekey=somevalue'})As seen in the boilerplate code above, thefetch()function is used to contact a mocked-up URL with a POST request. The second argument of thefetch()function is theWixFetchRequestobject, which contains information about the HTTP request. This object can be used to pass in content that needs to be sent to the server, such as the following properties:
- methodwhich is a string representing the specific HTTP request method to use. To make a POST request, we must designate this property as'post'.
- headersis an object that is used to pass along information about the request body to the server (in this case, theContent-Typeof the body).
- bodyis a string representing the request data we’re sending, also known as thepayload. In more complex programs, thebodyof a POST request is where the user will send information to the server, such as login credentials.
Handling the Response
We’ve used thefetch()function and itsWixFetchRequestargument to send the endpoint our data. Afterward, we need to handle the data and the response that comes back from the endpoint.
import { fetch } from 'wix-fetch';
fetch('https://someapi.com/api/endpoint', { 'method': 'post', 'headers': { 'Content-Type': 'application/x-www-form-urlencoded' }, 'body': 'somekey=somevalue'}) .then((httpResponse) => { if (httpResponse.ok) { return httpResponse.json(); } else { return Promise.reject('Fetch did not succeed'); } }) .then((json) => console.log(json.importantData)) .catch((err) => console.log(err));
Copy to clipboardimport { fetch } from 'wix-fetch';
fetch('https://someapi.com/api/endpoint', { 'method': 'post', 'headers': { 'Content-Type': 'application/x-www-form-urlencoded' }, 'body': 'somekey=somevalue'}) .then((httpResponse) => { if (httpResponse.ok) { return httpResponse.json(); } else { return Promise.reject('Fetch did not succeed'); } }) .then((json) => console.log(json.importantData)) .catch((err) => console.log(err));Sincefetch()returns aWixFetchResponseobject which is a Promise, we also have to chain the appropriate.then()and.catch()methods.
Through the.then()method, we can first check if the HTTP request was successful by usinghttpResponse.okto get the returned HTTP status code. If successful, we can then get theJSONdata that is returned fromhttpResponse.json()as another Promise (in more complex programs, this can be data like authentication tokens to allow for the user to login). If we fail to receive the properWixFetchResponse, the.catch()method is executed, which prints out the error in this case.
Putting It Together
Let’s take a look at how we can use POST requests to calculate mathematical expressions for a Wix calculator widget.
To prevent issues withCORSand avoid anysecurity concerns, we often have to implementfetch()on the backend. We’ll create a backend file calledcalculator.jswwith the following code:
import { fetch } from 'wix-fetch';
export function calculate (expression) {  return fetch('http://api.mathjs.org/v4/', {    'method': 'post',    'headers': {      'Content-Type': 'application/json'    },    'body': JSON.stringify({ expr: expression })})  .then((httpResponse) => {    if (httpResponse.ok) {      return httpResponse.json();    } else {      return Promise.reject('Fetch did not succeed');    }  })  .then((json) => {    return json.result;  })  .catch(err => console.log(err));}
Copy to clipboard
import { fetch } from 'wix-fetch';
export function calculate (expression) { return fetch('http://api.mathjs.org/v4/', { 'method': 'post', 'headers': { 'Content-Type': 'application/json' }, 'body': JSON.stringify({ expr: expression })}) .then((httpResponse) => { if (httpResponse.ok) { return httpResponse.json(); } else { return Promise.reject('Fetch did not succeed'); } }) .then((json) => { return json.result; }) .catch(err => console.log(err));}With our backend set up, we can import and callcalculate()from our frontend:
import { calculate } from 'backend/calculator.jsw';
const calculateButton = $w('#calculate');
calculateButton.onClick((event) => {  const expression = $w('#input').value;  calculate(expression)    .then((result) => {      $w('#result').text = `= ${result}`;    })});
Copy to clipboard
import { calculate } from 'backend/calculator.jsw';
const calculateButton = $w('#calculate');
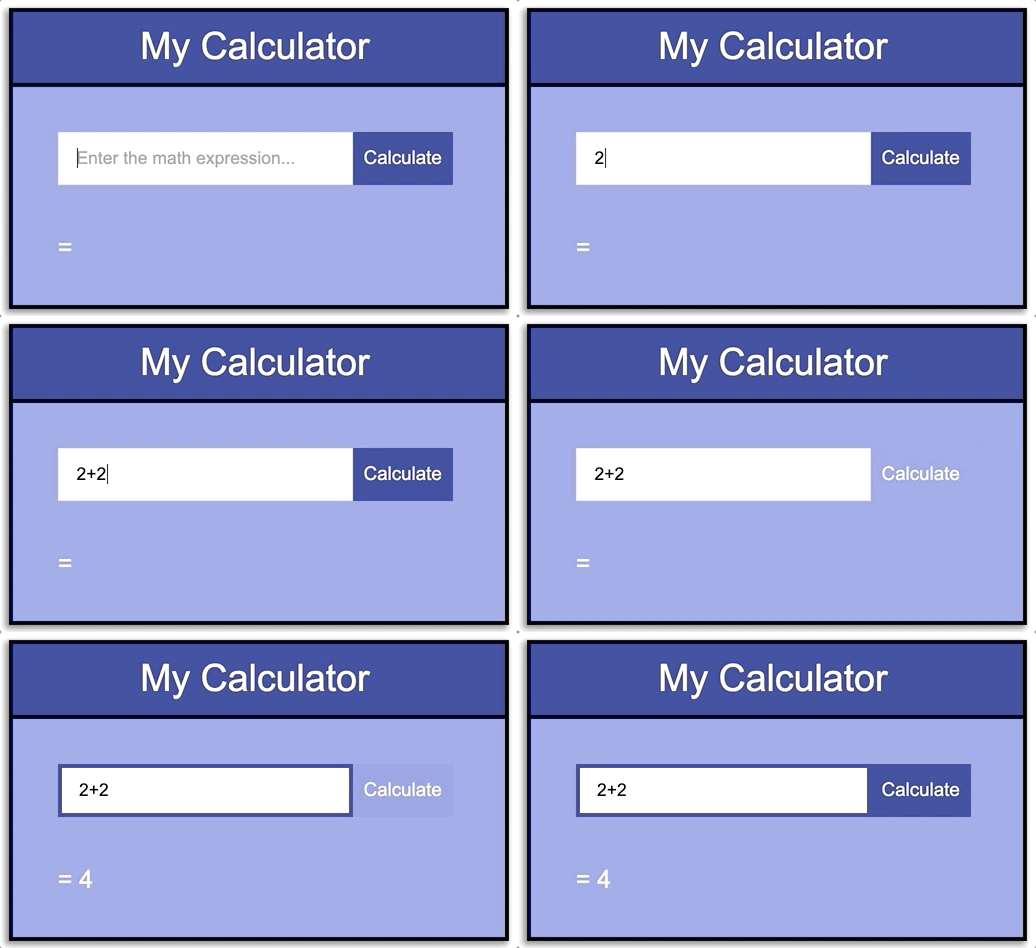
calculateButton.onClick((event) => { const expression = $w('#input').value; calculate(expression) .then((result) => { $w('#result').text = `= ${result}`; })});Having both functions set up, we can now see our calculator widget in action:
My Calculator
When we click the “Calculate” button, the inputted mathematical expression is sent to themath.jsAPI via a POST request (notice how the POST requestContent-Typeis different from before and that thebodycontaining the expression is stored in JSON format as a string). From there, the API automatically calculates the mathematical expression and returns a JSON object containing the result, which is displayed on the widget.
Similarities and Differences
The boilerplate code for POST, GET, DELETE, and PUT requests look very similar, but it’s important to note that they perform different actions and thus require different properties.
One difference is themethodproperty of theWixFetchRequestobject. To make a POST request, we must set themethodproperty to'post', however, for a GET request, a DELETE request, and a PUT request, it must be set to'get','delete', and'put'respectively.
A more subtle difference is the content of thebody, which depends on whether it’s aPOSTrequest,DELETErequest, orPUTrequest.
Wrapping Up
You can now expand your Wix possibilities even further by using the HTTP requests you learned about:
- Different types of HTTP requests are needed so that websites can allow for different types of user interaction.
- The DELETE request allows us to remove a specific resource, the GET request allows us to retrieve a specific resource or collection of resources, and the PUT request allows us to update a resource. In this article, we focused on the POST request, which enables us to create a new resource.
- The POST request uses the Wixfetch()function and itsWixFetchRequestargument to send the requestmethod,headers, andbodyto the server, along with handling the response.
Being equipped with HTTP requests opens many doors — you can now delete, get, update, and send data to the server right from your Wix websites. Go ahead and apply these techniques by contacting an API in different ways or building a social media platform that uses HTTP requests, for example. Or perhaps leave your comfort zone by making a PUT and DELETE request to put your knowledge to the test!
'The Codecademy Team, composed of experienced educators and tech experts, is dedicated to making tech skills accessible to all. We empower learners worldwide with expert-reviewed content that develops and enhances the technical skills needed to advance and succeed in their careers.'
Complete Payment to Unlock Full Guide & Source Code
You are viewing the 30% preview. Join TopCourseAI Pro to unlock the remaining 70% of this article, unblur all code snippets, and gain full access to all 412 technical projects and guides.
Ready to access the complete step-by-step tutorial?
Gain full unhindered access to all 412 technical projects and guides, unblur all source code snippets, and download runnable scripts.
Related Blueprints & Guides
View all 166 →Accessibility on the Platform
Codecademy is committed to providing a high-quality learning experience for all learners. That includes accommodating different usage forms such as auditory, motor, or visual restrictions, limited hardware, or other acce...
Web developmentAffordances, Signifiers, and Clickability
For users on the web, the mouse click is perhaps the most fundamental human-computer interaction. The webbecamethe web partially through the power ofhypertext, or text in one document that links to other documents or res...
Web developmentAuthentication and OAuth
Authenticationis the process used by applications to determine and confirm identities of users. It ensures that the correct content is shown to users. More importantly, it ensures that incorrect content is secured and u...
Ready to build production-grade AI systems?
Enjoyed this guide? Continue exploring our library of 166+ production blueprints, multi-agent swarms, and autonomous agent systems with 100% unblurred, executable source code.