
Handy Git Operations
Handy Git Operations
Introduction
Git provides us with a vast number of different commands that are listed on thedocumentationwhich can be intimidating at first. We will break down a couple that are powerful for daily tasks.
Git stash
Let’s say you’re working on experimental code on a fresh branch and realize that you forgot to add something to a previous commit in order to continue your work. In order to go to a different branch, one must always be at a clean commit point. In this case you don’t want to commit your experimental code since it’s not ready but you also don’t want to lose all the code you’ve been working on.
A good way to handle this is by usinggit stash, which allows you to get back to a clean commit point with a synchronized working tree, and avoid losing your local changes in the process. You’re “stashing” your local work temporarily in order to update a previous commit and later on retrieve your work.
The flow when usinggit stashmight look something like this:
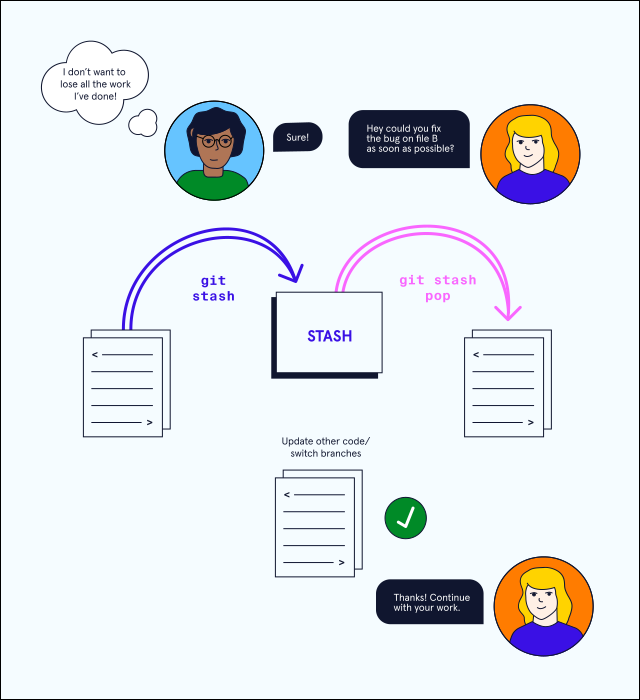
In this diagram, a coworker asks the programmer if they can work on something else while they have their current code open. Git stash allows their current code to be stashed as they finish the other update. Git stash pop puts the code changes back into the working directory.
While working on a file, you find a small bug in a separate file from a previous commit that needs to be fixed before you continue.
$ git stashRunning the command above will store your work temporarily for later use in a hidden directory.
At this point, you can switch branches and do work elsewhere.
Once the bug is fixed, you want to retrieve the code you were working on previously, you can “pop” the work that was stored when you usedgit stash.
$ git stash popFrom here, you can continue your work and commit it when ready.
Coming up we have a short video demo’ing this in action.
Git log
At this point you might be familiar with the commandgit log, which allows you to view the commit history of the branch you currently have checked out:
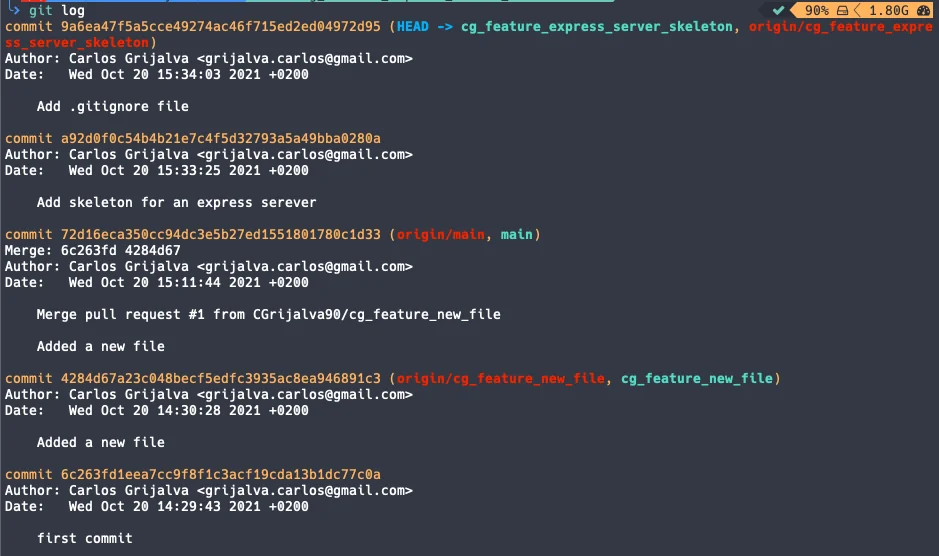
Git Log output shows recent commit history
There are other ways you can usegit login order to view recorded changes. Here are a few examples:
- git log --onelineshows the list of commits in one line format.

Git Log online output shows recent commit history all in one line
- git log -S "keyword"displays a list of commits where the number of occurrences of the keyword changes within at least one file via addition, deletion, or modification. In the screenshot below, we usegit log -S "Add"to find any commits where the number of occurrences of “Add” within a file changes.

The output of `git log -S "Add"` finds a commit where the number of occurrences of "Add" changes within a file.
- git log --oneline --graph---graphDisplays a visual representation of how the branches and commits were created in order to help you make sense of your repository history. When used alone, the description can be very lengthy, so you can combine the command with--onelinein order to shorten the description.

Git log --online --graph outputs a graphical representation of commits, showing where branches were created earlier and merged.
Git commit amend
Git’s--amendflag is extremely useful when updating a commit, it allows you to correct mistakes and edit commits easily instead of creating a completely new one.
Let’s say you finish working on a lengthy feature and everything seems to be working fine so you commit your work. Shortly after, you realize you missed a few semicolons in one of your functions. You could technically create a new commit, but ideally, you want to keep all commits specific, clean, and succinct. To avoid creating a new one, you could create your changes, stage them withgit addand then type the commandgit commit --amendto update your previous commit.
It’s important to note that although it seems like--amendis simply updating the commit, what Git actually does is replace the whole previous commit. For this reason, when you execute the commandgit commit --amend, your terminal editor asks you to update your commit message:
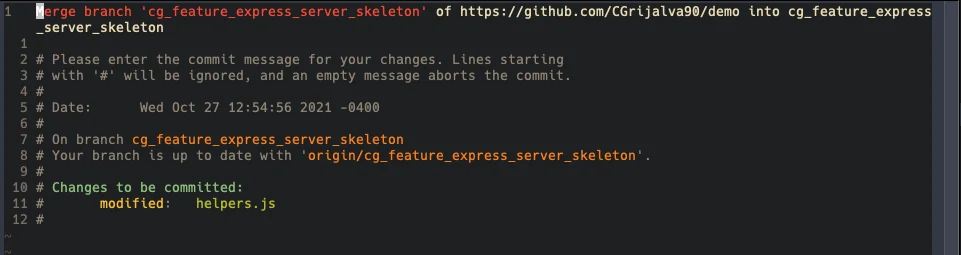
git-amend
However, if you want to keep the same commit message, you can simply add the flag--no-edit:
$ git commit --amend --no-editGit alias commands
When grouping commands together, you can end up writing very long lines of Git commands in the terminal such as:
$ git log --pretty=format:"%h %s" --graphFortunately, Git offers a helpful feature that can make your Git experience simpler, easier, and more familiar: aliases.
If you have a set of commands that you use regularly and want to save some time from typing them, you can easily set up an alias for each command using Git config.
Below are a couple of examples:
$ git config --global alias.co "checkout"
$ git config --global alias.br "branch"
$ git config --global alias.glop "log --pretty=format:"%h %s" --graph"
Once the aliases are configured, next time you want to check out to another branch you could type the command:
$ git co example_branchInstead of:
$ git checkout example_branchUsing Git aliases can create a much more fluid and efficient workflow experience when using Git. By getting creative with your aliases, you’re able to wrap a sequence of Git commands into one in order to save time and effort.
'The Codecademy Team, composed of experienced educators and tech experts, is dedicated to making tech skills accessible to all. We empower learners worldwide with expert-reviewed content that develops and enhances the technical skills needed to advance and succeed in their careers.'
Complete Payment to Unlock Full Guide & Source Code
You are viewing the 30% preview. Join TopCourseAI Pro to unlock the remaining 70% of this article, unblur all code snippets, and gain full access to all 412 technical projects and guides.
Ready to access the complete step-by-step tutorial?
Gain full unhindered access to all 412 technical projects and guides, unblur all source code snippets, and download runnable scripts.
Related Blueprints & Guides
View all 166 →Accessibility on the Platform
Codecademy is committed to providing a high-quality learning experience for all learners. That includes accommodating different usage forms such as auditory, motor, or visual restrictions, limited hardware, or other acce...
Web developmentAffordances, Signifiers, and Clickability
For users on the web, the mouse click is perhaps the most fundamental human-computer interaction. The webbecamethe web partially through the power ofhypertext, or text in one document that links to other documents or res...
Web developmentAuthentication and OAuth
Authenticationis the process used by applications to determine and confirm identities of users. It ensures that the correct content is shown to users. More importantly, it ensures that incorrect content is secured and u...
Ready to build production-grade AI systems?
Enjoyed this guide? Continue exploring our library of 166+ production blueprints, multi-agent swarms, and autonomous agent systems with 100% unblurred, executable source code.