
How To Create a Free AWS Account
How To Create a Free AWS Account
In this tutorial, we will explain how to create anAWSFree Tier account. The sign-up process involves the following:
- Creating a root user account
- Selecting an account type
- Payment, billing, and identity verification
- Choosing a plan
- Multi-Factor Authentication (MFA)
A fear many people have about using AWS is the cost. While some users may pay for AWS services, with careful use, it can be completely free. In addition, if a small number of resources are used for paid features, it can cost as little as a few dollars a month.
In AWS, there is only one account owner (root user). Additional users that are created by the root user are known as IAM users. IAM users can be configured as “admins” and be given the ability to create other IAM users. The root user is given full access to resources in the AWS account, while IAM users are granted permissions that are set in place by the root user. In addition, the root user’s sign-in credentials can be used for account recovery and other administrative functions.
Step 1: Creating An AWS Account
Let’s get started by creating the root user account.
- Let’s visit theAWS homepage.
- Upon clicking the button, “Create an AWS Account,” you will be prompted for an email address and a name that will be used to create the root user (this can be changed in the future).
- Next, we’ll select “Verify email address.” A verification code that’s sent to your email address will need to be entered, then we can select the “Verify” button. After creating your password, we can select “Continue.”
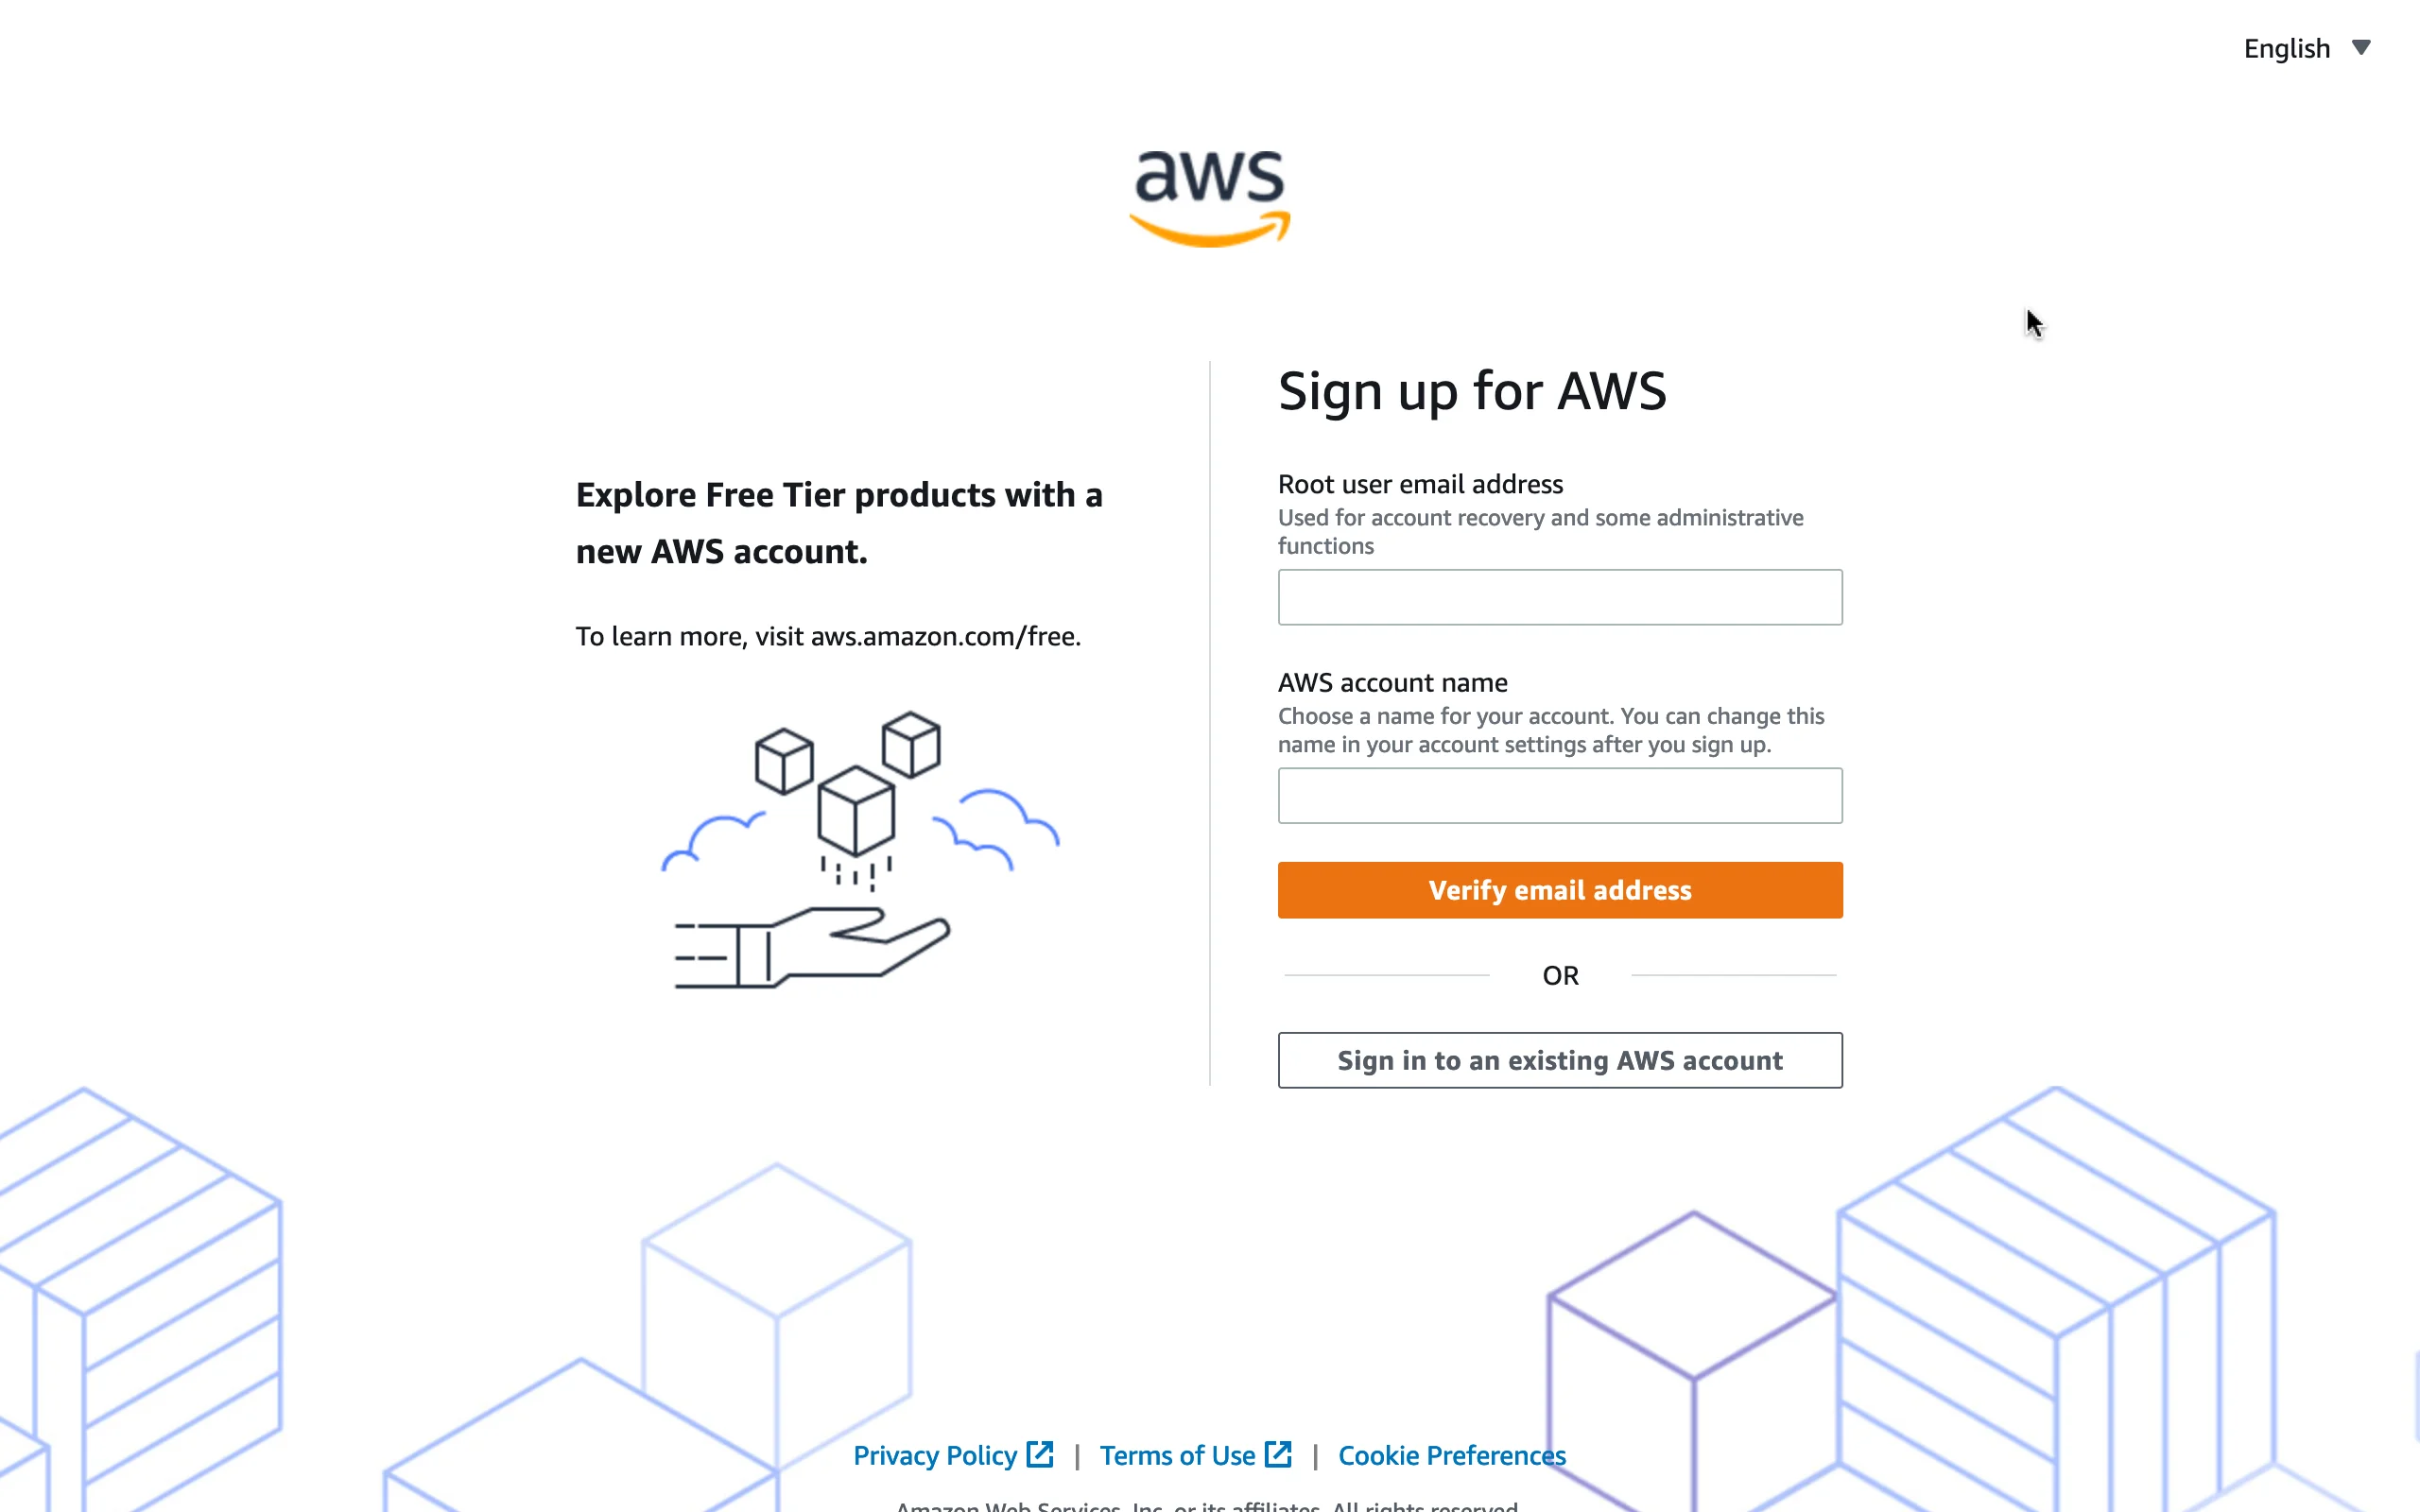
AWS signup page
Note:You can click on the images in this tutorial to view them at a larger size.
Selecting Account Type
Now we need to select the account type. There are two types of accounts: business and personal. Although they’re functionally the same, it is best practice to use a personal account for learning and development, and a business account for work or professional purposes.
- For this article, we will be creating a personal account by selecting the “Personal - for your own projects” radio button.
- After this, a phone number, country/region, and address are required for validation purposes.
- Finally, we’ll mark the checkbox to indicate that we have read and agreed to the terms of the AWS customer agreement and then select “Continue (step 2 of 5).”
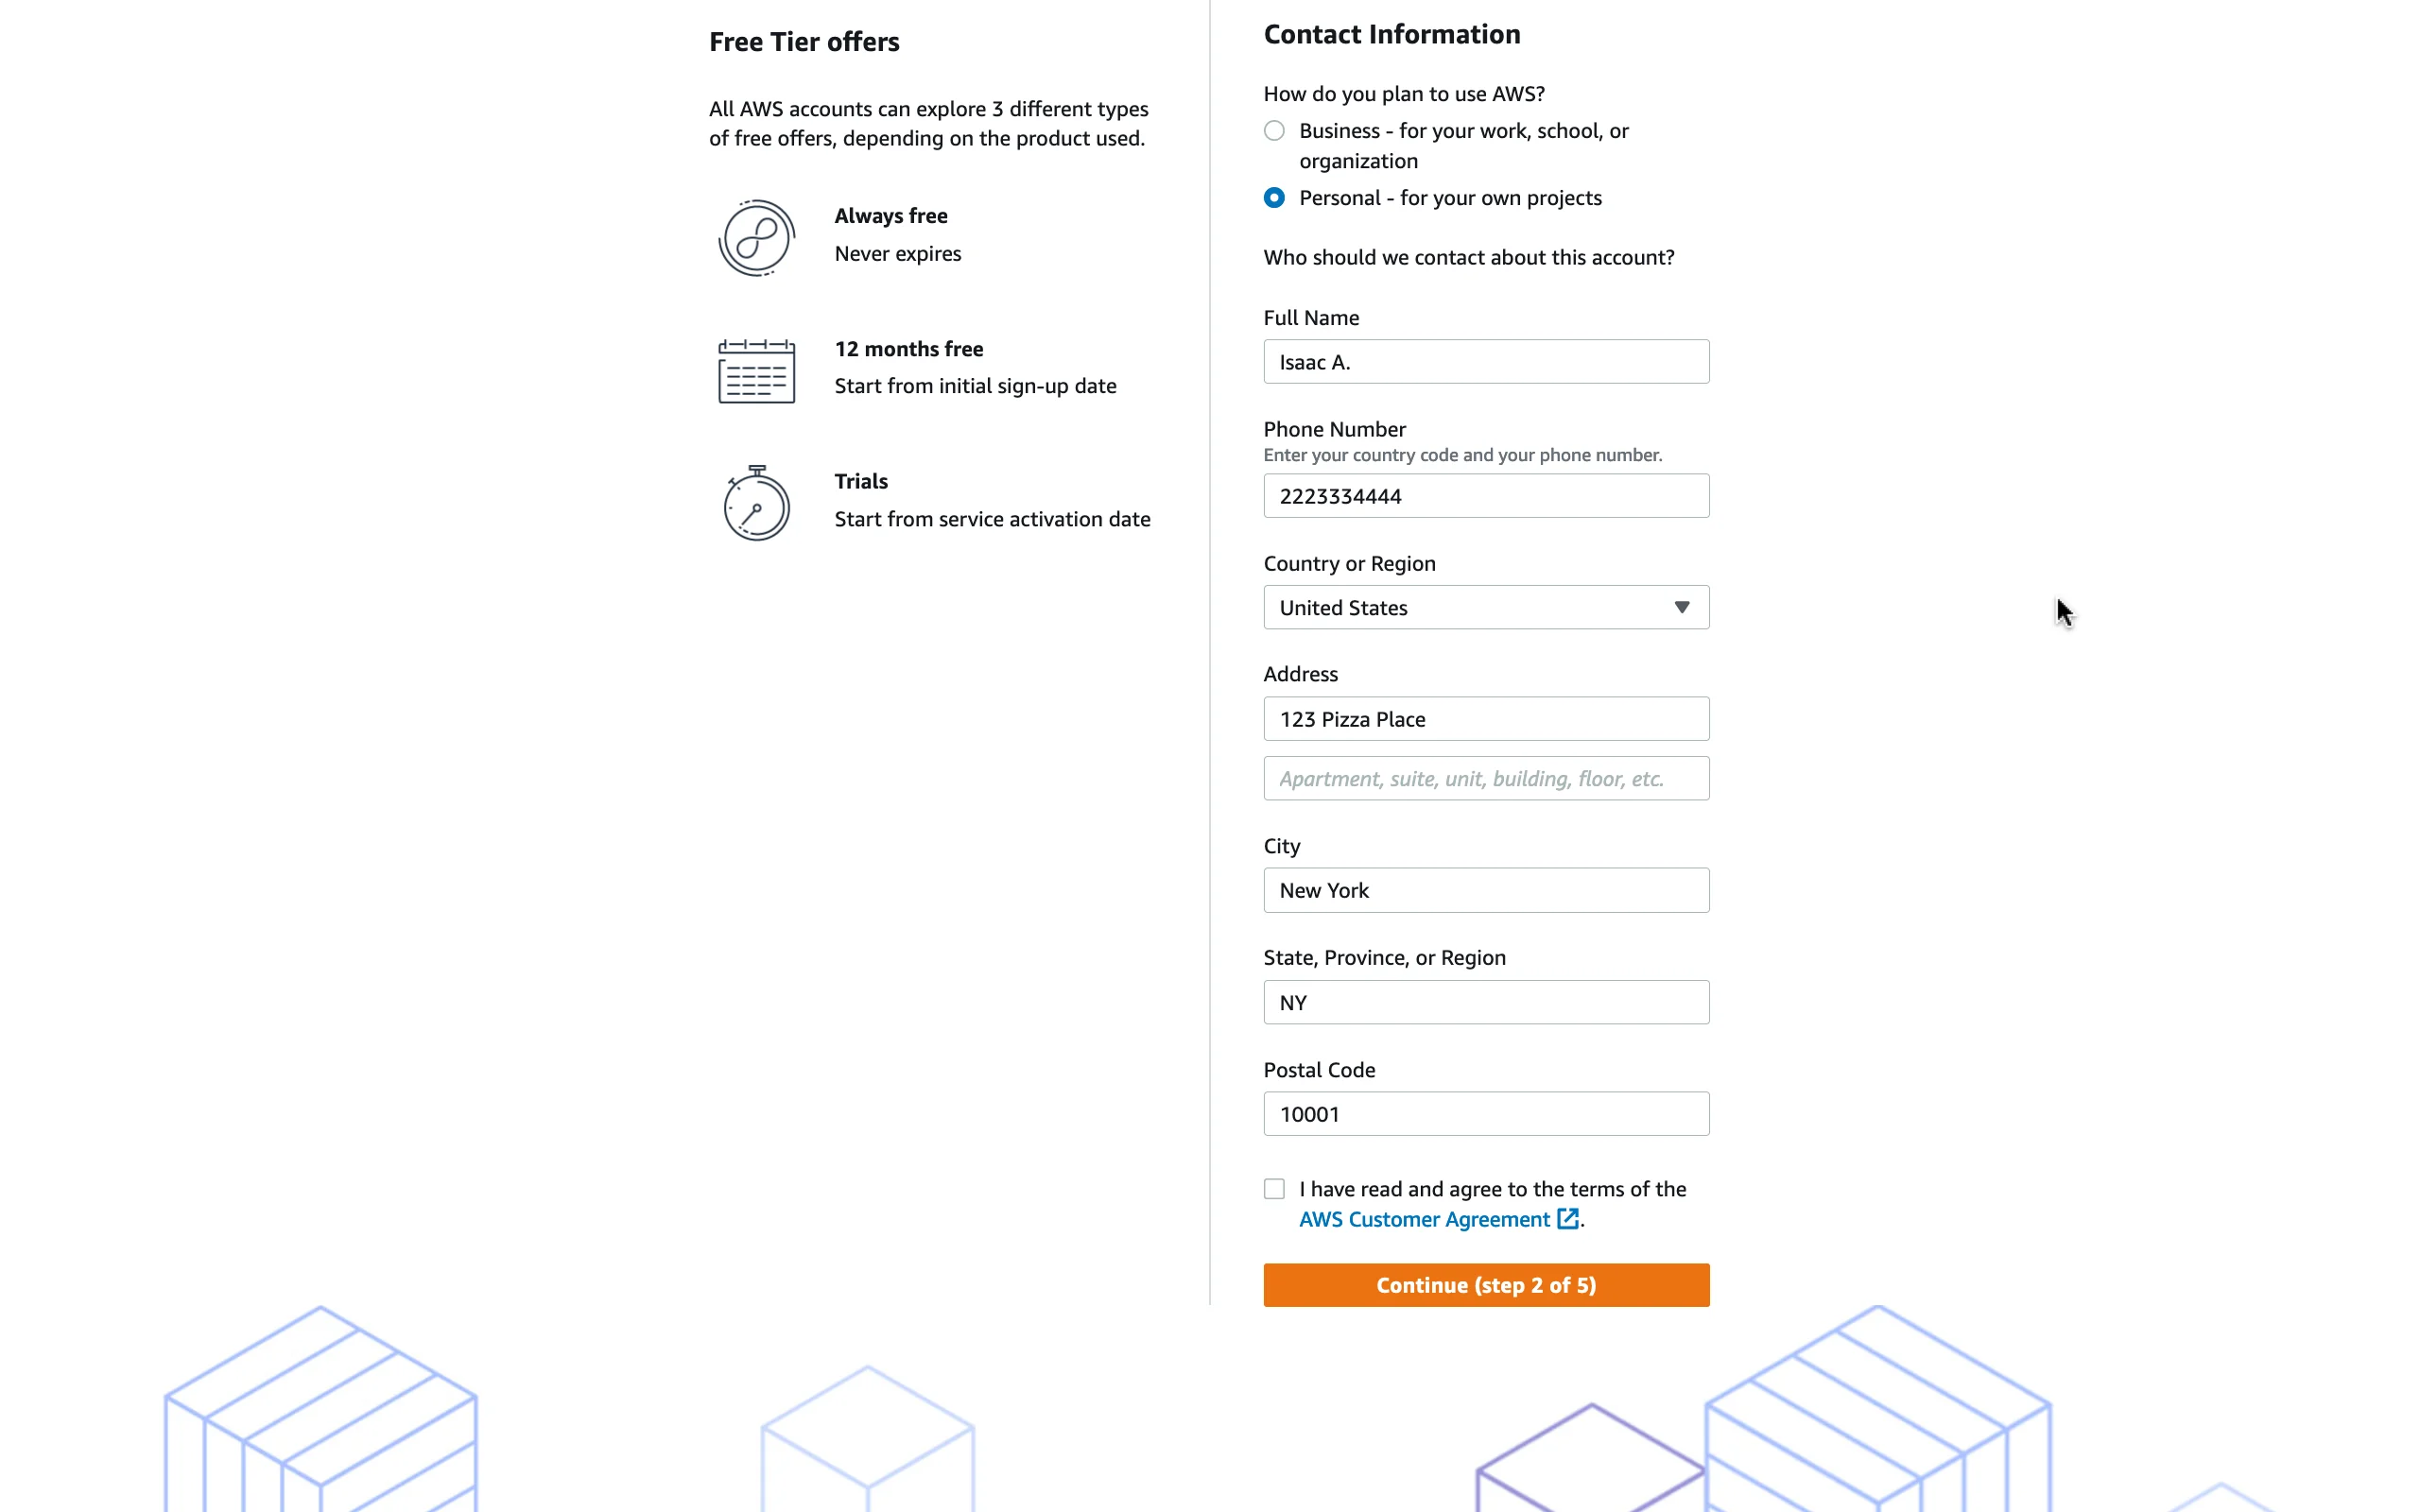
Contact information page
Payment, Billing, and Identity
The next step asks for a credit card, but no charge will be taken from you upon entering this information. If your account usage stays below the AWS Free Tier limits, you should be free from any payments. More detailed pricing information can be found through eachAWS Free Tierfeature page under “Pricing.”
- We will input our credit or debit card information.
- Then, we will select “Verify and Continue.”
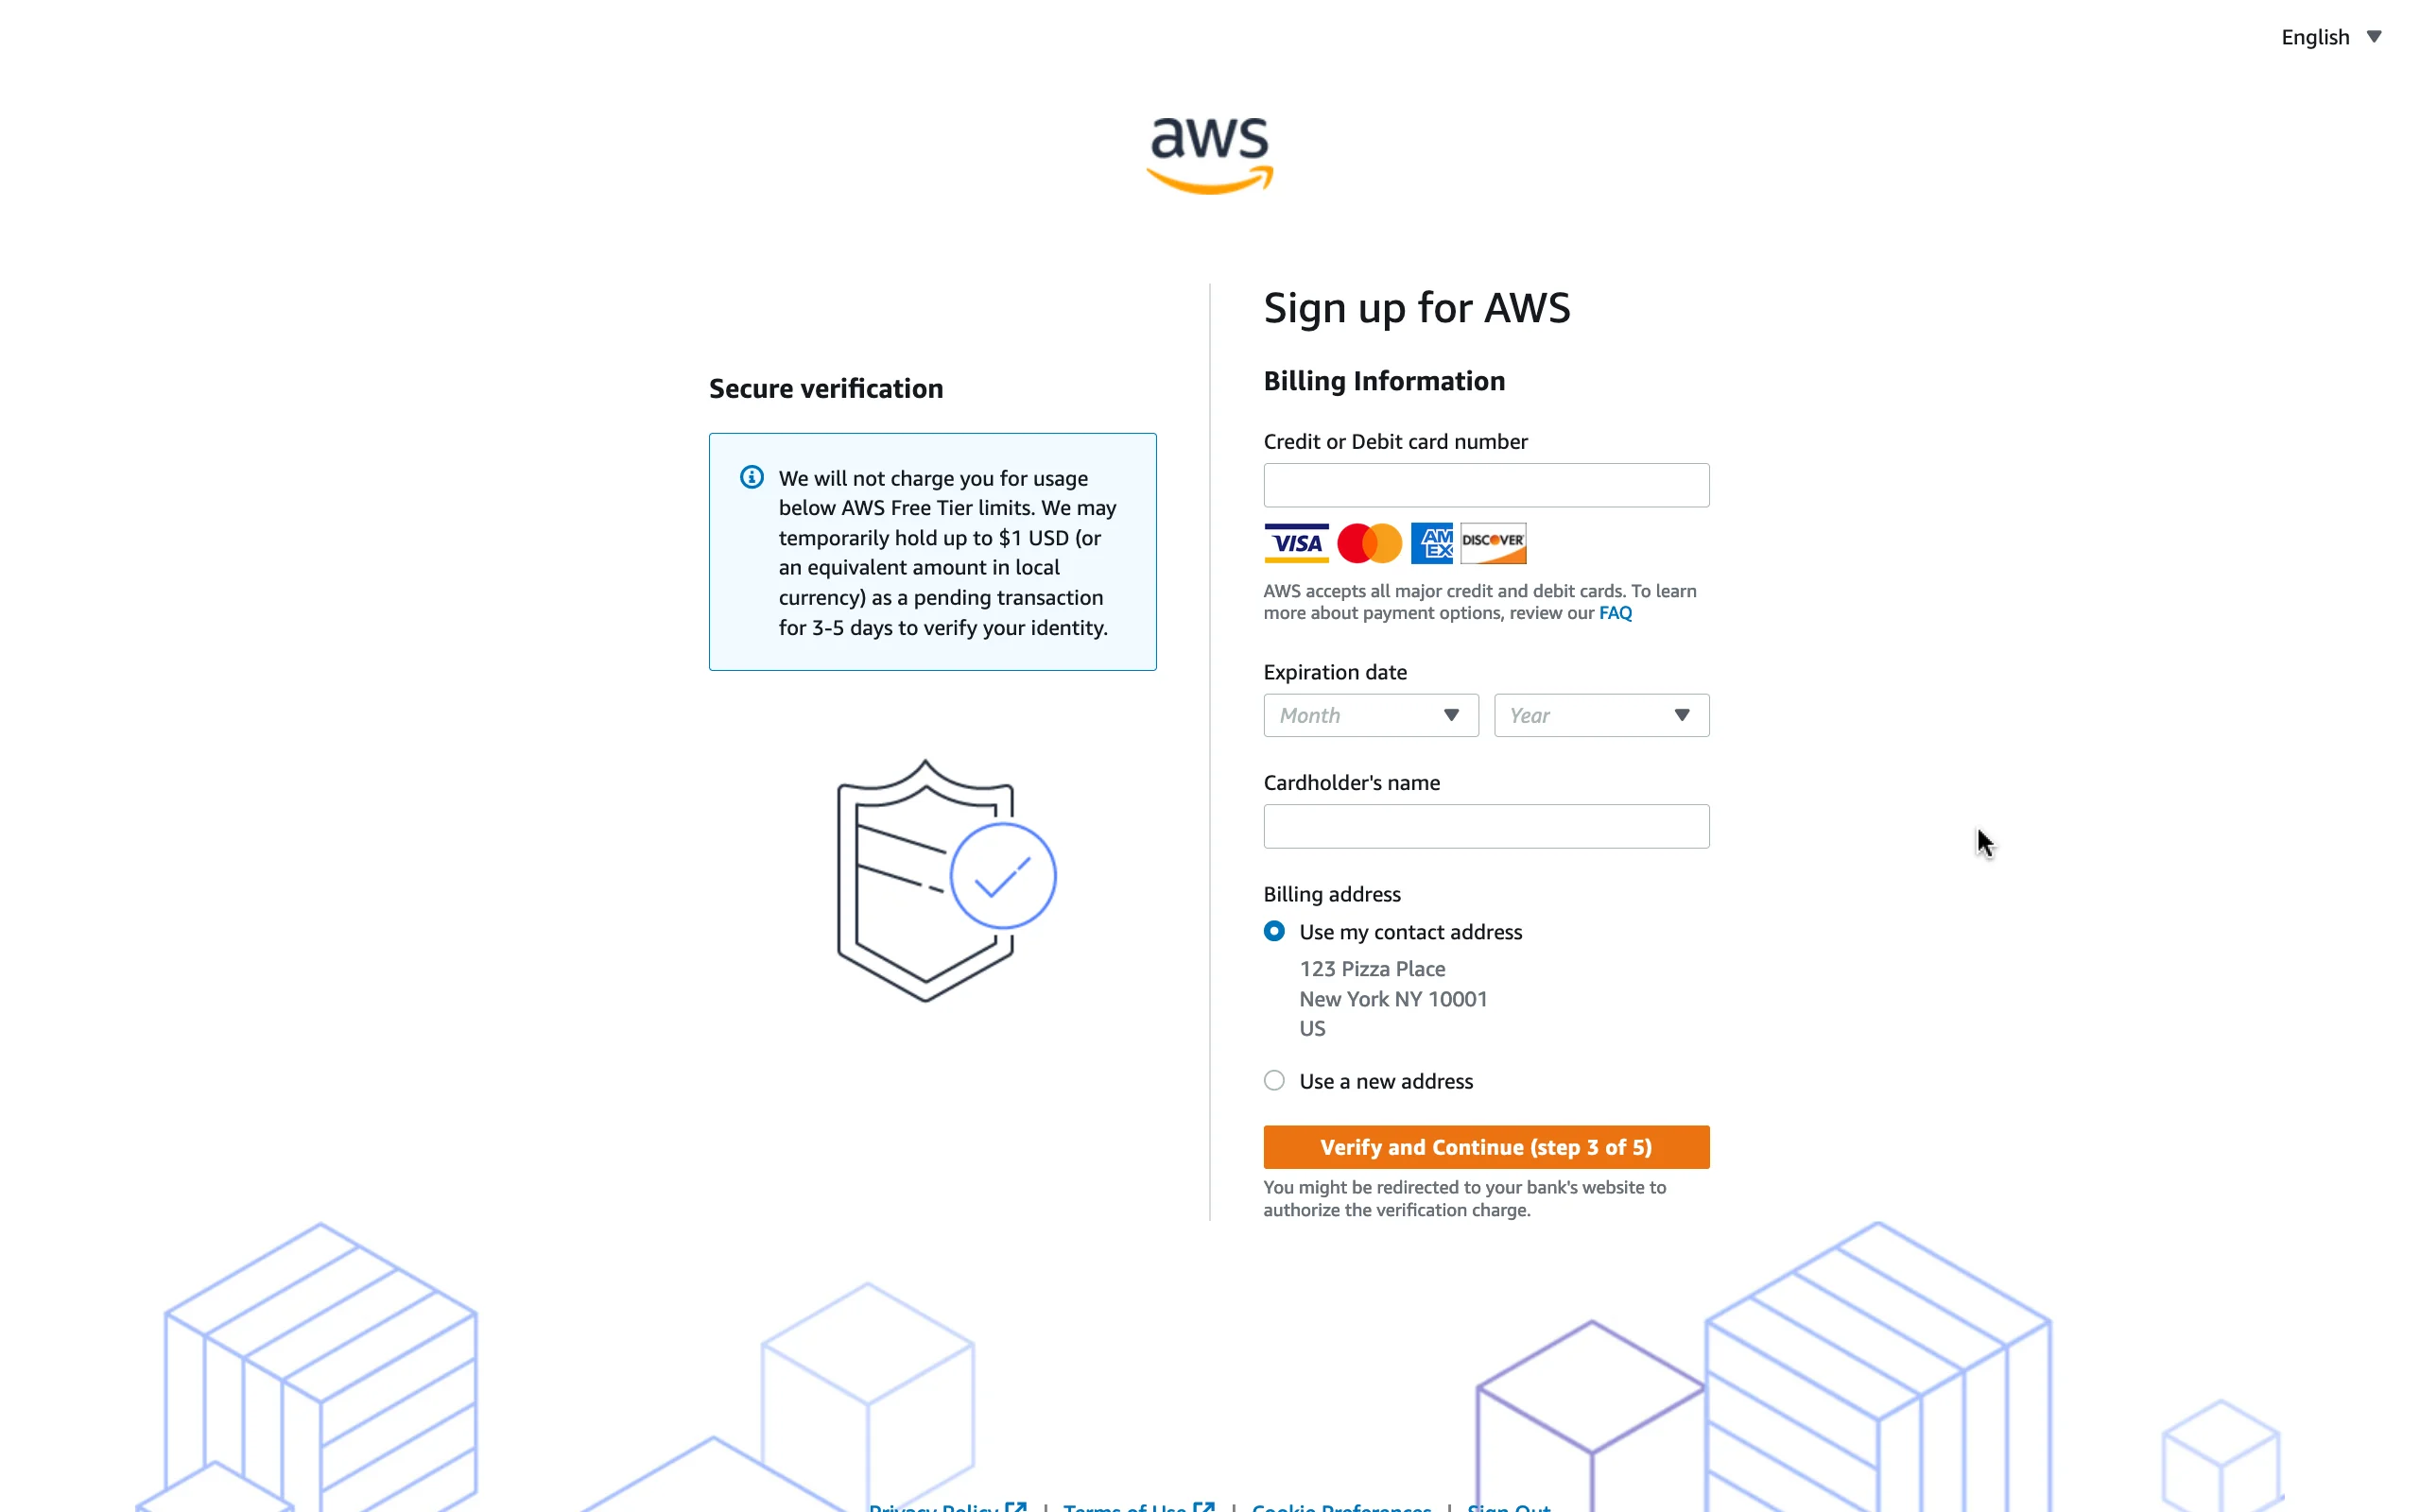
Billing page
The next step is to confirm your identity using a verification code.
- You can do this through text message or a voice call to receive the code — whichever is best for you.
- We’ll enter that code into the captcha text box, select “Verify Code,” and once verified we can select “Continue.”
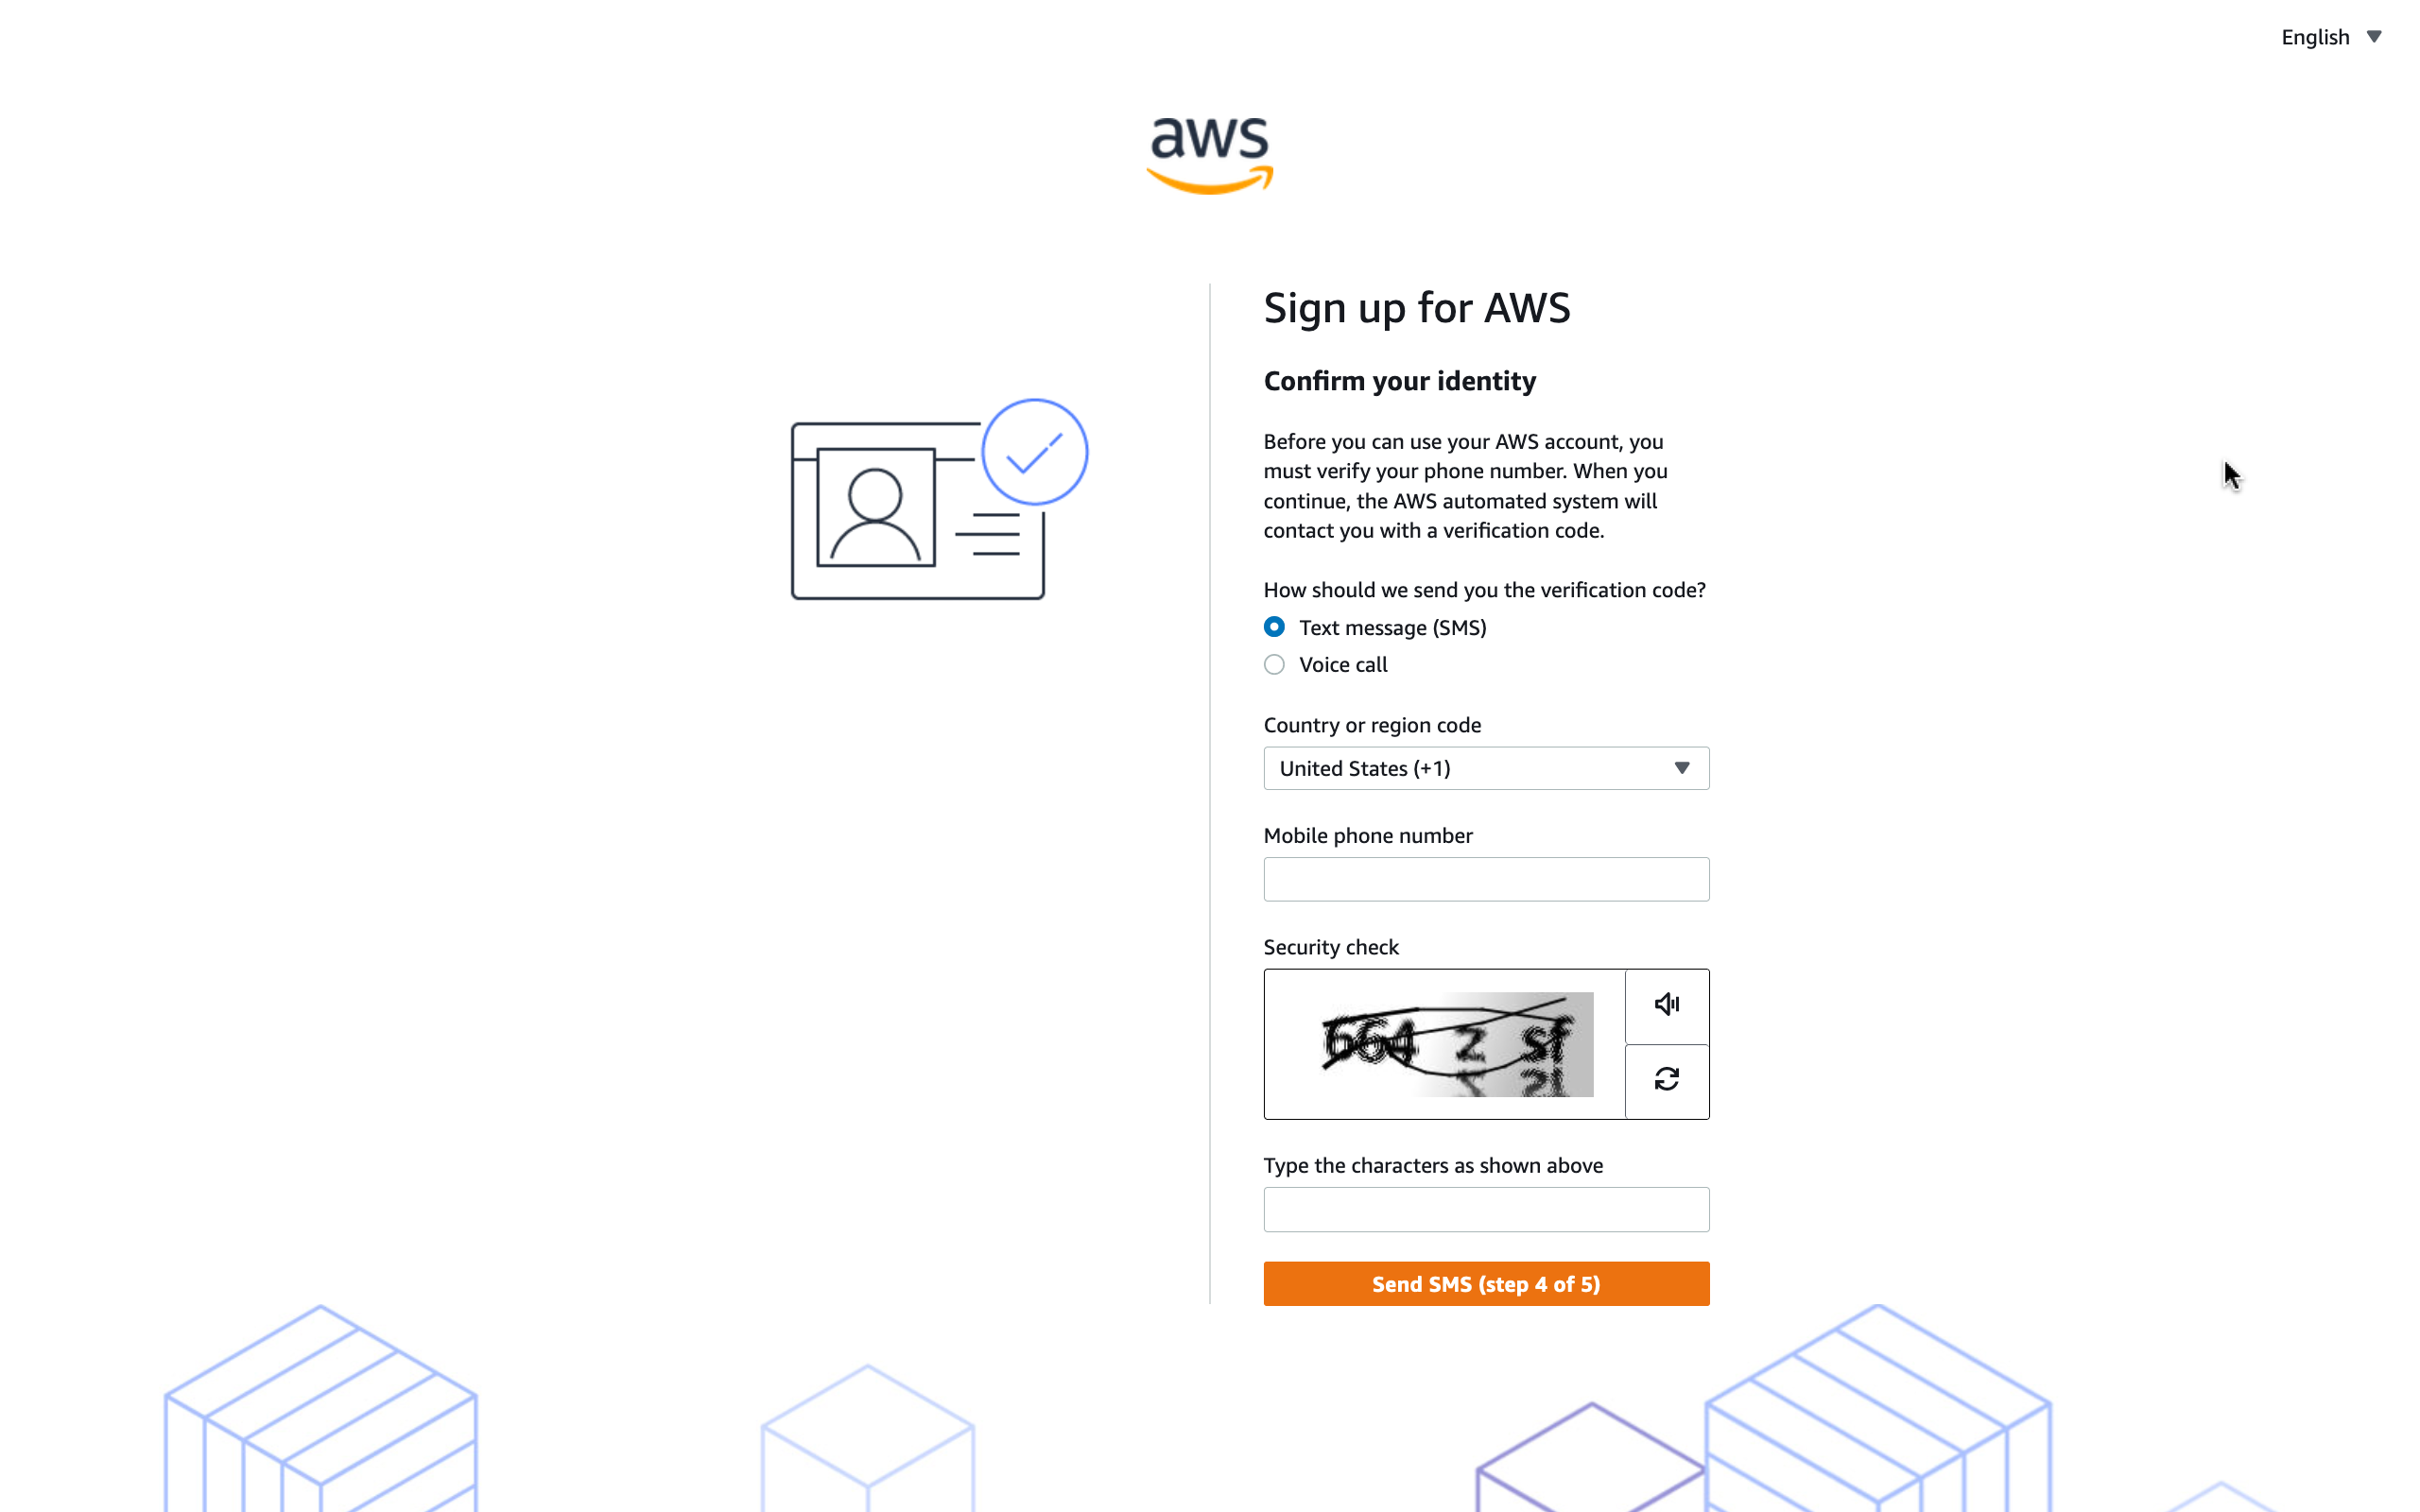
Security check page
Selecting a Plan
AWS provides different plans with additional services like 24/7 support, best practice advisors, and additional guidance. With each higher-tiered plan, there are more services and additional costs.
On the next page, you can select a support plan for your business or personal account. There are five support plans available. For this article, we will be choosing the “Basic support - Free” plan. You can learn more about the different plans and features available by navigating to theCompare Support Plans page.
- We will choose a plan by marking the corresponding radio button.
- Then, we’ll select “Complete sign up” to finish.
- Amazing! You just finished setting up your AWS basic account. You should see a message from AWS that says your account is being activated, after which you will get an email once that is complete.
Multi-Factor Authentication
Multi-Factor Authentication (MFA)provides an additional layer of protection on top of your username and password.
MFA Set Up
Let’s set upMulti-Factor Authentication(MFA).
When we first log in to our AWS account using root user credentials, we’re brought to the console home. Here, we can see recently visited services, supplementary learning material, and other service-related information.
- From the console page, we will navigate to the dropdown menu in the header where your account name is, and choose “Security credentials.”
- Next, we’ll select “Multi-factor authentication (MFA)”, then “Activate MFA.”
- For this tutorial, we’ll choose “Virtual MFA device” from the list of options, and select “Continue.” However, you can choose another option if it suits you better. Make sure to keep the generated QR code up for the following three steps.
- Now, we’ll choose a preferredsupported virtual authenticator application. If you don’t have one yet, you’ll need to download and set up an account for one.
- On the authenticator app, we’ll add a new app.
- Then, we’ll select “Scan a QR code” and scan the QR code on your screen.
- In AWS, let’s enter the two consecutive MFA codes into the fields available. If all steps were done correctly, you should get a message that says you successfully assigned virtual MFA.
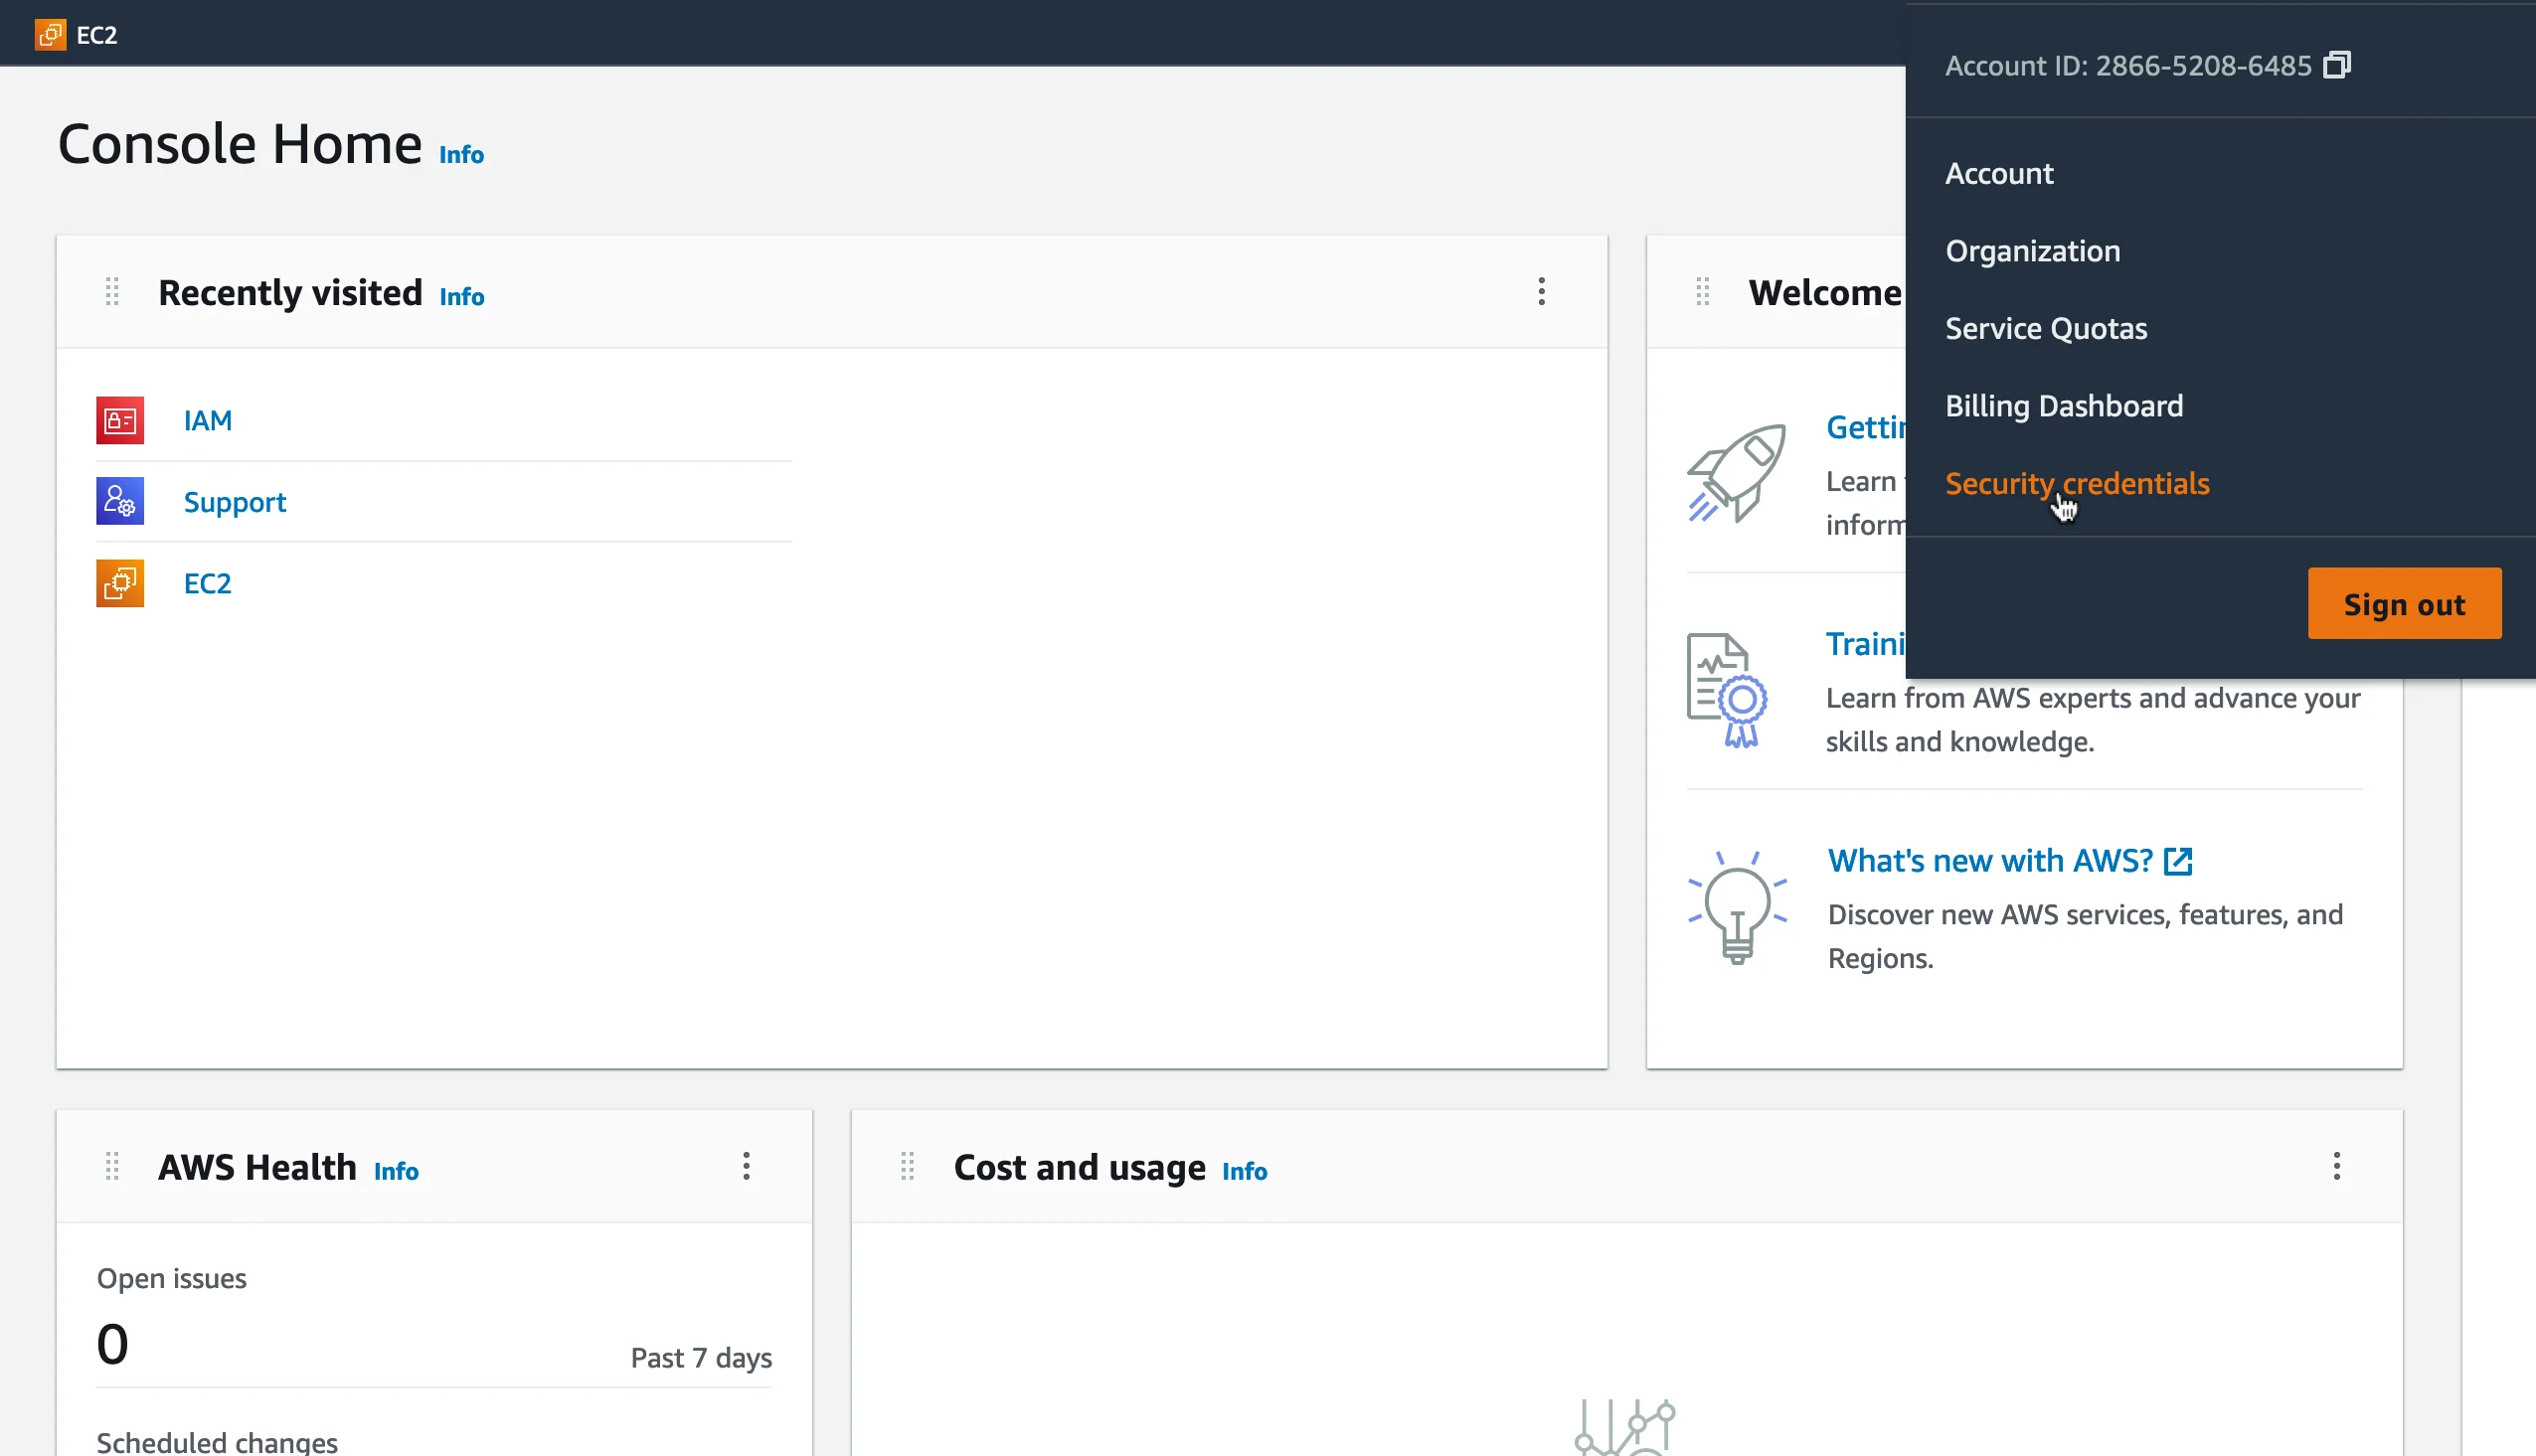
Selecting "Security credentials" in the drop-down menu.
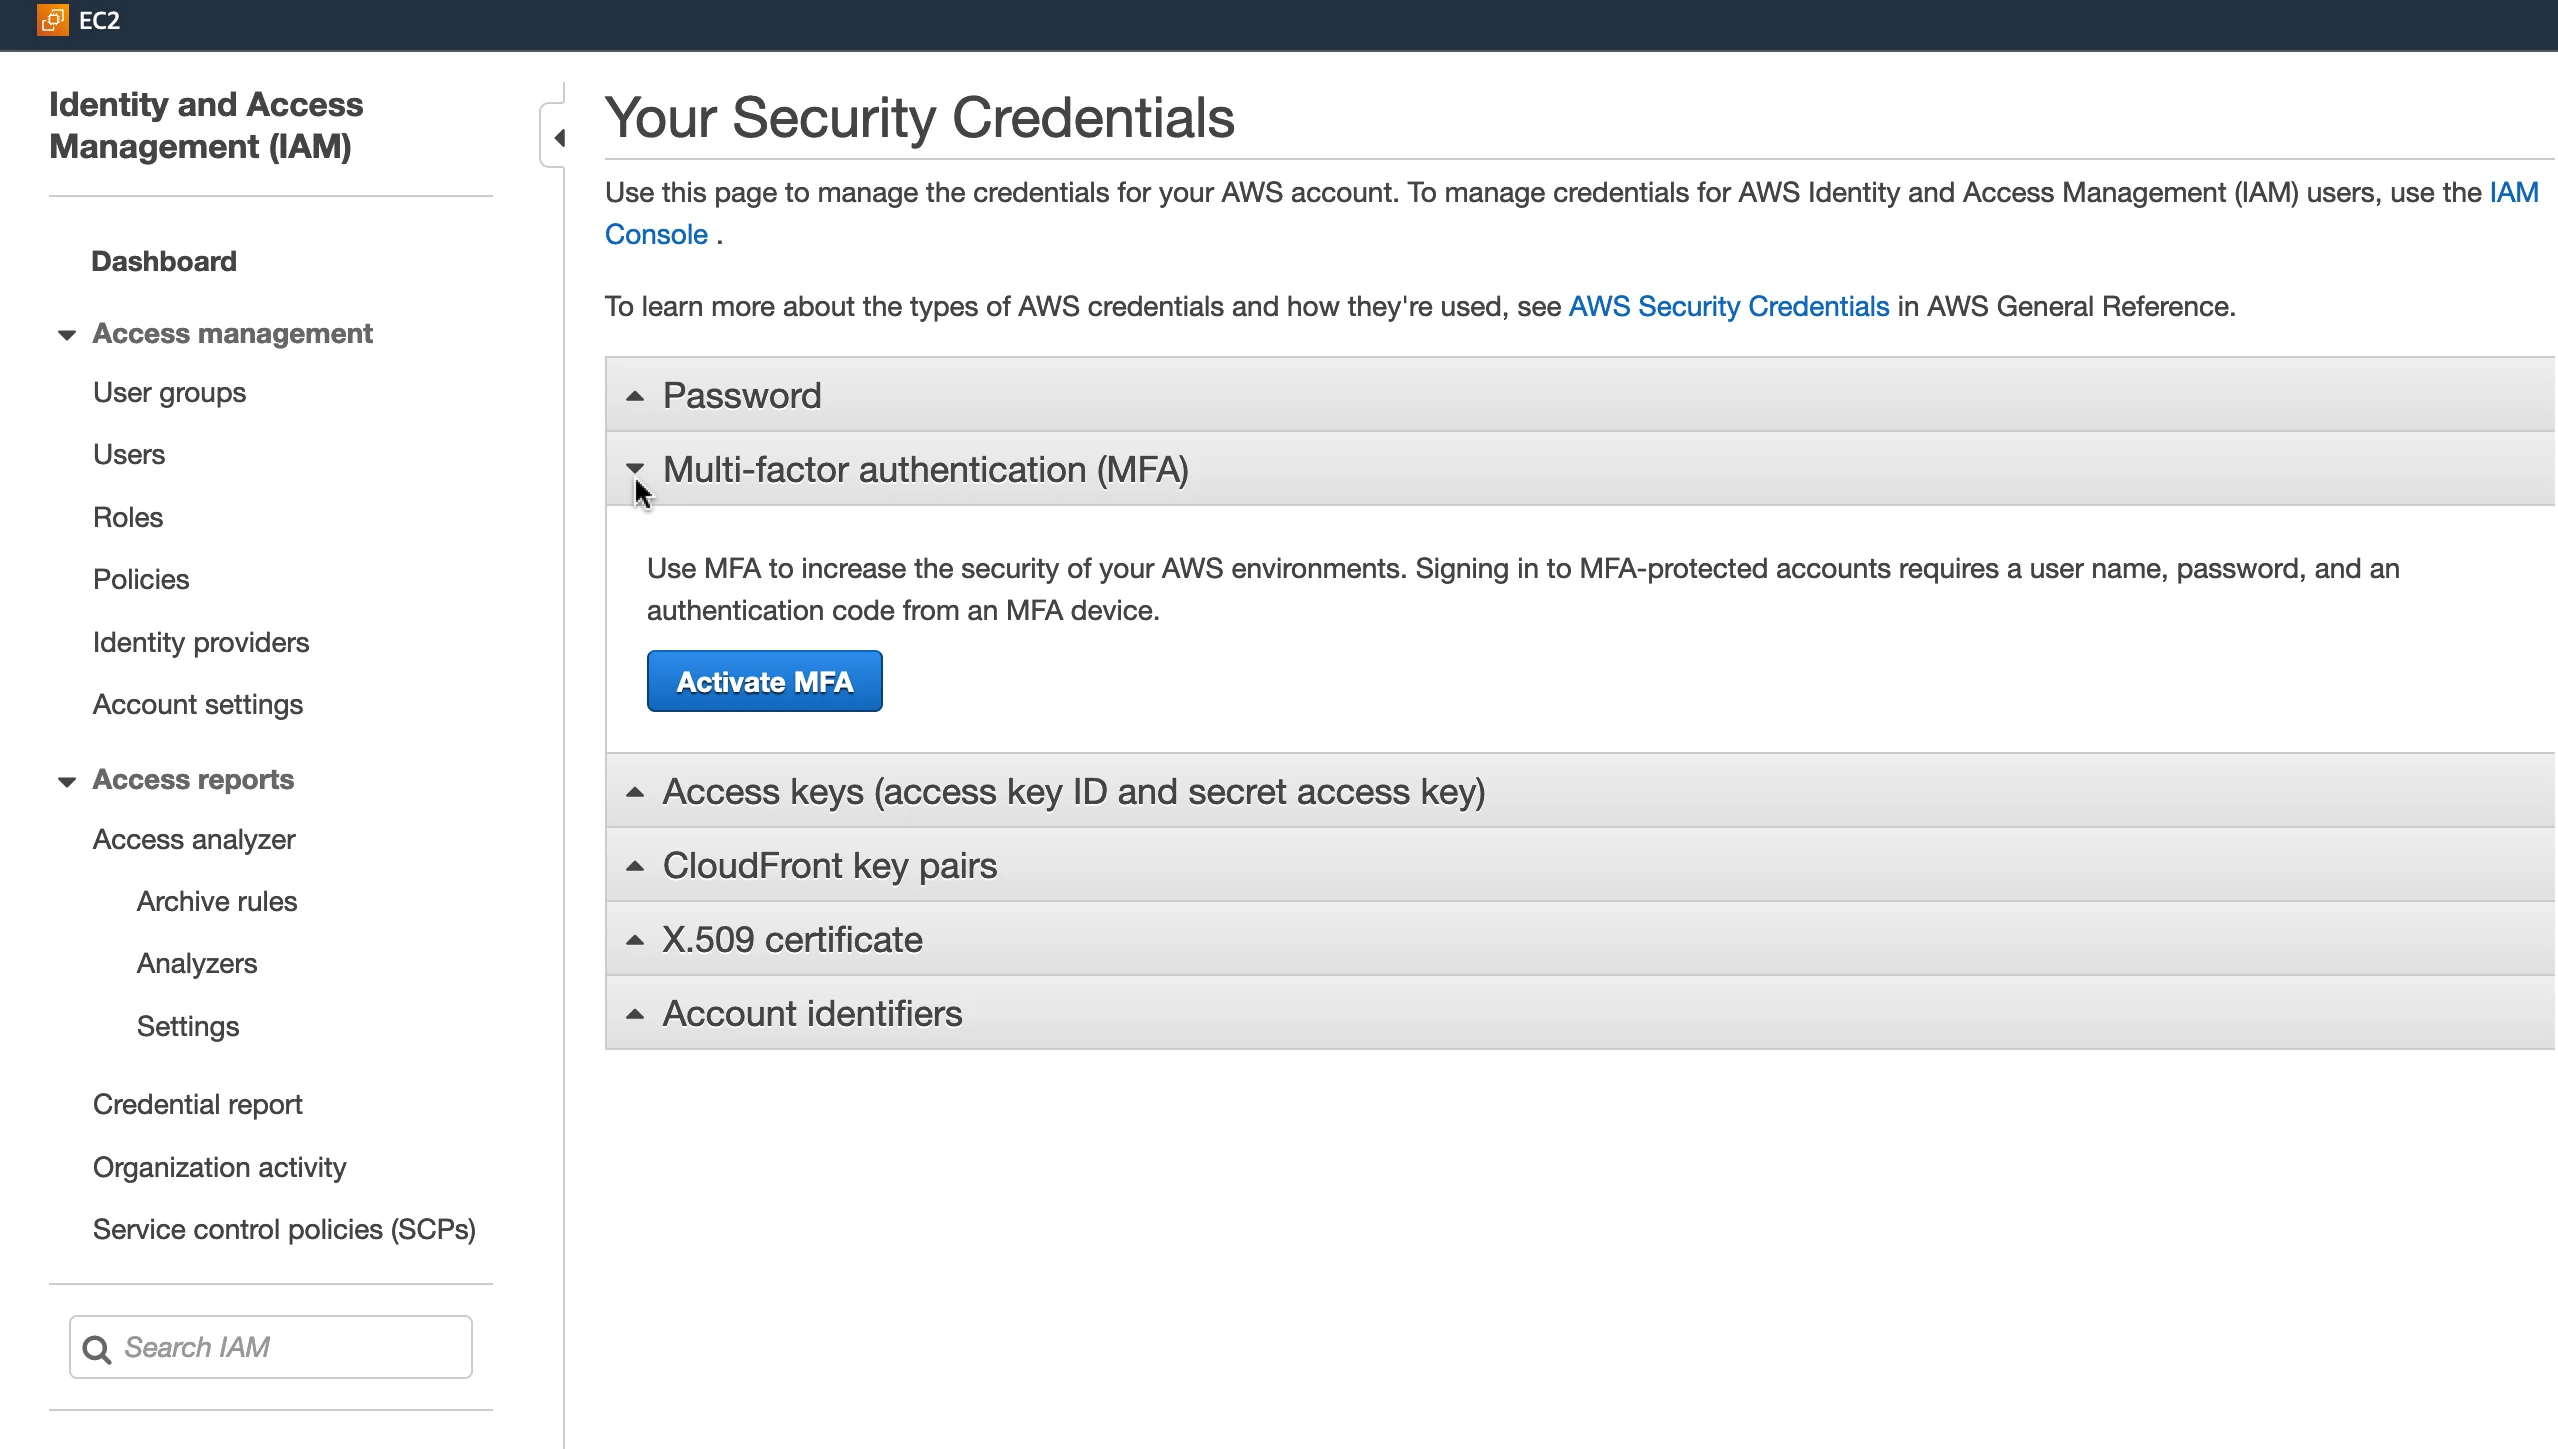
Selecting Multi-factor authentication in the Security Credentials menu
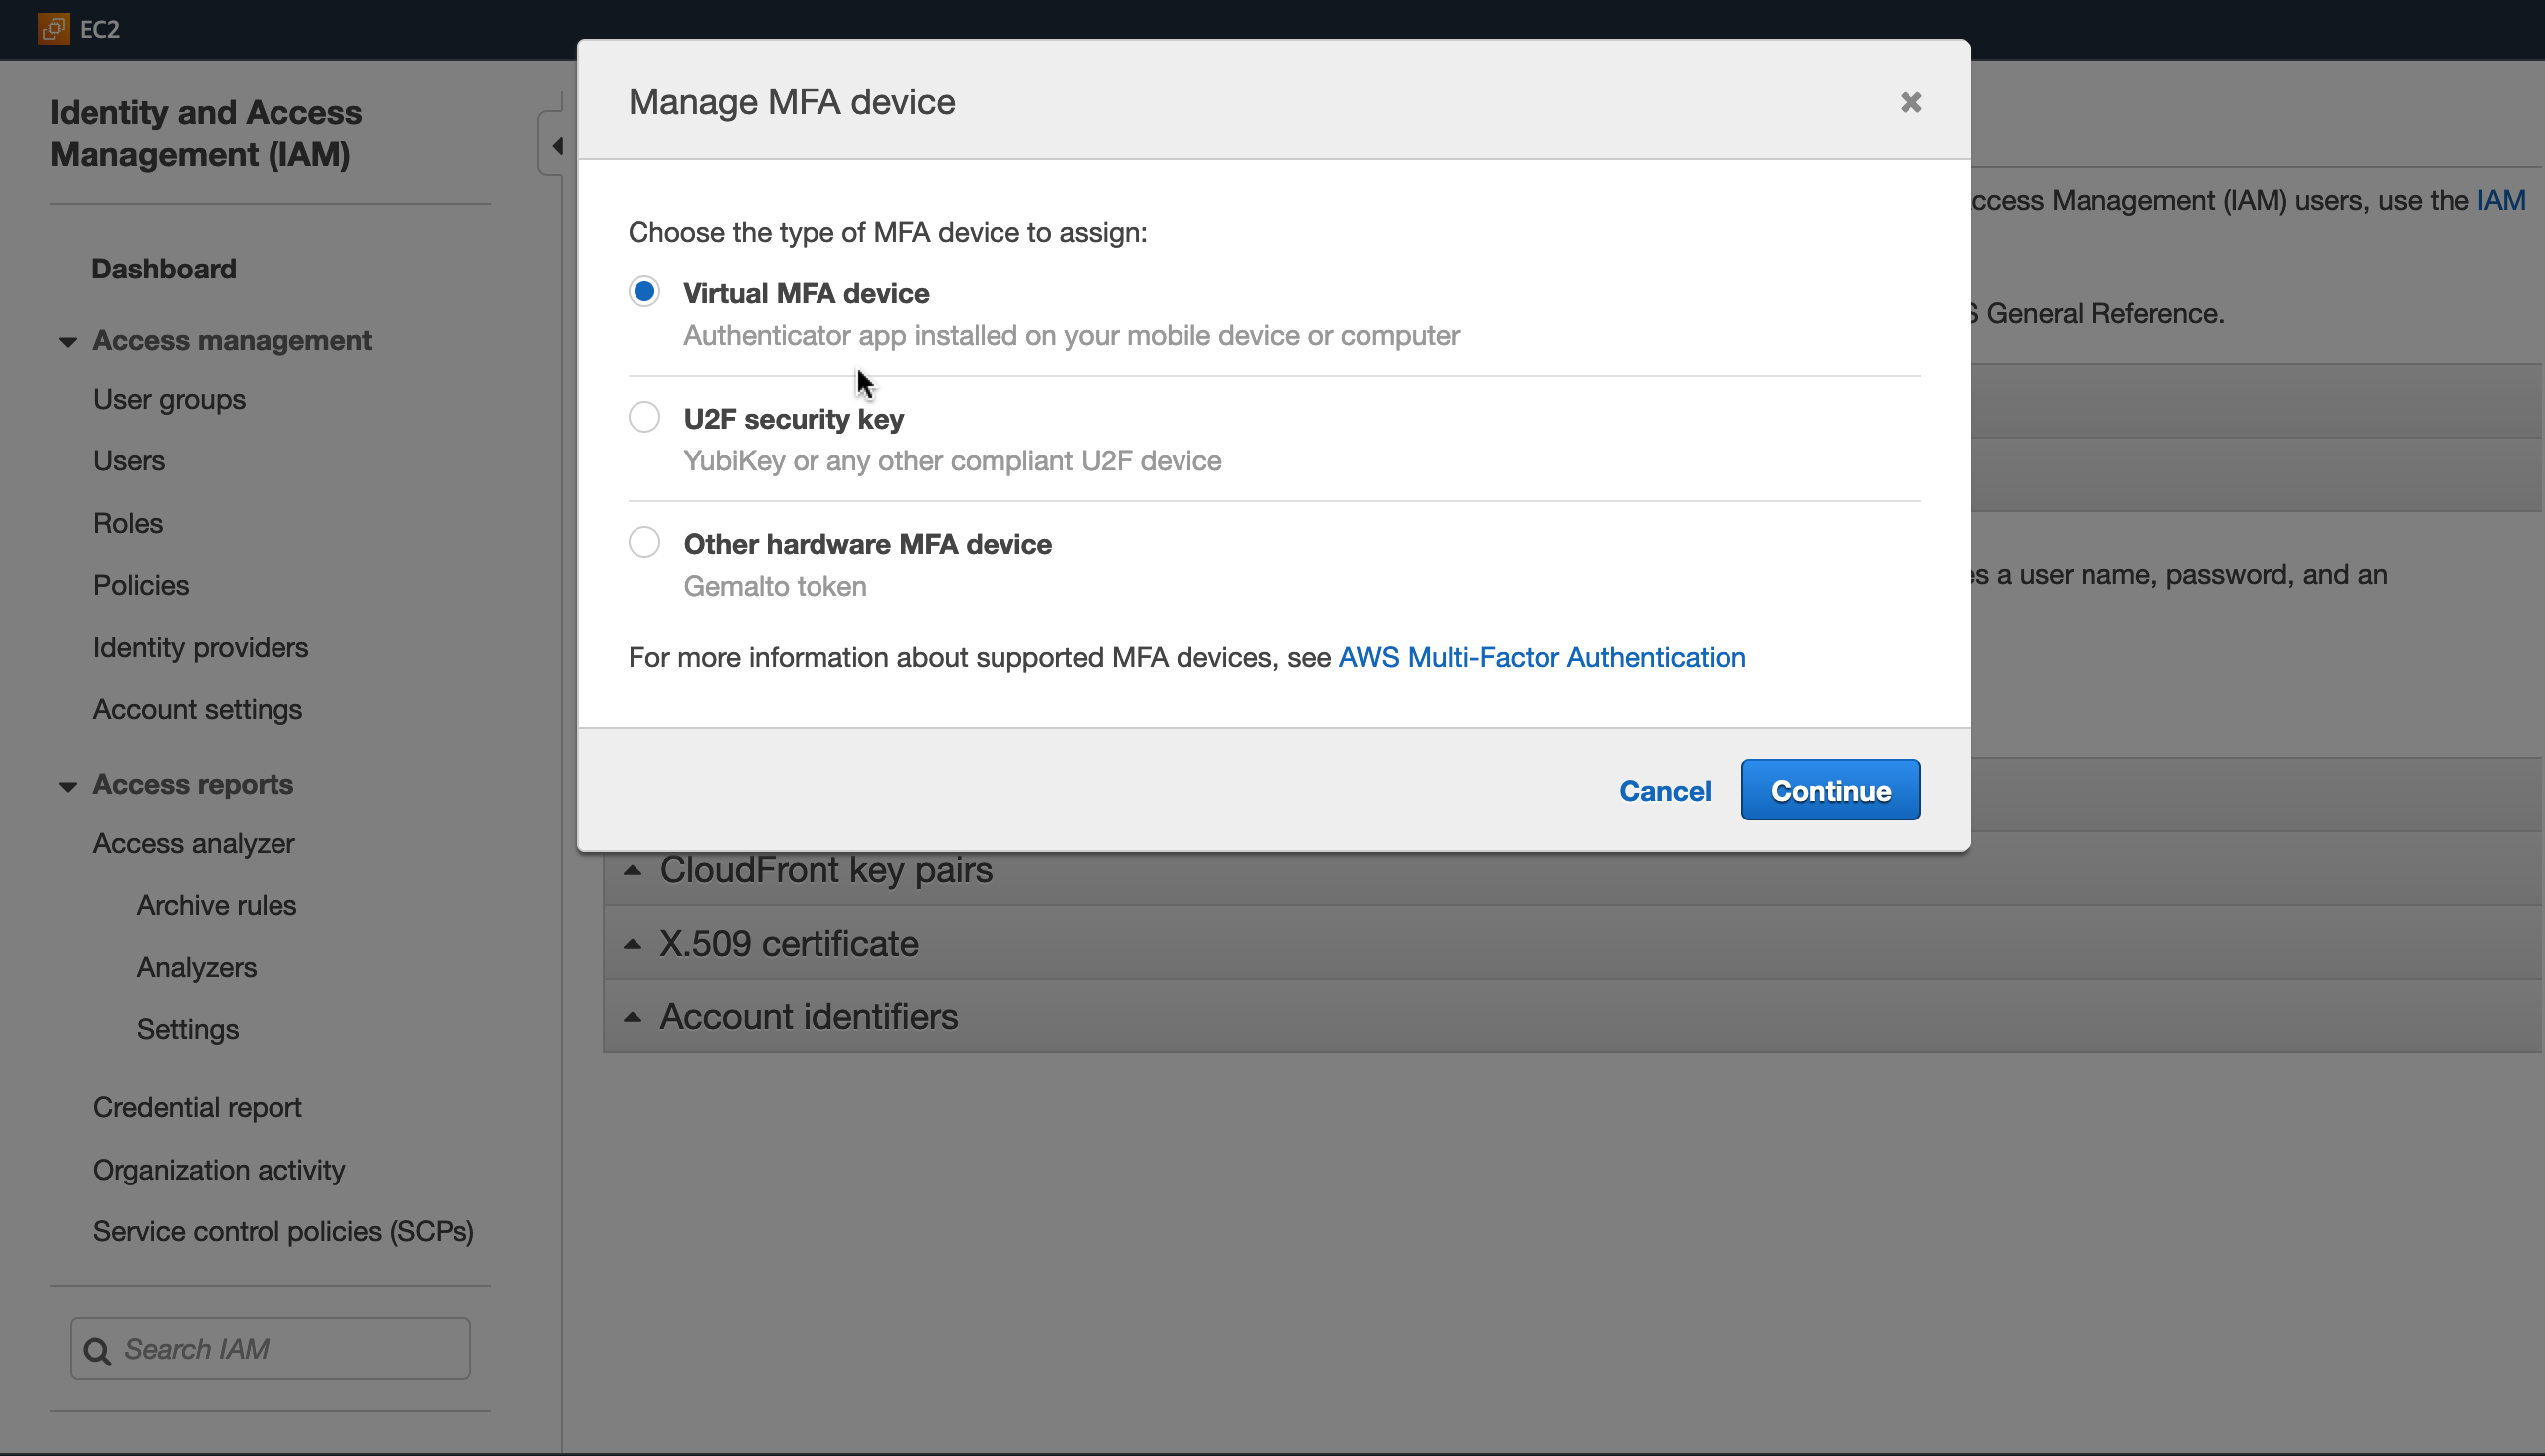
Choosing "Virtual MFA device" from the list of Multi-factor authentication options
When logged in to the AWS Console with MFA enabled, you will be prompted for your username and password (the first factor is what you know) and for an authentication code from your AWS MFA device (the second factor is what you have):
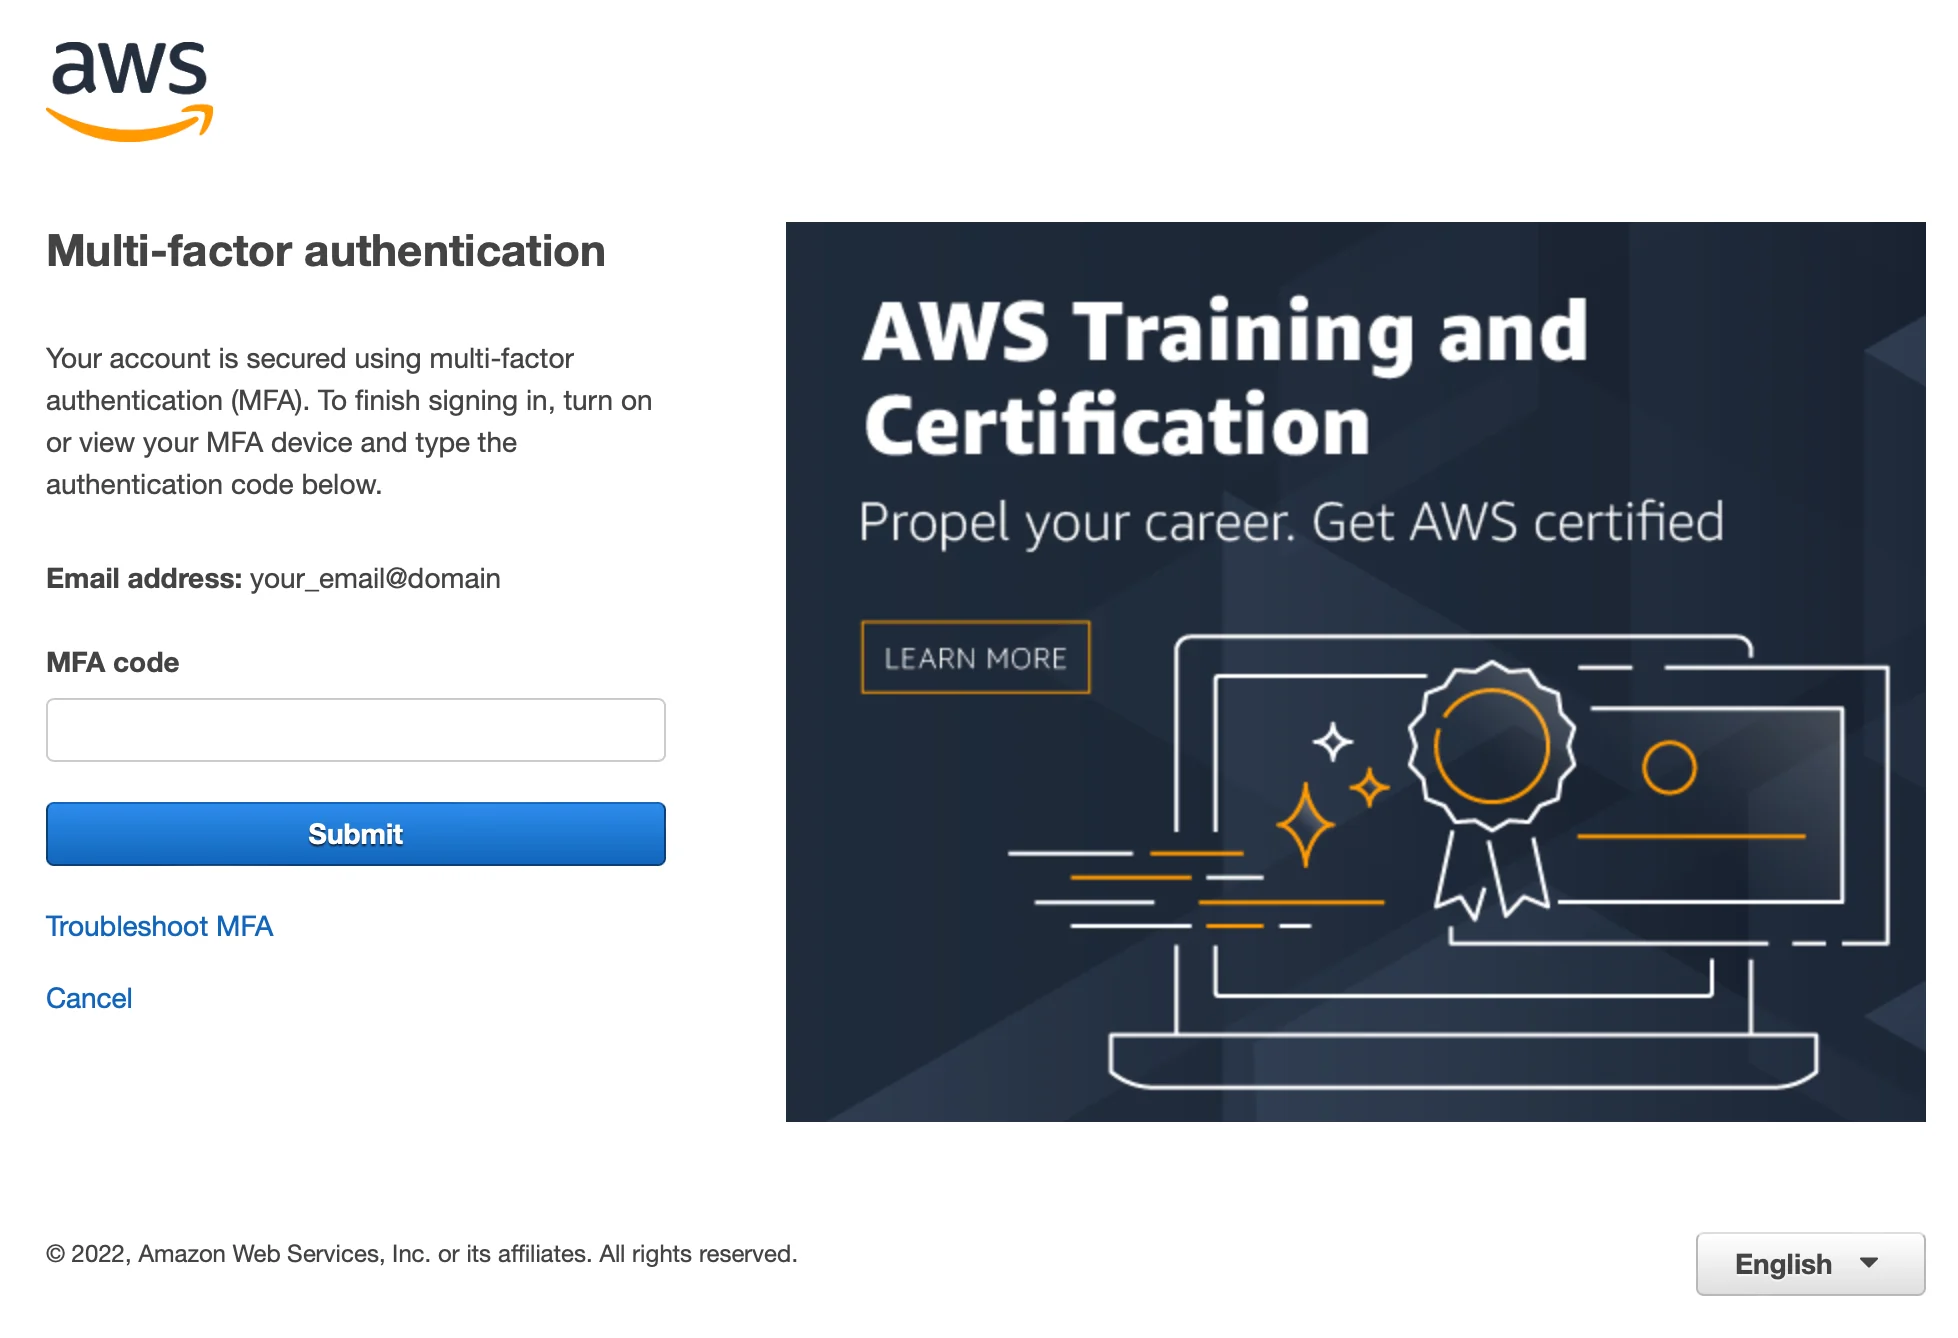
Logging in with MFA
Together, these two factors boost security for your AWS account settings and resources. You can enable MFA for your AWS account and for individual IAM users you have under your account. MFA can also be used to control access to AWS serviceAPIs.
Conclusion
Congratulations! You have successfully created your AWS Free Tier account and learned how to set it up with some basic services and features. Let’s summarize what we’ve learned and accomplished in this article. In this tutorial, we signed up for an AWS account by:
- Creating a root user
- Set up payment information and billing
- Selected the free-tier AWS support plan
- Set up MFA for account security
Well done!
'The Codecademy Team, composed of experienced educators and tech experts, is dedicated to making tech skills accessible to all. We empower learners worldwide with expert-reviewed content that develops and enhances the technical skills needed to advance and succeed in their careers.'
Complete Payment to Unlock Full Guide & Source Code
You are viewing the 30% preview. Join TopCourseAI Pro to unlock the remaining 70% of this article, unblur all code snippets, and gain full access to all 412 technical projects and guides.
Ready to access the complete step-by-step tutorial?
Gain full unhindered access to all 412 technical projects and guides, unblur all source code snippets, and download runnable scripts.
How To Build an App With Windsurf AI
Next BlueprintHow To Install Jupyter Notebook on Mac and Windows
Related Blueprints & Guides
View all 166 →Accessibility on the Platform
Codecademy is committed to providing a high-quality learning experience for all learners. That includes accommodating different usage forms such as auditory, motor, or visual restrictions, limited hardware, or other acce...
Web developmentAffordances, Signifiers, and Clickability
For users on the web, the mouse click is perhaps the most fundamental human-computer interaction. The webbecamethe web partially through the power ofhypertext, or text in one document that links to other documents or res...
Web developmentAuthentication and OAuth
Authenticationis the process used by applications to determine and confirm identities of users. It ensures that the correct content is shown to users. More importantly, it ensures that incorrect content is secured and u...
Ready to build production-grade AI systems?
Enjoyed this guide? Continue exploring our library of 166+ production blueprints, multi-agent swarms, and autonomous agent systems with 100% unblurred, executable source code.