
Building an AI Chatbot with Rasa and Ollama
Building an AI Chatbot with Rasa and Ollama
Rasa is an open-source framework that builds AI-powered chatbots and virtual assistants. It helps chatbots understand what users say, manage the flow of conversation, and respond intelligently. Rasa has two main parts:
- NLU (Natural Language Understanding): It extracts intent and entities from user messages. For example, in "Book a flight to Paris", the intent is book_flight and the entity is Paris.
- Core: Decides how the bot should respond based on the user's input and the conversation's context.
NLU (Natural Language Understanding): It extracts intent and entities from user messages. For example, in "Book a flight to Paris", the intent is book_flight and the entity is Paris.
Core: Decides how the bot should respond based on the user's input and the conversation's context.
In this Rasa chatbot tutorial, you'll build a chatbot that uses NLU to understand user questions and generates responses by calling a custom action using the llama3 model.
Build a chatbot using Rasa AI and Ollama
Let us build a Rasa chatbot that understands natural language queries and replies with intelligent responses generated by a local Ollama LLM. This bot will use Rasa's core components like intents, actions, and rules to manage conversations and fetch answers using a custom action. The video here takes you through the steps of building the Rasa AI chatbot using Ollama. If you prefer reading at your own pace, this section also explains the steps in detail.
Step 1: Set up a virtual environment for Rasa AI chatbot
Before starting with Rasa, creating a virtual environment is good practice to keep our project's dependencies isolated and manageable. On the terminal, use the cd command and navigate to the desired directory, then follow this command to create a virtual environment inside this directory:
python -m venv rasa_envOnce created, we also need to activate it. Here's how this can be done:
# On Windows rasa_env\Scripts\activate
# On macOS/Linux  source rasa_env/bin/activate
Once activated, the terminal prompt will change to show we're working inside the virtual environment.
Step 2: Install Rasa and required tools
Now that the virtual environment is activated, we'll install Rasa, the Rasa SDK (for custom actions), and Ollama. To install Rasa and Rasa SDK, run the following commands on the terminal:
pip install rasa pip install rasa-sdkTo install Ollama on your system, visit the official Ollama website, and download it based on your operating system.
_Jx4X.png)
Downloading Ollama from official website for the Rasa chatbot
Once all tools are installed, we need to pull the required llama3 model.
Step 3: Pull llama3 model using Ollama
We'll use the llama3 model via Ollama to generate responses locally. Use this command to pull the model:
ollama pull llama3Once pulled, start the model with:
ollama run llama3Now we're ready to create the Rasa project.
Step 4: Create the Rasa project
We'll use the rasa init command to create the Rasa chatbot project. This command sets up all the basic files and folders we need to get started. Use the command as follows:
rasa init --no-promptHere, the --no-prompt skips the interactive setup and automatically generates a default project structure.
After running this, Rasa will create a folder with key files like:
- nlu.yml for training examples (intents and user messages)
- domain.yml for intents, responses, actions, and slots
- rules.yml and stories.yml for conversation flow
- actions.py for custom Python actions
- config.yml for pipeline and policy settings
Once the project is created, we'll start customizing the chatbot.
Step 5: Define intents and training data in nlu.yml
In Rasa, the nlu.yml file is where we train the bot to understand the intent behind user messages. An intent represents the user's goal or purpose when they type a message. For example, when someone asks, "What is friction?", they want a definition. So, the intent could be ask_question. Or, if a user says "Hi", the intent might be greet. Here is a sample nlu.yml file with three intents for our chatbot:
version: "3.1"
nlu:  - intent: ask_question    examples: |      - What is photosynthesis?      - Define kinetic energy      - Tell me about friction      - What do you know about atoms?      - Can you explain Newton's third law?      - Explain Ohm's Law      - What does inertia mean?      - Give me the definition of gravity      - How would you define acceleration?      - I want to know what mass is   - intent: greet    examples: |      - Hi      - Hello      - Hey      - Good morning      - Hey there
- intent: goodbye    examples: |      - Bye      - Goodbye      - See you later      - I'm leaving      - Talk to you later
The nlu.yml file is in the data folder.
- ask_question: This is the key intent that will trigger our custom response. It handles any academic or definition-based question.
- greet and goodbye: Basic conversational intents to make the interaction more natural.
ask_question: This is the key intent that will trigger our custom response. It handles any academic or definition-based question.
greet and goodbye: Basic conversational intents to make the interaction more natural.
Step 6: Add actions, slots, and more in domain.yml
The domain.yml file is the core configuration file that connects all conversation pieces together. It defines which intents the bot can recognize, what actions it should take, how it responds, what data it stores in slots, and which entities to extract from the user's message. Let's define these terms first:
- Actions are what your bot does after recognizing an intent. They can be simple text responses or complex logic (like calling an API). For example, a custom action like action_openai_explain fetches an answer using Ollama.
- Responses are predefined messages that the bot sends back to users. Each response is linked to a name starting with utter_. For example, a greeting like "Hello! How can I help you?" is returned by utter_greet.
- Slots are variables that hold extracted or manually set values. They help maintain context or remember specific details in a conversation. For example, if a user asks about photosynthesis, a slot could store the topic "photosynthesis" for future use.
Actions are what your bot does after recognizing an intent. They can be simple text responses or complex logic (like calling an API). For example, a custom action like action_openai_explain fetches an answer using Ollama.
Responses are predefined messages that the bot sends back to users. Each response is linked to a name starting with utter_. For example, a greeting like "Hello! How can I help you?" is returned by utter_greet.
Slots are variables that hold extracted or manually set values. They help maintain context or remember specific details in a conversation. For example, if a user asks about photosynthesis, a slot could store the topic "photosynthesis" for future use.
Entities are specific keywords or phrases extracted from a user's message. Rasa identifies entities to provide context to the intent. For example, in Tell me about gravity, "gravity" is an entity (a topic), while the intent is ask_question.
Here's a sample code for domain.yml file:
version: "3.1"
intents:   - ask_question   - greet   - goodbye
entities:   - topic
actions:   - action_llama3_explain
responses:    utter_greet:      - text: "Hello! Ask me any academic question."
  utter_goodbye:      - text: "Goodbye! Have a great day."
  utter_default:      - text: "Sorry, I couldn't understand that. Try asking in a different way."
slots: {}- intents define the types of user messages like ask_question, greet, and goodbye.
- entities extract key details like topic from user input, e.g., "photosynthesis".
- actions list the custom functions like action_llama3_explain that the bot can trigger.
- responses provide predefined replies such as greetings, goodbyes, or fallback messages.
- slots store information during the conversation, though we haven't used any yet.
Step 7: Create rules in rules.yml
In Rasa, rules define how the chatbot should respond to specific user intents. When the user says something with a particular intent, Rasa checks these rules to decide which action or response to trigger. A sample code for the rules.yml file is:
version: "3.1"
rules: - rule: Greet user    steps:   - intent: greet   - action: utter_greet
- rule: Say goodbye    steps:   - intent: goodbye   - action: utter_goodbye
- rule: Fallback for unknown messages    steps:   - intent: nlu_fallback   - action: utter_default
- rule: Answer user's question steps: - intent: ask_question - action: action_llama3_explain- Each rule connects a user intent to a specific action.
- The greet and goodbye intents map to simple utter responses (utter_greet and utter_goodbye).
- The nlu_fallback rule activates a fallback message if the bot can't understand the user's message.
- The ask_question intent is connected to a custom action action_llama3_explain, which uses the LLaMA 3 model to generate the answer dynamically.
Each rule connects a user intent to a specific action.
The greet and goodbye intents map to simple utter responses (utter_greet and utter_goodbye).
The nlu_fallback rule activates a fallback message if the bot can't understand the user's message.
The ask_question intent is connected to a custom action action_llama3_explain, which uses the LLaMA 3 model to generate the answer dynamically.
Step 8: Create dialogue flows in stories.yml
The stories.yml file is used to define sample conversations that show how users interact with the chatbot and how the bot should respond.
A story is a sequence of intents and actions that represent a possible path in a dialogue. Rasa uses these stories during training to learn how to predict the next best action. The stories.yml file for our chatbot could be:
version: "3.1"
stories:   - story: "greet and ask a question steps"    - intent: greet     - action: utter_greet     - intent: ask_question     - action: action_llama3_explain
  - story: "say goodbye steps"    - intent: goodbye     - action: utter_goodbye
  - story: "fallback message steps"    - intent: out_of_scope     - action: utter_default
The stories here are:
- Story 1: If the user greets and then asks a question, the bot replies with a greeting and then uses the LLaMA3 model to answer via action_llama3_explain.
- Story 2: Handles when the user says goodbye, and the bot replies with utter_goodbye.
- Story 3: Triggers when the user's input doesn't match any known intent, and the bot responds with a fallback message utter_default.
Story 1: If the user greets and then asks a question, the bot replies with a greeting and then uses the LLaMA3 model to answer via action_llama3_explain.
Story 2: Handles when the user says goodbye, and the bot replies with utter_goodbye.
Story 3: Triggers when the user's input doesn't match any known intent, and the bot responds with a fallback message utter_default.
Step 9: Update endpoints.yml and config.yml
The endpoints.yml file in Rasa is used to configure connections to external services like the action server, which runs our custom actions. Without this file, Rasa won't know where to send requests for executing your custom Python code. Our endpoints.yml will look like:
action_endpoint: url: "http://localhost:5055/webhook"- action_endpoint: This key tells Rasa where to find the action server.
- url: This is the address of the action server. If you're running it locally (using rasa run actions), the default is http://localhost:5055/webhook.
action_endpoint: This key tells Rasa where to find the action server.
url: This is the address of the action server. If you're running it locally (using rasa run actions), the default is http://localhost:5055/webhook.
We will also update the config.yml with:
pipeline: - name: WhitespaceTokenizer - name: CountVectorsFeaturizer - name: DIETClassifier epochs: 100 - name: FallbackClassifier threshold: 0.4We have a fallback classifier. threshold: 0.4 means that if the intent confidence is below 40%, the fallback is triggered.
Step 10: Import the required libraries in the code
Now we'll create custom actions to connect Rasa chatbot to the Llama 3 model. The next few steps (Steps 10 - 14) will be written inside the actions.py file of our project.
We'll begin by importing the required libraries:
import requests from typing import Any, Text, Dict, List from rasa_sdk import Action, Tracker from rasa_sdk.executor import CollectingDispatcherThe libraries here are:
- requests: Allows us to send HTTP POST requests to the Ollama API.
- typing: Adds type hints for better code clarity and static checks.
- rasa_sdk.Action: Base class for all custom actions.
- rasa_sdk.Tracker: Lets retrieve the latest user message and track conversation context.
- CollectingDispatcher: Sends messages back to the user from your bot.
requests: Allows us to send HTTP POST requests to the Ollama API.
typing: Adds type hints for better code clarity and static checks.
rasa_sdk.Action: Base class for all custom actions.
rasa_sdk.Tracker: Lets retrieve the latest user message and track conversation context.
CollectingDispatcher: Sends messages back to the user from your bot.
Step 11: Define the custom action class
Let's define our custom action class inside the same actions.py file. This class registers the action for Rasa to use.
class ActionLlama3Explain(Action): def name(self) -> Text: return "action_llama3_explain"- ActionLlama3Explain is the name of our class that defines the action's behavior.
- The name() method returns the action's name, action_llama3_explain, which must match what you declared in the domain.yml and rules.yml files.
ActionLlama3Explain is the name of our class that defines the action's behavior.
The name() method returns the action's name, action_llama3_explain, which must match what you declared in the domain.yml and rules.yml files.
Step 12: Define run() method to handle user input
Now define the run method inside the ActionLlama3Explain class. This method captures the latest message from the user and decides how to respond.
  def run(self, dispatcher: CollectingDispatcher,      tracker: Tracker,      domain: Dict[Text, Any]) -> List[Dict[Text, Any]]:
    user_message = tracker.latest_message.get("text")      if not user_message:       dispatcher.utter_message(text="Can you please repeat your question?")       return []
Note: As therun() method is inside the class, this code already provides proper indentations.
- run() is the core function that gets triggered when this action is called.
- tracker.latest_message.get("text") fetches the latest message sent by the user.
- If the user message is missing or empty, we politely ask them to repeat their question.
run() is the core function that gets triggered when this action is called.
tracker.latest_message.get("text") fetches the latest message sent by the user.
If the user message is missing or empty, we politely ask them to repeat their question.
Step 13: Send user to Ollama and handle response
Inside the same run method, we'll now write the logic to send the user's message to the local Ollama running the llama3 model and handle the response:
    try:       response = requests.post(         "http://localhost:11434/api/generate",         json={           "model": "llama3",           "prompt": user_message,           "stream": False         }       )
      if response.status_code == 200:         data = response.json()         answer = data.get("response", "").strip()         if answer:           dispatcher.utter_message(text=answer)         else:           dispatcher.utter_message(text="I couldn't find an explanation for that.")       else:         print(f"Ollama API Error - Status Code: {response.status_code}")         dispatcher.utter_message(text="Sorry, I had trouble generating the answer.")
Note: Since the try block is a part of the run() method, this code already provides proper indentations.
Here's what's happening in this code:
- We send a POST request to http://localhost:11434/api/generate, which is the endpoint for the local Ollama server.
- We pass the llama3 model and the user's message as the prompt.
- If the response is successful (status code 200), we extract the text from the response field and send it back to the user.
- If no valid answer is found or an API issue occurs, we notify the user accordingly.
We send a POST request to http://localhost:11434/api/generate, which is the endpoint for the local Ollama server.
We pass the llama3 model and the user's message as the prompt.
If the response is successful (status code 200), we extract the text from the response field and send it back to the user.
If no valid answer is found or an API issue occurs, we notify the user accordingly.
Step 14: Handle errors using except block
To make sure your chatbot doesn't crash if something goes wrong (like Ollama not running), we'll add an except block to catch and handle exceptions:
except Exception as e: print(f"Error in Ollama request: {e}") dispatcher.utter_message(text="Sorry, something went wrong while contacting the model.")Note: Since the except block is a part of the run() method, this code already provides proper indentations.
We've completed the full custom action that sends user queries to LLaMA 3 and now we need to train and test our Rasa chatbot.
Step 15: Train the Rasa AI chatbot
Once all our files are ready, it's time to train our chatbot so it can understand intents and generate appropriate responses. To train the chatbot, run this command in your terminal:
rasa trainThis command will process all the training data and create a trained model in the models/ directory.
If everything is correctly configured, you'll see a message like, Your Rasa model was successfully trained and saved at: models/your_model_name.tar.gz
Step 16: Run the Rasa chatbot
To run the chatbot, we need to open two terminals.
Terminal 1: Start the action server
In the project directory, run:
rasa run actionsThis will start the custom action server which communicates with the Ollama API through your actions.py code.
Terminal 2: Start the chatbot
Open another terminal in the same project folder and run:
rasa shellThis starts the Rasa chatbot in the terminal and allows you to type in questions. Here are some sample outputs generated by our Rasa chatbot:
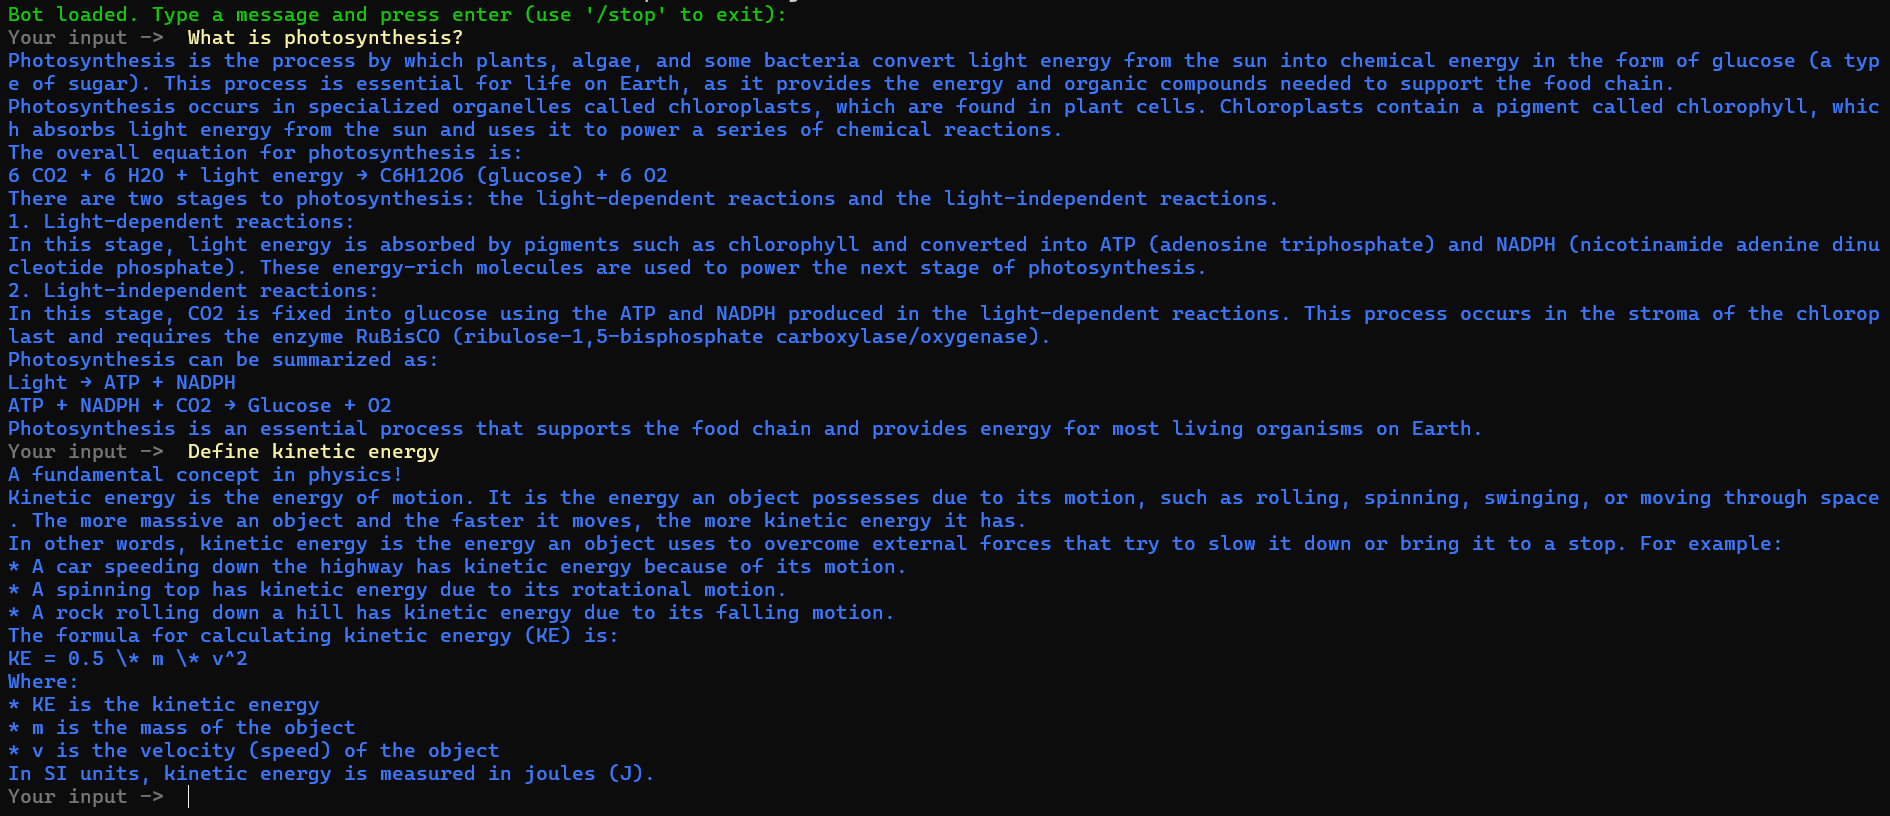
Example conversation showing Rasa AI chatbot responding to user questions about physics concepts
As we can see, the chatbot uses the Llama 3 model via Ollama to answer user questions intelligently. You can now ask new queries or customize the bot further as needed.
Visualizing and debugging the Rasa chatbot
Once your Rasa chatbot is up and running, the next step is refining its behavior. Rasa provides built-in tools to help you debug and improve your conversational flows effectively:
- rasa interactive: This command launches an interactive shell where you can talk to your bot and correct its predicted intents or actions in real-time. It's great for tuning your model based on actual conversations.
- rasa visualize: This tool generates a flowchart showing how your stories are connected, helping you understand and refine dialogue paths.
rasa interactive: This command launches an interactive shell where you can talk to your bot and correct its predicted intents or actions in real-time. It's great for tuning your model based on actual conversations.
rasa visualize: This tool generates a flowchart showing how your stories are connected, helping you understand and refine dialogue paths.
Here's how our stories are connected as per this command:
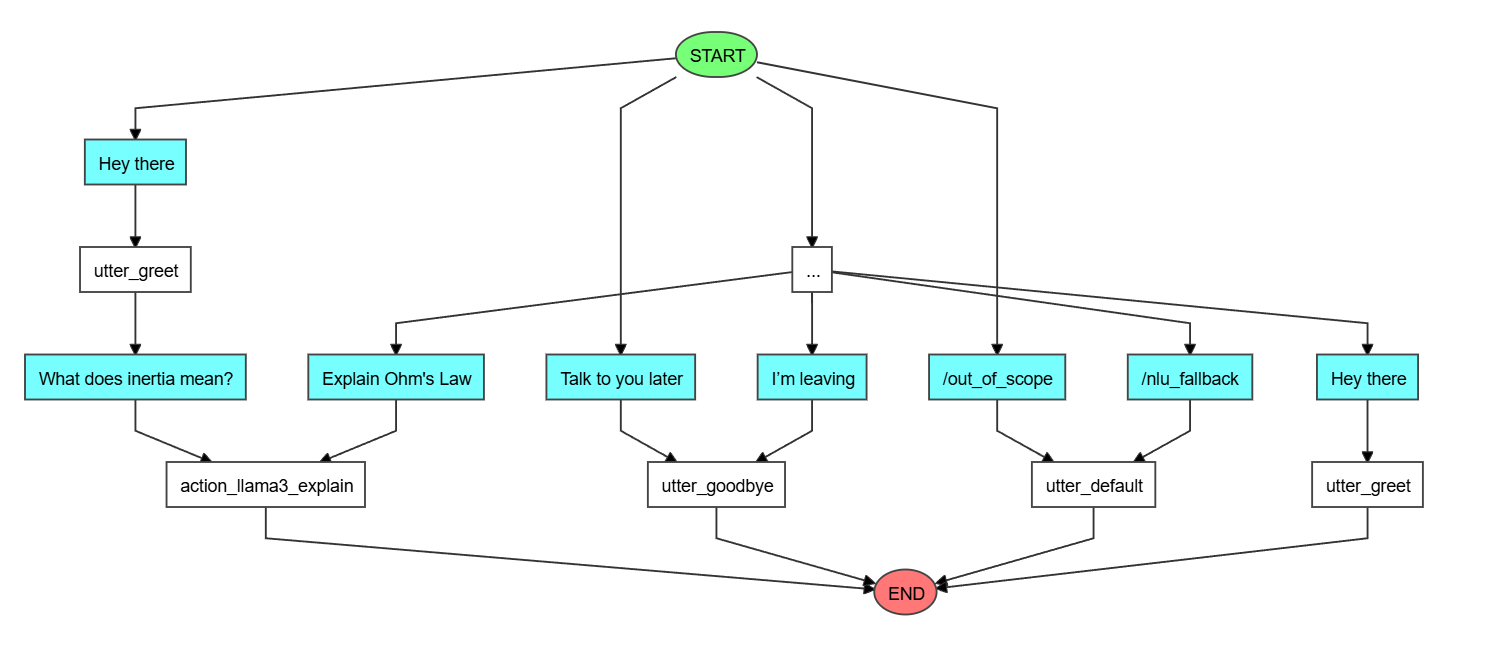
Image showing how the stories of our Rasa chatbot are connected
With our Rasa AI chatbot fully functional, we can enhance, troubleshoot, and visualize its behavior for a more polished conversational experience.
Conclusion
In this tutorial, we built a complete Rasa chatbot that connects user queries to Llama 3 responses via Ollama. Along the way, we explored essential Rasa components like NLU, domain definitions, stories, and custom actions. With proper training and testing, our chatbot can now handle natural conversations and deliver intelligent, AI-generated answers.
If you're interested in learning more about language models and chatbot development, check out Codecademy's Language Models in Python: Basic Chatbots course.
Frequently asked questions
1. Is Rasa AI open source?
Yes, Rasa AI is an open-source framework. Developers can use and modify it freely to build intelligent chatbots without licensing fees.
2. Is Rasa completely free?
Rasa Open Source is completely free to use. You only pay if you opt for enterprise features available in Rasa Pro.
3. What is the difference between Rasa Open Source and Rasa Pro?
Rasa Open Source gives you full control over chatbot development. Rasa Pro includes additional features like conversation analytics, enterprise support, and scalable deployment tools.
4. Is Rasa better than Dialogflow?
Rasa offers more flexibility and customization compared to Dialogflow, making it ideal for developers who want full control. However, Dialogflow may be easier to start with for beginners.
5. Is Rasa a Python library?
Rasa is more than just a Python library. It's a complete framework built in Python, with tools for NLU (Natural Language Understanding), dialogue management, and integrations.
6. What is NLU in AI?
NLU (Natural Language Understanding) is a branch of AI that helps machines understand human language. In Rasa, the NLU component processes user inputs, identifies their intent, and extracts relevant information to drive the chatbot's responses.
'The Codecademy Team, composed of experienced educators and tech experts, is dedicated to making tech skills accessible to all. We empower learners worldwide with expert-reviewed content that develops and enhances the technical skills needed to advance and succeed in their careers.'
- Build a chatbot using Rasa AI and Ollama
- Visualizing and debugging the Rasa chatbot
- Conclusion
- Frequently asked questions
Complete Payment to Unlock Full Guide & Source Code
You are viewing the 30% preview. Join TopCourseAI Pro to unlock the remaining 70% of this article, unblur all code snippets, and gain full access to all 412 technical projects and guides.
Ready to access the complete step-by-step tutorial?
Gain full unhindered access to all 412 technical projects and guides, unblur all source code snippets, and download runnable scripts.
Building a Redux Store from Scratch Using Vanilla JavaScript
Next BlueprintCSS Glossary
Related Blueprints & Guides
View all 166 →A Complete Guide to Vercel's AI SDK
Vercel AI SDK is a powerful TypeScript-first toolkit that provides a unified interface for building AI applications with Next.js and other modern frameworks. It eliminates the traditional complexity of managing multiple ...
AI Agents & AutomationAG-UI: How the Agent-User Interaction Protocol Works
AG-UI (Agent-User Interaction Protocol) is an open, lightweight protocol that standardizes the way AI agents interact with frontend apps. Consider it a common language that eliminates the need for custom integration code...
Generative AI FoundationsAI vs Generative AI: Understanding the Difference
Artificial Intelligence, or AI, is everywhere, from chatbots helping you shop to recommendation engines suggesting your next binge. Yet not all AI is the same, and the term is often used loosely, leaving many confused be...
Ready to build production-grade AI systems?
Enjoyed this guide? Continue exploring our library of 166+ production blueprints, multi-agent swarms, and autonomous agent systems with 100% unblurred, executable source code.