
Working in the Code Panel
Working in the Code Panel
Using the Wix Editor and Velo
Wix is a powerful website builder that gives you all the tools to create your own customized website either from scratch or using a template.
Traditionally, you would have to create each of these elements by writing code inHTMLandCSS. Wix’s in-browser visual editor allows you to build a website quickly and easily by dragging and dropping Wix elements like images, buttons, and text directly onto webpages.
After setting up the elements with the Wix editor, we can add further customization to our site by writing code using Wix’s development platform:Velo. Velo allows you to create more complex web applications without ever having to worry about hosting and infrastructure so you can focus just on developing your website.
For the rest of this article, we’ll be using the Wix Editor in Dev Mode to explore the Code Panel feature which is enabled through Velo. The Code Panel allows us to write code for our website and create custom elements or functionality not available to us through a template or pre-made elements.
Accessing the Code Panel
To access the Code Panel, “Dev Mode” must be enabled. It is located in the toolbar at the top of the Wix Editor. Click onDev Modeand then click onTurn on Dev Modeto enable it.
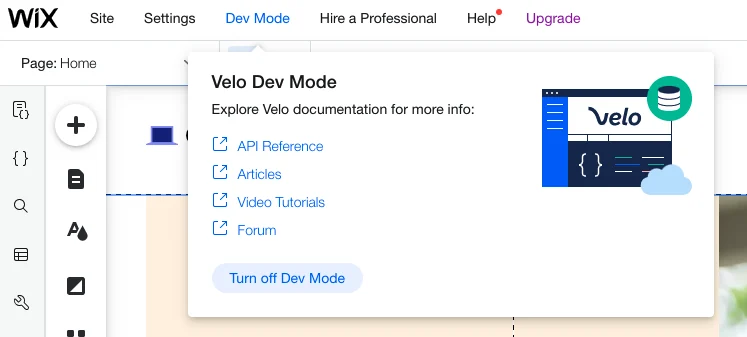
Wix Dev Mode Button
Turning on Dev Mode opens a side panel, Page Code, that shows the files and folders that make up the website. It also opens up the Code Panel at the bottom of the browser window of the website we’re building.
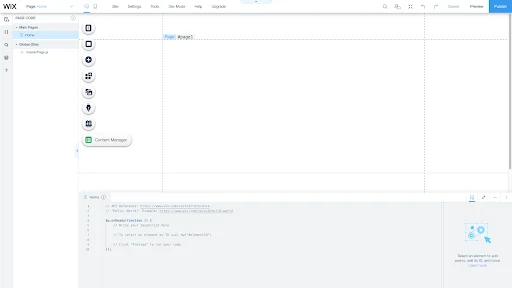
Wix site with Dev Mode turned on
The Code Panel enables you to write code for a website. The Page Code side panel’s “Main Pages” and “Global” sections allow you to apply code either to a specific page of a website or the entire website.
It’s important to note that the code we add through the Code Panel needs to beJavaScriptor Wix-specific syntax. Wix elaborates on these specifics in theirVelo JavaScript Support article.
The $w Namespace
With the Code Panel open, the first thing that we see is the following boilerplate code in the files under the Main Pages section:
// API Reference: https://www.wix.com/velo/reference/api-overview/introduction// “Hello, World!” Example: https://learn-code.wix.com/en/article/1-hello-world
$w.onReady(function () {  // Write your JavaScript here   // To select an element by ID use: $w("#elementID")   // Click "Preview" to run your code});
Copy to clipboard
// API Reference: https://www.wix.com/velo/reference/api-overview/introduction// “Hello, World!” Example: https://learn-code.wix.com/en/article/1-hello-world
$w.onReady(function () { // Write your JavaScript here // To select an element by ID use: $w("#elementID") // Click "Preview" to run your code});Similarly, the following boilerplate code appears in the file under the Global section:
// The code in this file will load on every page of your site $w.onReady(function () {    // Write your code here});
Copy to clipboard
// The code in this file will load on every page of your site $w.onReady(function () { // Write your code here});For this article, the code we’ll be adding to our website will be placed below the comment// Write your JavaScript herefor files under the Main Pages section or// Write your code herefor the file under the Global section. We’ll be using a combination of JavaScript and Wix’s$wnamespaceto interact with Wix UI elements. The$wnamespace is a reference to all the Wix-created elements that make up our website. The rest of the code including.onReady(...)allows us to interact with these elements after our website loads in the browser.
Adding Code
We’ll be adding code to the “Home” page.

Wix Header element
At the bottom of the editor in the Code Panel, theHomepage tab should be open by default. Placing code in a Main Pages file tab ensures that it will only run on that particular page of the website via our browser. We’ll test this out by printing a message.
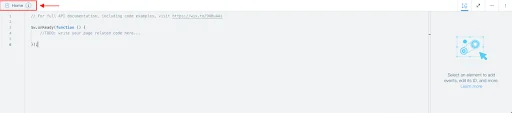
Wix Code Panel with tabs highlighted
Find the commented line//TODO: write your page related code here.... We’ll add JavaScript code below this comment to store a string inside a constant using theconstkeyword:
const greeting = 'Hello, from the Home Page!';
Copy to clipboard
const greeting = 'Hello, from the Home Page!';On a new line after where we declared the constantgreeting, we can use the JavaScriptconsole.log()function to print the string we stored.
console.log(greeting);
Copy to clipboardconsole.log(greeting);There are also other convenient shortcuts found viaVelo keyboard shortcuts. For example, if we wanted to format our code, we could use eitherOption + Shift + Ffor Mac orAlt + Shift + Ffor PC. Formatting code allows us to write uniform code that is easier to read and debug.
Our function now look like this:
$w.onReady(function () {    // Write your JavaScript here    const greeting = 'Hello, from the Home Page!';    console.log(greeting);
  // To select an element by ID use: $w("#elementID")    // Click "Preview" to run your code});
Copy to clipboard
$w.onReady(function () { // Write your JavaScript here const greeting = 'Hello, from the Home Page!'; console.log(greeting);
// To select an element by ID use: $w("#elementID") // Click "Preview" to run your code});While we can add code in the Wix Editor Code Panel, to run it, we need to preview the website. Click on thePreviewbutton in the upper-righthand corner and the browser will display the website as a user would see it.

A preview of a Wix Website with the Code Panel open
The Developer Console
At the bottom of the previewed page is the “Developer Console.” Click on it to open it if it isn’t already open. It should now display the string stored ingreeting:
Hello, from the Home Page!
Copy to clipboard
Hello, from the Home Page!Click on some of the other pages of the website while previewing your website. Notice that the message"Hello, from the Home Page!"prints only in the Developer Console when the Home page is visited and not when visiting other pages of the website.
The Global Section
The code you added in theHomepage file only runs when we visit the page we applied it to. However, the code we place in themasterPage.jsfile under the Global section will run whenever any of the pages of a website are visited.
Let’s see this, now. Go back to the Editor by clicking on theBack to Editorbutton in the upper-righthand corner of the preview. Make sure we’re on the Home page or switch to it using thePagedropdown menu in the upper-lefthand corner of the Wix Editor. Click on themasterPage.jsfile under the Global section of the Page Code side panel to open it in a new tab in the Code Panel. Replace the existing page code on themasterPage.jstab with the code below to print a different message:
import wixSite from 'wix-site';
$w.onReady(function () {    const currentPage = wixSite.currentPage;    console.log(`Currently viewing ${currentPage}`);});
Copy to clipboard
import wixSite from 'wix-site';
$w.onReady(function () { const currentPage = wixSite.currentPage; console.log(`Currently viewing ${currentPage}`);});Click onPreviewand visit different pages of the website to see what it does! A message with the name of the current page you’re viewing and the website is printed in the Developer Console for all the pages of the website.

Wix Code Panel with code displayed
Wrapping Up
Congratulations! You’ve made it through the article and built a website with customized code. You now know:
- how to open the Code Panel and add custom code
- the$wnamespace allows you access Wix Editor Elements
- how to preview your website and code in the Developer Console
Although this exercise seems simple, you’re now familiar with all the tools needed to create more complicated websites. As a next step after reading this article and watching the video, we encourage you to take what you’ve learned here and try to build a website under your own Wix account using the steps and code in this article.
'The Codecademy Team, composed of experienced educators and tech experts, is dedicated to making tech skills accessible to all. We empower learners worldwide with expert-reviewed content that develops and enhances the technical skills needed to advance and succeed in their careers.'
Complete Payment to Unlock Full Guide & Source Code
You are viewing the 30% preview. Join TopCourseAI Pro to unlock the remaining 70% of this article, unblur all code snippets, and gain full access to all 412 technical projects and guides.
Ready to access the complete step-by-step tutorial?
Gain full unhindered access to all 412 technical projects and guides, unblur all source code snippets, and download runnable scripts.
Related Blueprints & Guides
View all 166 →Accessibility on the Platform
Codecademy is committed to providing a high-quality learning experience for all learners. That includes accommodating different usage forms such as auditory, motor, or visual restrictions, limited hardware, or other acce...
Web developmentAffordances, Signifiers, and Clickability
For users on the web, the mouse click is perhaps the most fundamental human-computer interaction. The webbecamethe web partially through the power ofhypertext, or text in one document that links to other documents or res...
Web developmentAuthentication and OAuth
Authenticationis the process used by applications to determine and confirm identities of users. It ensures that the correct content is shown to users. More importantly, it ensures that incorrect content is secured and u...
Ready to build production-grade AI systems?
Enjoyed this guide? Continue exploring our library of 166+ production blueprints, multi-agent swarms, and autonomous agent systems with 100% unblurred, executable source code.