
How to set up a deep learning environment
How to set up a deep learning environment
TensorFlow(TF), developed by Google Brain, is the most well-known library used in production fordeep learningmodels and it has a very large community. However, TensorFlow has a steep learning curve. On the other hand,Kerasis a high-level API built on top of TensorFlow. It is more user-friendly and easy to use compared to TF, and you can familiarize yourself more quickly because it’s more “pythonic”. So why not just use Keras alone? You can. But in case you want to have more control over your model network, have access to better debugging, or develop novel networks and conduct some deep learning research in the future, TensorFlow is the way.
In this tutorial, we will help you set up a TensorFlow deep learning environment. Keras API is included in TensorFlow, but you can also download and use it separately.
Some considerations before installing: using GPU or not
A Graphics Processing Unit (GPU) is a microprocessing chip designed to handle graphics in computing environments and can have many more cores than aCentral Processing Unit (CPU). More cores of GPUs allow for the better computation of multiple parallel processes. If you have access to GPU, how can you use it?
On your computer, if you installed TensorFlow usingpip, the newest version will have the GPU support. For releases 1.15 and older, CPU and GPU packages are separate.
pip install tensorflowfor CPU
pip install tensorflow-gpufor GPU
However, it is not that simple since you need to also install some NVIDIA® software requirements. We suggest followingTensorFlow’s installation instructions for GPU support.
Different ways to using TensorFlow
There are multiple ways for you to run deep learning algorithms using TensorFlow:
- (Easy-breezy) Use Google Colaboratory (Colab).This is the easiest option for some initial exploration. No installation is necessary - run TensorFlow code directly in the browser with Colaboratory, Google’sJupyter Notebookenvironment that requires no setup to use and runs entirely in the cloud. There are two ways to start a Colaboratory notebook:– VisitColab– From your Google Drive:Right Mouse Click>More>Colaboratoryto start a new Colab Notebook.Switching to using a GPU is easy in Colaboratory. InRuntime>Changeruntimetype, select GPU, and there you are. You even have access to a special Tensor Processing Unit (TPU), an application-specific circuit developed by Google specifically for neural network machine learning.
- Your computer, your rules.To install TensorFlow on your computer, you first need to have Python installed (version 3.5–3.8) and a Python’s package managerpip(version >19.0.), which should have come with your Python version. TensorFlow is installed in the same way as any other package you add to your Python. It’s always good to install new large packages in a virtual environment to keep it separate from your base distribution and we will provide commands for that as well.(Suggested) Installing withpip:Create a virtual environment withvenv(install it if needed):python3 -m venv my_tensorflowActivate the virtual environment:source my_tensorflow/bin/activateFirst upgrade pip:pip install --upgrade pipUsepipto install TensorFlow in your virtual environment:pip install --upgrade tensorflowNote: with the new versions of TF (version > 2.0) by installing withpip, you don’t need to specifically install the GPU supported version:tensorflow-gpu.The procedure withAnaconda/Miniconda:Create a virtual environment using the following command:conda create -n my_tensorflow(instead ofmy_tensorflowyou can give any name)Activate the environment:conda activate my_tensorflowNow that you are inmy_tensorflowvirtual environment you can download TensorFlow (for CPU) with:conda install -c anaconda tensorflowIf you wish to use TensorFlow with GPU support use:conda install -c anaconda tensorflow-gpuYou can complete the steps above in Anaconda Navigator which provides a Graphical User Interface (GUI) if you don’t want to use the command line. Be careful about the distinction between the CPU and GPU version when using Anaconda.
- Takes some footwork: useDocker.Docker is a software platform for building applications based on containers — small and lightweight execution environments that make shared use of the operating system kernel but otherwise run in isolation from one another. For this, you need to install Docker on your machine. Depending on your operating system,procedures can differ. Using Docker is the easiest way to set up GPU support.
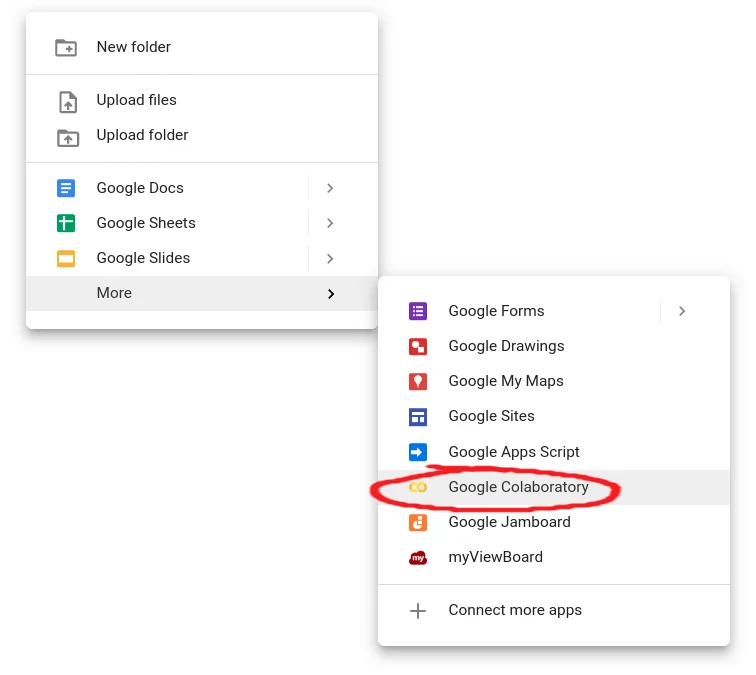
To start a Colaboratory notebook from your Google Drive do the Right Mouse Click > More > Colaboratory.
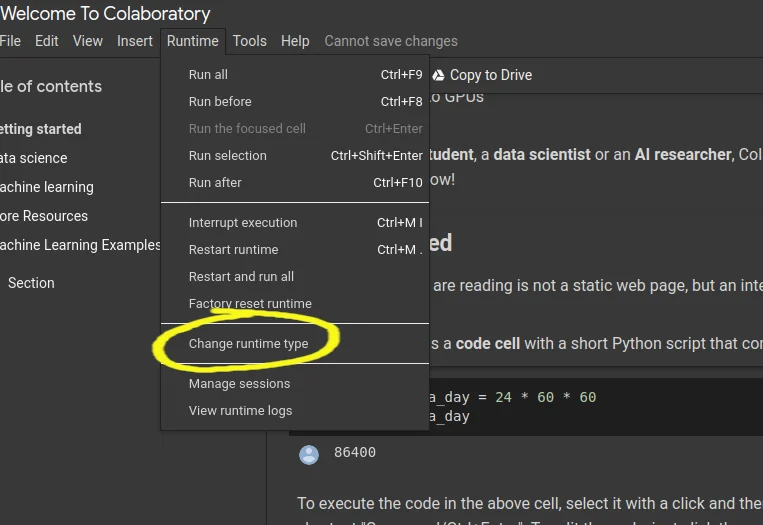
To switch to GPU in the toolbar go to Runtime > Change Runtime.
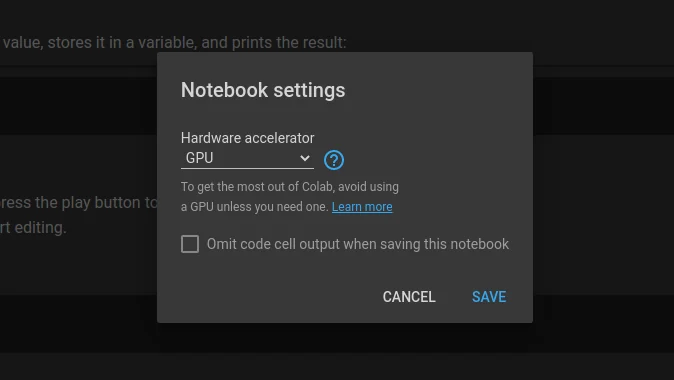
Select GPU.
How to check if you successfully downloaded TensorFlow?
You can test your installation by entering Python’s interactive mode and typing the following code:
import tensorflow as tfprint(tf.__version__) #will print the version of your TensorFlow
Copy to clipboard
import tensorflow as tfprint(tf.__version__) #will print the version of your TensorFlowThe community often usestfas a module handle, and by also using it will enable you to copy-paste some code from the Internet as you are learning, and it will already be compatible with your import handle.
How to access the functionalities of Keras?
As we mentioned, Keras is built on top of TensorFlow. You can access its functionalities directly if you install the Keras Python package:
import keras
Copy to clipboard
import kerasor through TensorFlow:
from tensorflow import keras
Copy to clipboard
from tensorflow import kerasHappy coding!
'The Codecademy Team, composed of experienced educators and tech experts, is dedicated to making tech skills accessible to all. We empower learners worldwide with expert-reviewed content that develops and enhances the technical skills needed to advance and succeed in their careers.'
Complete Payment to Unlock Full Guide & Source Code
You are viewing the 30% preview. Join TopCourseAI Pro to unlock the remaining 70% of this article, unblur all code snippets, and gain full access to all 412 technical projects and guides.
Ready to access the complete step-by-step tutorial?
Gain full unhindered access to all 412 technical projects and guides, unblur all source code snippets, and download runnable scripts.
How to create a portfolio website using Lovable AI
Next BlueprintHow to use Gemini 2.5 Flash Image (Nano Banana)
Related Blueprints & Guides
View all 166 →Decision Trees for Classification and Regression
Decision trees are a common type of machine learning model used for binary classification tasks. The natural structure of a binary tree lends itself well to predicting a “yes” or “no” target. It is traversed sequentially...
Machine learningFeature Importance
When we fit a supervised machine learning (ML) model, we often want to understand which features are most associated with our outcome of interest. Features that are highly associated with the outcome are considered more...
Machine learningHistory of Chatbots
In October of 1950, Alan Turing proposed an approach for evaluating a computer’s intelligence and famously named his method, The Imitation Game. The premise is that an interrogator talks to two people through a “typewrit...
Ready to build production-grade AI systems?
Enjoyed this guide? Continue exploring our library of 166+ production blueprints, multi-agent swarms, and autonomous agent systems with 100% unblurred, executable source code.