
Deploying a Back-End with Heroku
Deploying a Back-End with Heroku
Note: This article is currently teaching deployment usingHerokuwhich no longer offers a free tier plan.
Deploying a Back-End
The back-end is a crucial part of most apps. It’s used in operations involving routing, requests, and data. And, as you know, Heroku is a service that lets you get a back-end app up-and-running quickly. In this article, you’ll learn how to deploy a simple, pre-built,Node.jsapp on Heroku’s platform. But ifJavaScriptisn’t your cup of tea, feel free to follow along using yourpreferred language, and/or personal repository.
Prerequisites & Setup
Before starting, you’ll need to have:
- aHerokuaccount
- aGitHubaccount
Heroku
If you haven’t already, read throughGetting Started with Herokuto create an account and learn the basics.
When deploying an app with Heroku, you have the option of using theGraphical User Interface(GUI), or Heroku’s ownCommand Line Interface(CLI). Since having a visual interface to interact with can be advantageous to new learners, this article will stick to using the Heroku GUI for deployment.
Fork the GitHub Repository
This article will use the app found at:https://github.com/Codecademy/deploying-backend-with-heroku-sampleto deploy to Heroku. You’re free to use your own project, but make sure to modify the steps as needed.
First,fork the repositoryto your own GitHub account by clicking theForkbutton in thesource repository. (Need more of an explanation? Try ourLearn Git & GitHub course.)

Heroku GitHub Fork Button
You’ll now have a copy of the app in your own GitHub account. Take a look at the files, there are 2 important ones to explore further:
- app.js- The app’s entry point. This file defines the port for your web server, and contains all of the logic for the app. In this case, you are fetching data (an activity, specifically) fromThe Bored API. Take a look at the comments to better understand what each line does.
- Procfile- A text file that is used by Heroku to tell it what commands to run on startup. Your Procfile contains a process type:webthat lets Heroku know that this app will receive web traffic, and a command to start the process:node app.jswhich starts the server (just like if you were to typenode app.jsto start a server on your local host).
Testing out an app for Proof of Concept, or needing a Minimum Viable Product is something that happens often. To share the app, you could show the code to the person and tell them to imagine what it does…
Or, you could set up a server, configure ports, and point a new domain to the server, which might not be something you’re prepared to (or wanting to) do with your time.
Instead of spending time figuring out a domain and server configuration, use Heroku to deploy it for the world to see!
Deploying to Heroku
Login to yourHeroku accountand click theNewbutton in the upper right corner of you dashboard. Then clickCreate new appto start creating your first app on Heroku.

Heroku New App
On the next screen, name your app (you can name it anything, but a name similar to the GitHub repository in which you’re deploying from is helpful). When you have a good name, clickCreate App.
Every app you create on Heroku will have a menu with these tabs:
- Overview
- Resources
- Deploy
- Metrics
- Activity
- Access
- Settings
When an app is created, you are taken to theDeploytab.
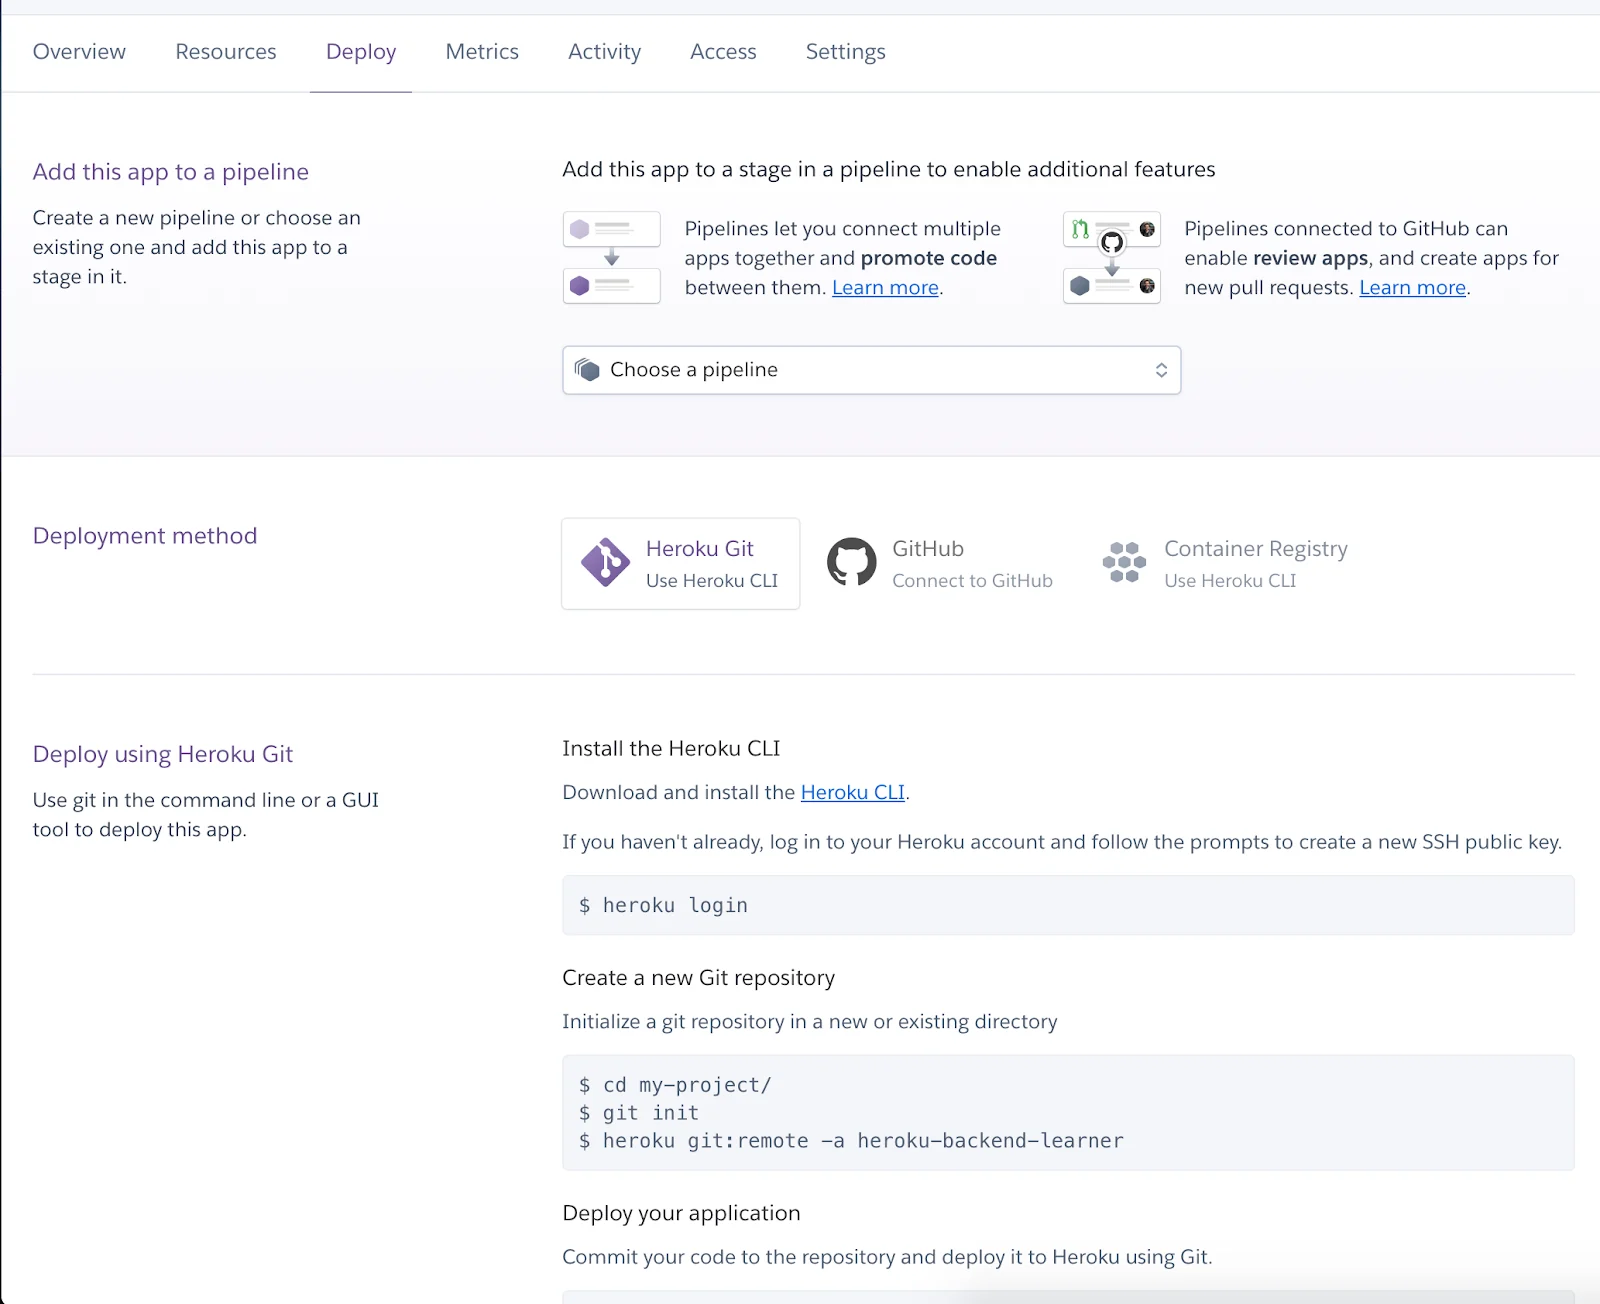
Heroku Deploy Options
In theDeploytab, you have three sections:
- Add this app to a pipeline
- Deployment method
- Deploy using Heroku Git
Looking at theDeployment methodsection, there are three different options for deploying your app. This example will show how to deploy by connecting to GitHub. When your app is connected to GitHub, Heroku will build and release the code stored in your GitHub repository. Click theGitHubdeployment method to reveal a new “Connect to GitHub” section.
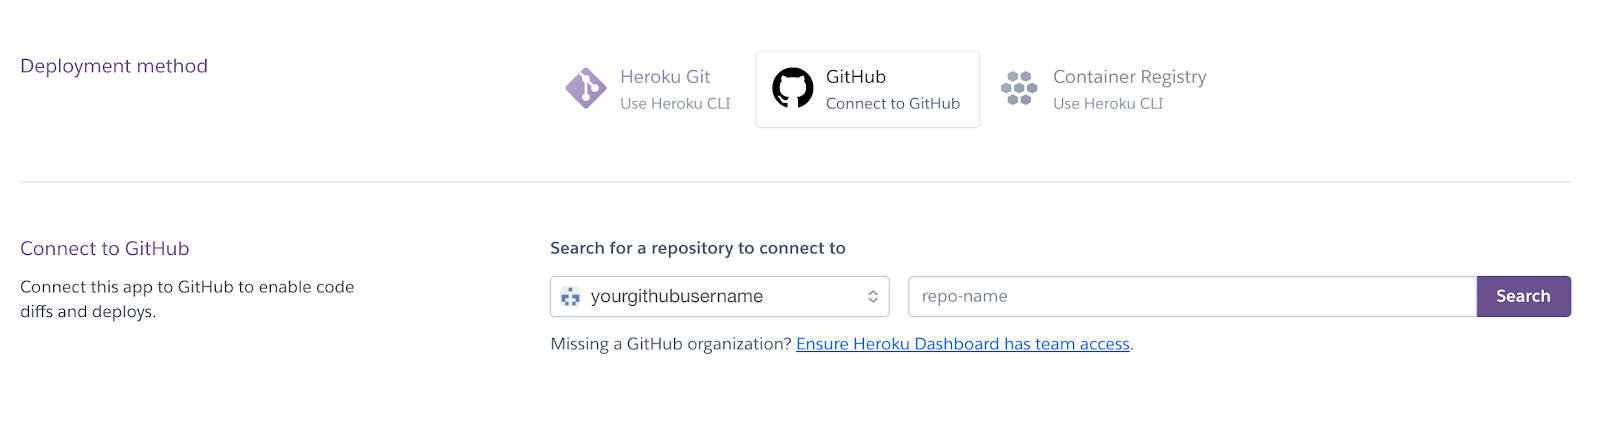
Heroku Deploy From GitHub
In the “Connect to GitHub” section, search for the app you cloned during setup: it should be something similar to “deploying-backend-with-heroku-sample”. When the app appears, click theConnectbutton to reveal two new sections.
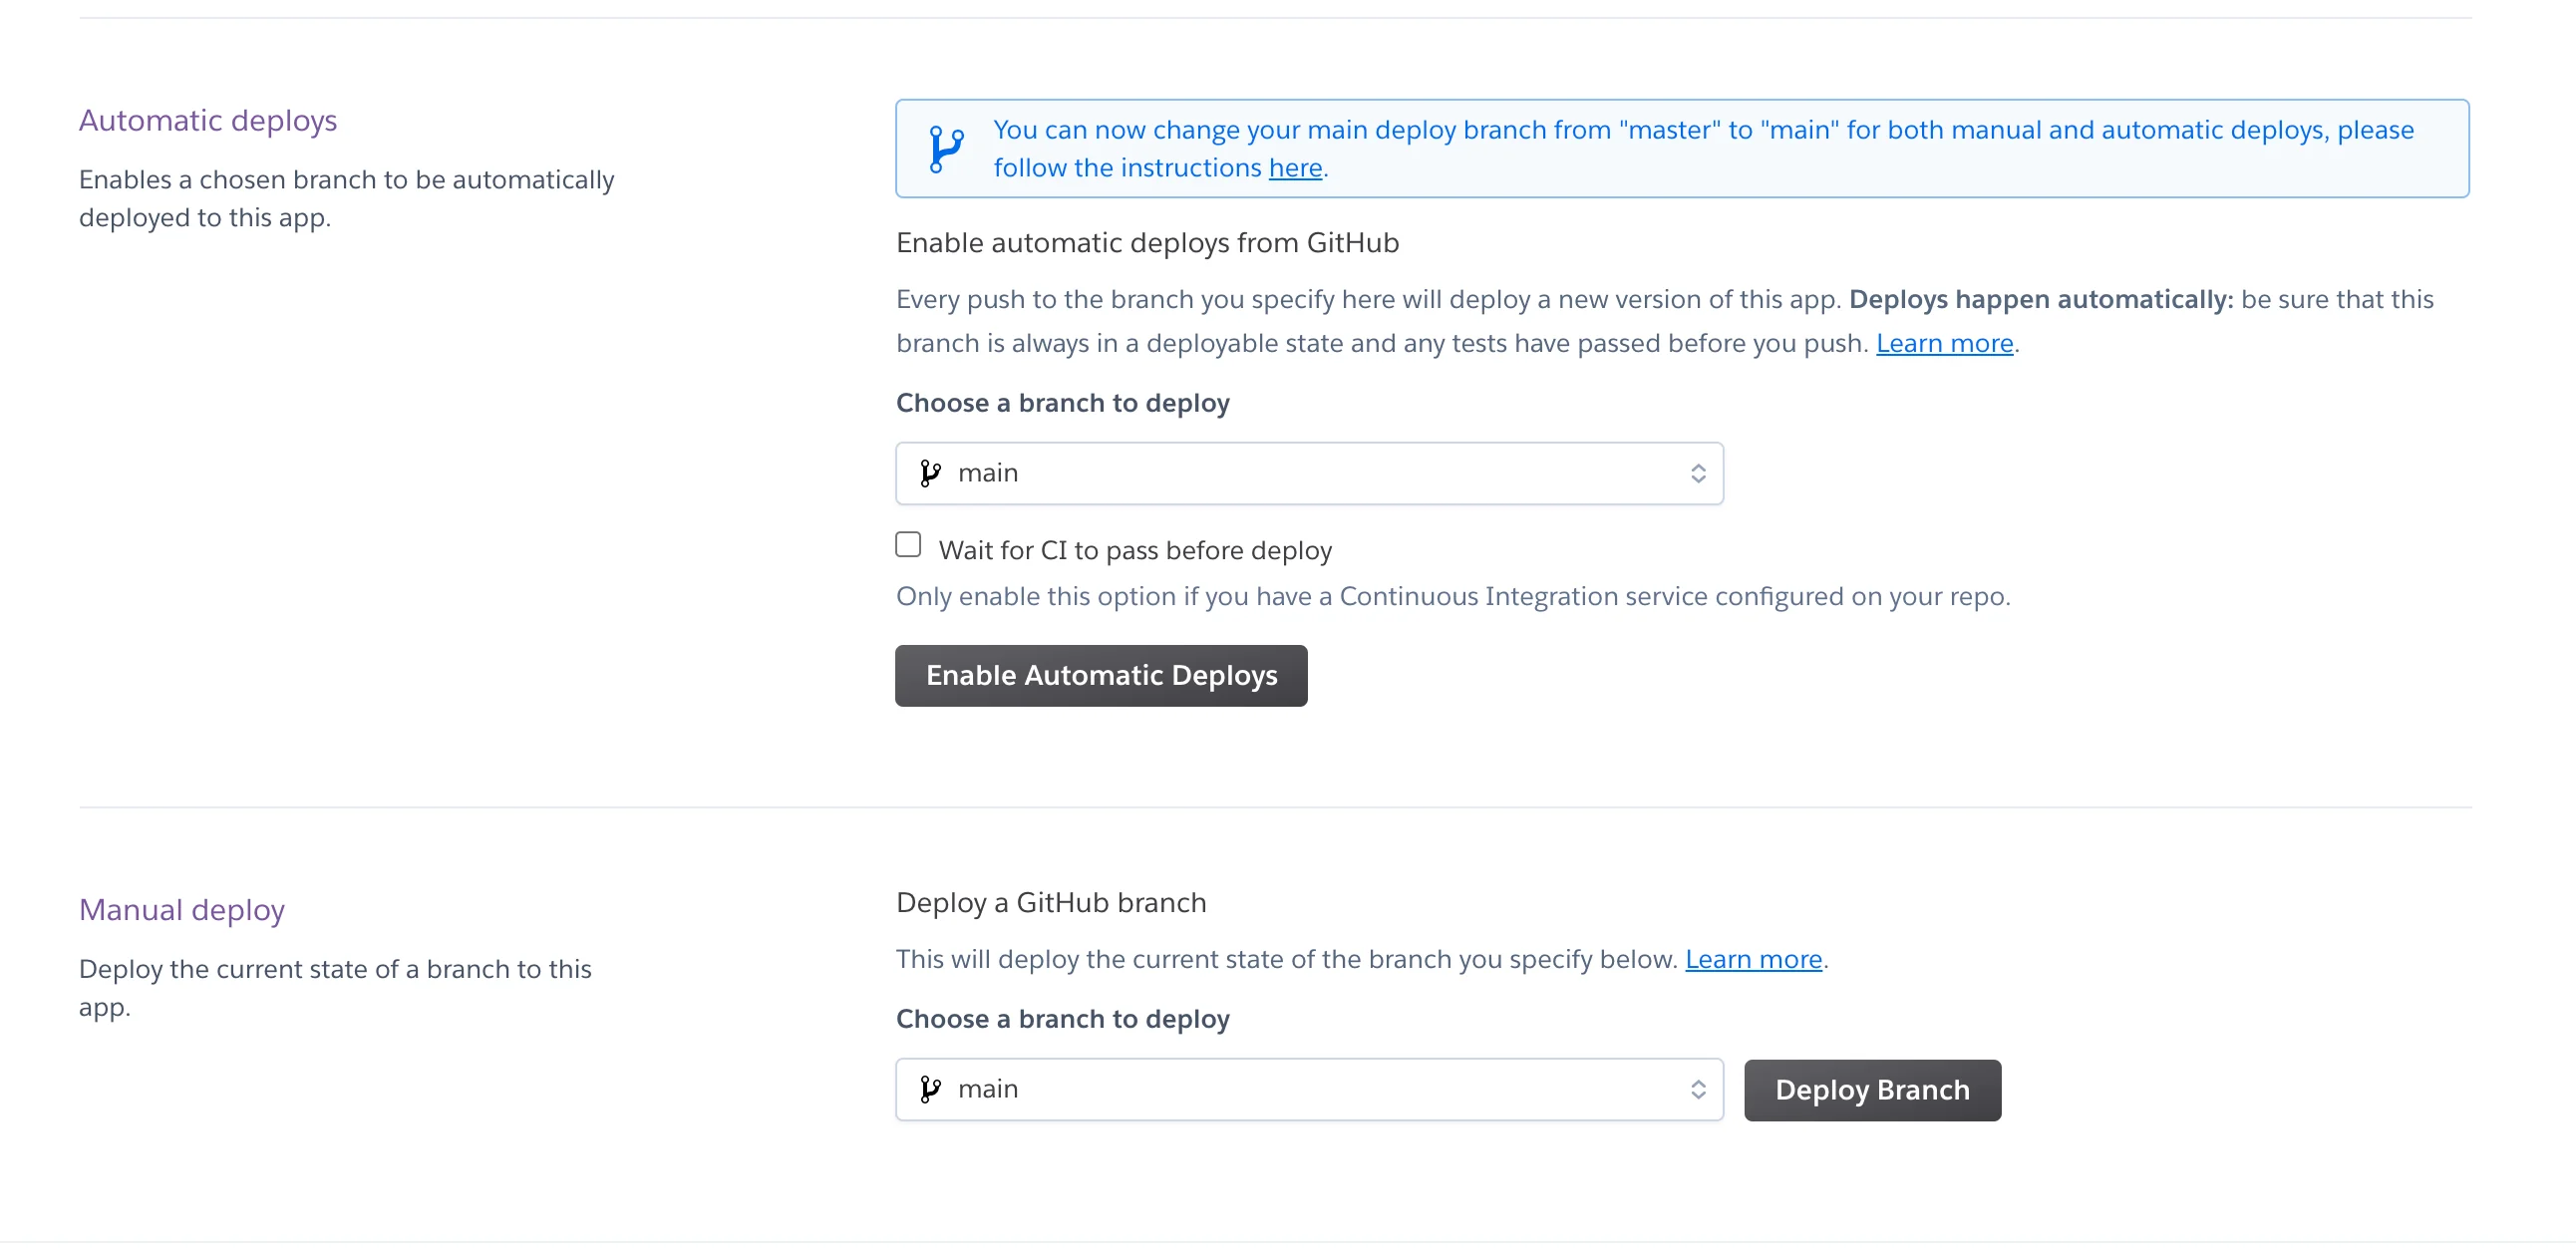
Heroku Automatic and Manual Deploy
These new sections are where the magic happens!
- Automatic deploys- Enabling automatic deploys will tell Heroku to deploy the specified branch of your app every time a new version is pushed to GitHub.
- Manual deploy- This allows you to deploy the specified branch of your app, manually, by clicking theDeploy Branchbutton whenever you are ready to deploy.
Click theDeploy Branchbutton to manually deploy your app. You will see a log that scrolls through the build processes. When it finishes successfully, there will be a success message andViewbutton.

Heroku Successful Deploy
This means the app was deployed, and Heroku has assigned a URL which people can use to visit the app. Click theViewbutton to be taken to your new URL and see what today’s activity will be:

Heroku Sample Site
That’s all there is to it! You can refresh the page a few times to fetch new activities.
Troubleshooting
It’s likely, at some point, that you run into an error when Heroku attempts to deploy your app. And even after successful deployments, there may be errors in your code that prevent the app from being displayed. The first place to look when you run into an issue is theHeroku logs.
Abuild logcan be found in theActivitytab of the app’s dashboard.

Heroku Build Log
ClickView build logon the build event in question to see the complete log of the build. If you come across an error code, run it by the list ofHeroku Error Codes, and do a Google search if necessary.
Theapplication logcan be found inMorebutton located in the top left corner of your app’s dashboard (while in any tab).
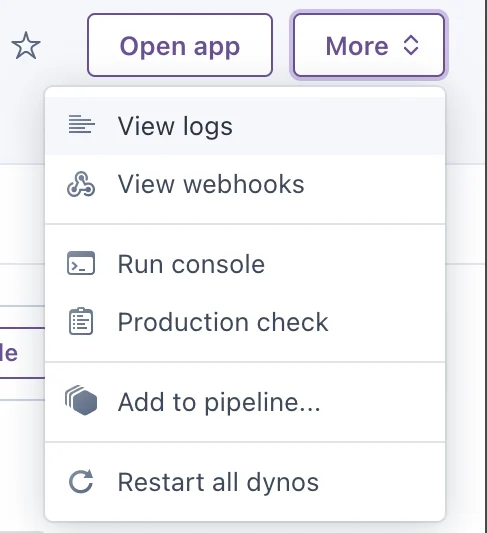
Heroku More Menu
Select “View logs” to see the complete application log. Again, reference theHeroku Error Codesto troubleshoot further.
Wrap Up
Congratulations on deploying your first app with Heroku! As you can see, the deployment process is a breeze. You now know how to deploy an app from a GitHub repository using Heroku’s GUI, as well as how to begin troubleshooting any errors that may occur.
Take this knowledge further by turning on Automatic Deploys, and pushing a change to GitHub. Then visit the URL to see the change “magically” deployed by Heroku. And if you enjoy using Heroku, be sure to give the Heroku CLI a try in order to create and manage your Heroku apps directly from the terminal!
'The Codecademy Team, composed of experienced educators and tech experts, is dedicated to making tech skills accessible to all. We empower learners worldwide with expert-reviewed content that develops and enhances the technical skills needed to advance and succeed in their careers.'
Complete Payment to Unlock Full Guide & Source Code
You are viewing the 30% preview. Join TopCourseAI Pro to unlock the remaining 70% of this article, unblur all code snippets, and gain full access to all 412 technical projects and guides.
Ready to access the complete step-by-step tutorial?
Gain full unhindered access to all 412 technical projects and guides, unblur all source code snippets, and download runnable scripts.
Related Blueprints & Guides
View all 166 →Accessibility on the Platform
Codecademy is committed to providing a high-quality learning experience for all learners. That includes accommodating different usage forms such as auditory, motor, or visual restrictions, limited hardware, or other acce...
Web developmentAffordances, Signifiers, and Clickability
For users on the web, the mouse click is perhaps the most fundamental human-computer interaction. The webbecamethe web partially through the power ofhypertext, or text in one document that links to other documents or res...
Web developmentAuthentication and OAuth
Authenticationis the process used by applications to determine and confirm identities of users. It ensures that the correct content is shown to users. More importantly, it ensures that incorrect content is secured and u...
Ready to build production-grade AI systems?
Enjoyed this guide? Continue exploring our library of 166+ production blueprints, multi-agent swarms, and autonomous agent systems with 100% unblurred, executable source code.