
Create Your First Local HTML/CSS Project
Create Your First Local HTML/CSS Project
Requirements:
- Text editor (we recommend VS Code)
- An Internet browser
In this article, we’ll cover how to take the CSS skills you’ve learned on Codecademy and use them to create a basic web page built entirely from the tools you have on your computer. Before you proceed, you should already be familiar with the basics of text editors, local files, and directories, all of which are coveredelsewhereon Codecademy.
We recommend that you watch this explainer video and then follow the instructions below.
If you’d like some optional extra guidance on real-world CSS, watch thesecond partof the video.
Let’s create a folder structure to support your web page. A well-designed folder structure will help you quickly navigate to the HTML or CSS files that contain your code.
First, open Finder (in Mac) or Explorer (in Windows). Next, create a folder (also known as a directory) calledDevProject. This folder will contain all of the files for your HTML and CSS project.
Open theDevProjectfolder. Inside, create the following items:
- A new file calledindex.html(use your preferred text editor)
- A new folder calledresources
Theindex.htmlfile will contain the HTML code for your web page, while theresourcesfolder will contain all of the necessary resources needed by the HTML files (CSS files, images, etc.).
Next, open the newly createdresourcesfolder. Inside of this folder, create the following:
- An additional folder namedcss
Thecssfolder will contain the CSS files needed to style your web page.
Finally, open thecssfolder you just created. Inside of this folder, create the following:
- A new file namedindex.css(use your preferred text editor)
Theindex.cssfile will contain all of the CSS styling rules that will be applied to your web page.
This overall folder structure will help support your workflow as you add files or resources. At a high-level, here’s what it should look like:
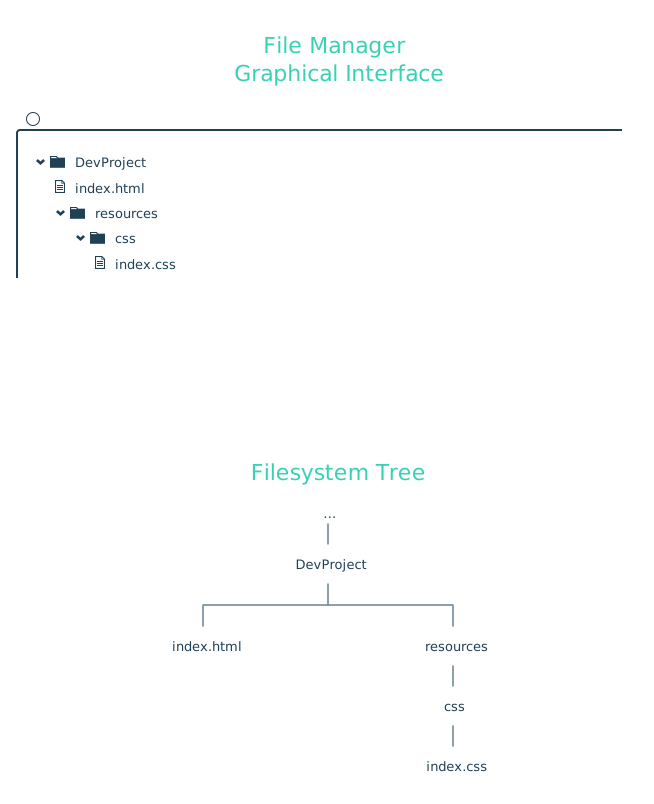
filesystem
Great! With your folder structure, HTML, and CSS files all in the right place, we can add content to the web page.
First, open theindex.htmlfile in your preferred text editor. Next, add the required boilerplate HTML code:
<!DOCTYPE html><html><head>  <title></title></head><body>

</body></html>
Copy to clipboard
<!DOCTYPE html><html><head> <title></title></head><body>
</body></html>After you add the boilerplate HTML code, feel free to also add the following items:
- Your own title between the<title>tags
- Your own content within the<body>tags. If you need some quick, pre-written content, feel free to use the following and modify as you wish:
<h1>FirstName LastName</h1><p>I'm learning to code on Codecademy! My goals include:</p><ul>  <li>Learn to code</li>  <li>Start a company</li>  <li>Help the world</li></ul><p>This is one of my favorite websites: <a href="https://www.google.com/" target="_blank">Google</a></p>
Copy to clipboard
<h1>FirstName LastName</h1><p>I'm learning to code on Codecademy! My goals include:</p><ul> <li>Learn to code</li> <li>Start a company</li> <li>Help the world</li></ul><p>This is one of my favorite websites: <a href="https://www.google.com/" target="_blank">Google</a></p>Finally, open theindex.cssfile in your preferred text editor. Add the following pre-written CSS rules to the file (feel free to modify as you wish):
* {  font-family: Helvetica, Arial, sans-serif;}

h1 {  color: SeaGreen;}

p, li {  font-size: 18px;}

a {  text-decoration: none;}
Copy to clipboard
* { font-family: Helvetica, Arial, sans-serif;}
h1 { color: SeaGreen;}
p, li { font-size: 18px;}
a { text-decoration: none;}Be sure to save your changes for both files!
As it turns out, the HTML content you added will not be styled by the CSS rules unlessindex.htmlandindex.cssare linked together. In the<head>section, link the stylesheet to the HTML file.
<link href="./resources/css/index.css" type="text/css" rel="stylesheet">
Copy to clipboard
<link href="./resources/css/index.css" type="text/css" rel="stylesheet">You might be wondering why thehrefattribute is set to./resources/css/index.css. This is because you must specify exactly where theindex.cssfile lives within your folder(s)relativeto whereindex.htmllives (otherwise, the two files won’t link).
Again, make sure to save your changes!
Great work - let’s take a look at your web page in the browser.
Open your preferred web browser. In the menu bar, click on “File” and then click on “Open File…” (or equivalent). Navigate to yourindex.htmlfile and then click “Open” (or equivalent). The browser should load your web page. What do you see?
At this point, feel free to make changes to your HTML or CSS code. Keep in mind that in order to view anynewchanges you make, you’ll have to refresh your browser.
Congrats! In this short time, you learned how to take what you’ve been learning on Codecademy and apply it using the tools you have available on your own personal computer. You successfully learned how to:
- Create a folder structure to support both your workflow and your web page
- Add HTML content and CSS styling to respective files
- Link the HTML and CSS files together
- View your web page in a browser (and refresh the browser to view new changes)
In general, the four points above are a strong starting point for your own developer workflow. As you learn more, you may modify the workflow to fit your specific needs. At this point, feel free to modify the content of the web page or create an entirely new project. Happy coding!
'The Codecademy Team, composed of experienced educators and tech experts, is dedicated to making tech skills accessible to all. We empower learners worldwide with expert-reviewed content that develops and enhances the technical skills needed to advance and succeed in their careers.'
Complete Payment to Unlock Full Guide & Source Code
You are viewing the 30% preview. Join TopCourseAI Pro to unlock the remaining 70% of this article, unblur all code snippets, and gain full access to all 412 technical projects and guides.
Ready to access the complete step-by-step tutorial?
Gain full unhindered access to all 412 technical projects and guides, unblur all source code snippets, and download runnable scripts.
Create Text-Based Marketing Assets Using ChatGPT
Next BlueprintCreate a Business Pitch Using ChatGPT
Related Blueprints & Guides
View all 166 →Accessibility on the Platform
Codecademy is committed to providing a high-quality learning experience for all learners. That includes accommodating different usage forms such as auditory, motor, or visual restrictions, limited hardware, or other acce...
Web developmentAffordances, Signifiers, and Clickability
For users on the web, the mouse click is perhaps the most fundamental human-computer interaction. The webbecamethe web partially through the power ofhypertext, or text in one document that links to other documents or res...
Web developmentAuthentication and OAuth
Authenticationis the process used by applications to determine and confirm identities of users. It ensures that the correct content is shown to users. More importantly, it ensures that incorrect content is secured and u...
Ready to build production-grade AI systems?
Enjoyed this guide? Continue exploring our library of 166+ production blueprints, multi-agent swarms, and autonomous agent systems with 100% unblurred, executable source code.